Do you have a question about the Funlux CH-S1R-WA and is the answer not in the manual?
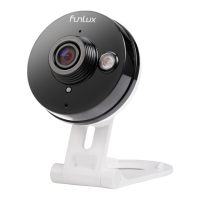
Identifies key components like HD camera, status light, microphone, and ports.
Lists all included items such as camera, power adapter, and mounting bracket.
Outlines prerequisites for camera setup, including WiFi and app requirements.
Log into the Funlux app and select 'Add Device' to begin the setup.
Choose the 'Zink' connection method for your camera.
Specify the number of devices to set up and proceed.
Connect to the specified network and return to the app.
Select and connect to the 'ZMD_SAP' WiFi network.
Input your WiFi network's SSID and password.
The app attempts to connect the camera to your WiFi network.
Return to WiFi settings to connect to your own network.
Choose your primary WiFi network and connect.
The app automatically searches and connects the camera.
Assign a name and set a password for your camera.
Confirm successful camera setup and begin viewing.
Locate and detach the mounting plate from the bracket.
Mark, drill, and secure the mounting plate to the wall.
Connect the camera bracket to the mounting plate for optimal viewing.
Plug the power adapter into the camera and an outlet.
Details cloud service features for recording and storing footage.
Access cameras via Funlux app or web browser.
Explains meanings of solid/blinking green and blue status lights.
Access Live Chat in the Funlux app for technical assistance.
| Two-Way Audio | Yes |
|---|---|
| Connectivity | Wi-Fi |
| Motion Detection | Yes |
| Storage | MicroSD card |
| Wireless | Yes |