The first time you open the app on the watch, the watch
automatically pairs with and connects to the stereo. If you
need to pair to another stereo, in the FUSION-Link app,
select Settings > Pair new.
5
Control the audio playback using the FUSION-Link app on
the watch.
After the devices are paired, they connect automatically when
they are turned on, within range, and the app is open on the
watch.
Attaching the FUSION Puck
™
Mount
You can attach the puck mount to a flat surface using the
included adhesive or screws. Refer to the manual for the item on
which you are mounting the puck mount for information about
the preferred mounting style.
If these mounting options are not sufficient for your mounting
surface, go to www.stereoactive.com for more mounting
accessories.
Attaching the Puck Mount Using Adhesive
NOTICE
Before placing the adhesive on the mounting surface, make sure
that the location and orientation are correct. It is extremely
difficult to remove the adhesive. The adhesive and puck mount
cannot be reused after being removed from a surface. Some
mounting surfaces might be damaged after removing the
adhesive.
1
Select an appropriate location for the stereo.
Before securing the puck mount, make sure it is oriented in
the preferred direction.
2
Thoroughly clean and dry the mounting surface using a
mixture of water and isopropyl alcohol.
The mounting surface must be free of dirt, debris, wax, or
coatings.
3
Remove the backing from one side of the adhesive.
4
Press the adhesive to the bottom of the puck mount.
5
Remove the backing from the other side of the adhesive.
6
Carefully orient the puck mount, and press the puck mount
firmly onto the mounting surface.
7
Allow the puck mount to sit at room temperature for 72 hours.
NOTICE
Before attaching the stereo to the puck mount, allow the
adhesive to bond to the mounting surface for 72 hours. Failure
to allow adequate bonding time may cause the mount to detach
from the surface, which could result in damage to the stereo or
mount.
Attaching the Puck Mount Using Screws
NOTICE
Before screwing into the surface, check with the manufacturer of
the item on which you are mounting the puck to verify that
screws should be used. Some surfaces are too thin to support
screws, and the adhesive should be used on these surfaces.
1
Select an appropriate location for the stereo.
Before securing the puck mount, make sure it is oriented in
the preferred direction.
2
Using the puck mount as a template, mark the location of the
holes.
3
Remove the mount.
4
Using a drill bit appropriate for the mounting surface, drill the
pilot holes.
5
Secure the mount to the surface with the included screws or
other screws suitable for the surface.
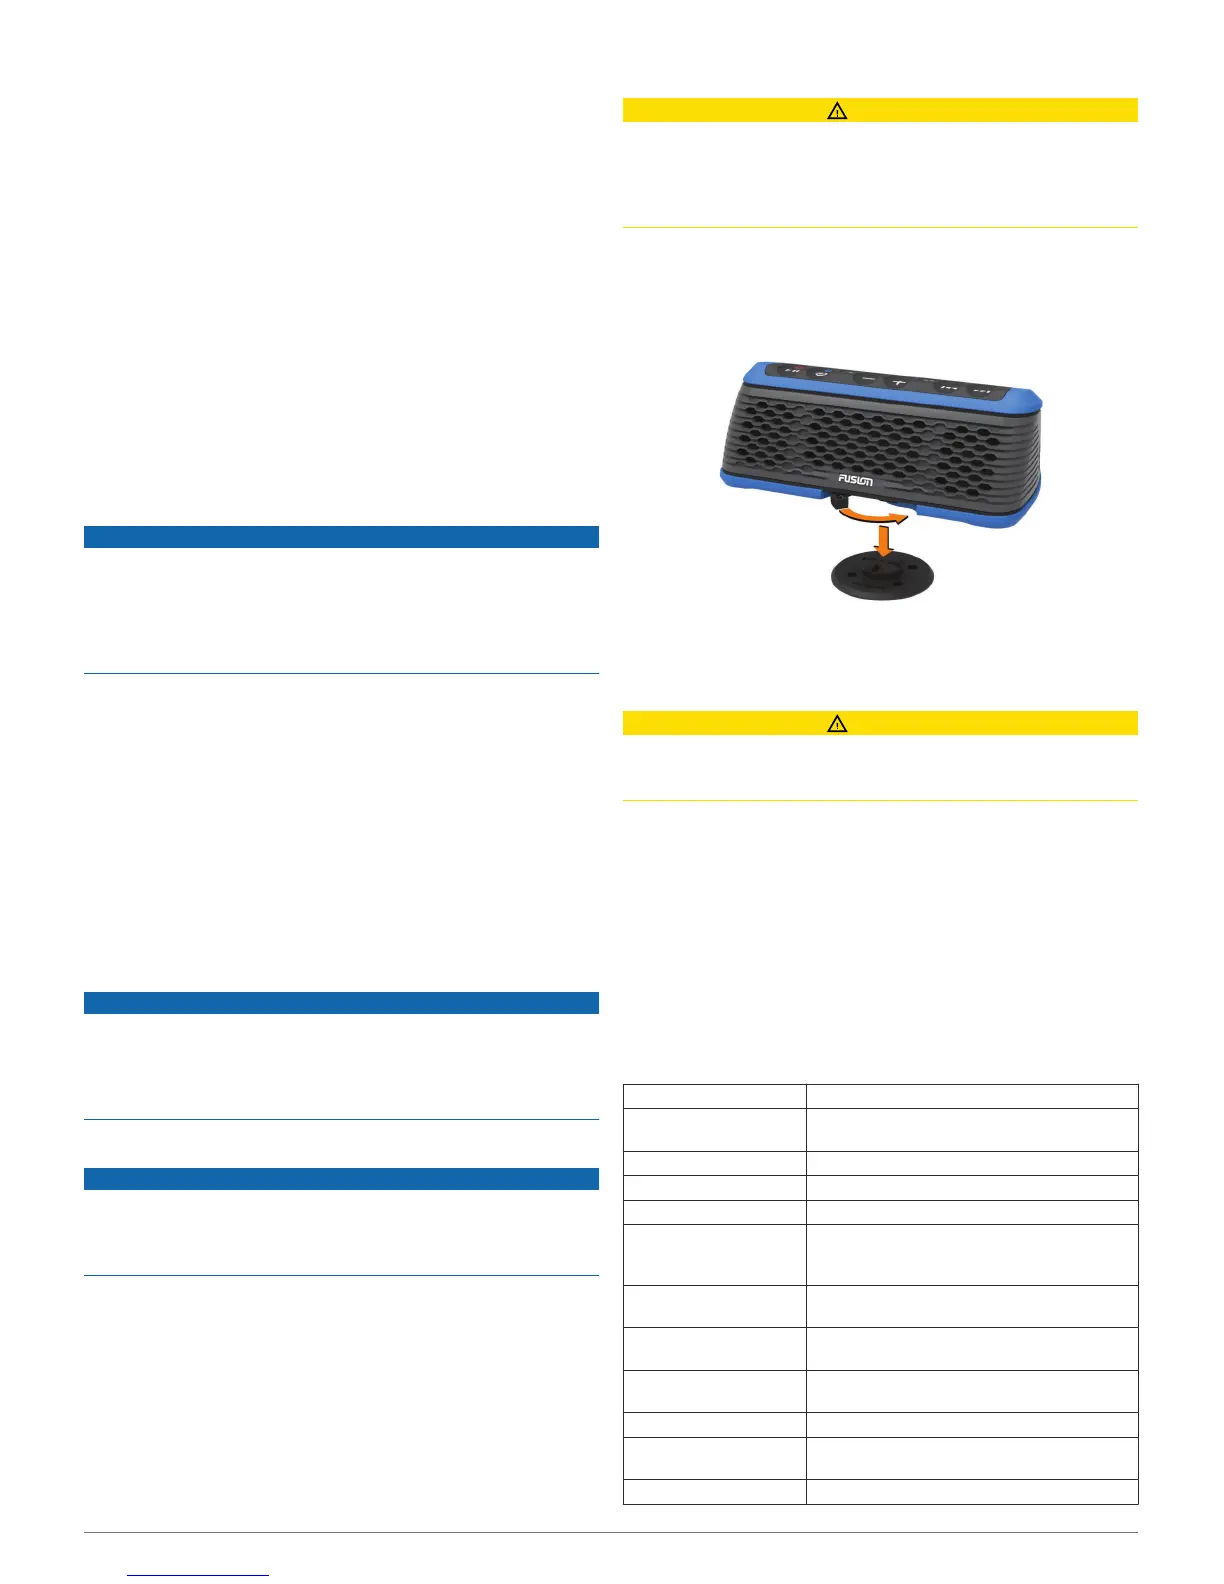
Attaching the Stereo to the Puck Mount
CAUTION
When playing audio with high bass content and at high volume,
the stereo may move across the surface if it has not been
mounted on the puck. When not on the puck mount, place the
stereo on a soft surface to reduce the likelihood of the stereo
moving.
1
Slide the locking lever fully to the left.
2
Place the stereo on the puck in the direction that provides the
best listening experience.
You can place the stereo on the puck in four different
directions to aim the speakers in the right direction.
3
Slide the locking lever to the right to lock the stereo on the
puck.
Puck Cover
CAUTION
To avoid potential injury from the exposed puck mount, always
fit the included rubber puck cover over the mount when not in
use.
More Information
Installing a Different Language for the Voice
Prompts
You can change the language of the voice prompts. Choose
from English, Dutch, French, German, Italian, and Spanish.
1
Go to www.stereoactive.com.
2
Follow the on-screen instructions.
Specifications
Water rating Fully gasketed, floatable, IEC 60529 IPX7*
Dimensions (W × H × D) 236 mm (9.29 in.) × 82 mm (3.23 in.) ×
139 mm (5.47 in.)
Weight 1.3 kg (2.87 lb.)
Battery type Rechargeable lithium-ion
Battery life Up to 20 hours
Charging requirements 100 to 240 Vac AC power adaptor (included)
or 12 Vdc 2 A car adaptor (optional
accessory); charges within 3 hours
Operating temperature
range
From 0° to 50°C (from -32° to 122°F)
Charging temperature
range
From 10° to 45°C (from 50° to 113°F)
Long-term storage
temperature range
From -20° to 70°C (from -4° to 158°F)
Compass-safe distance 1.37 m (54 in.)
Bluetooth wireless
range
Up to 10 m (33 ft.)
Bluetooth profiles A2DP, AVRCP, SPP
Attaching the FUSION Puck
™
Mount 3