Controller settingsController settings
Controller dead band settingController dead band setting
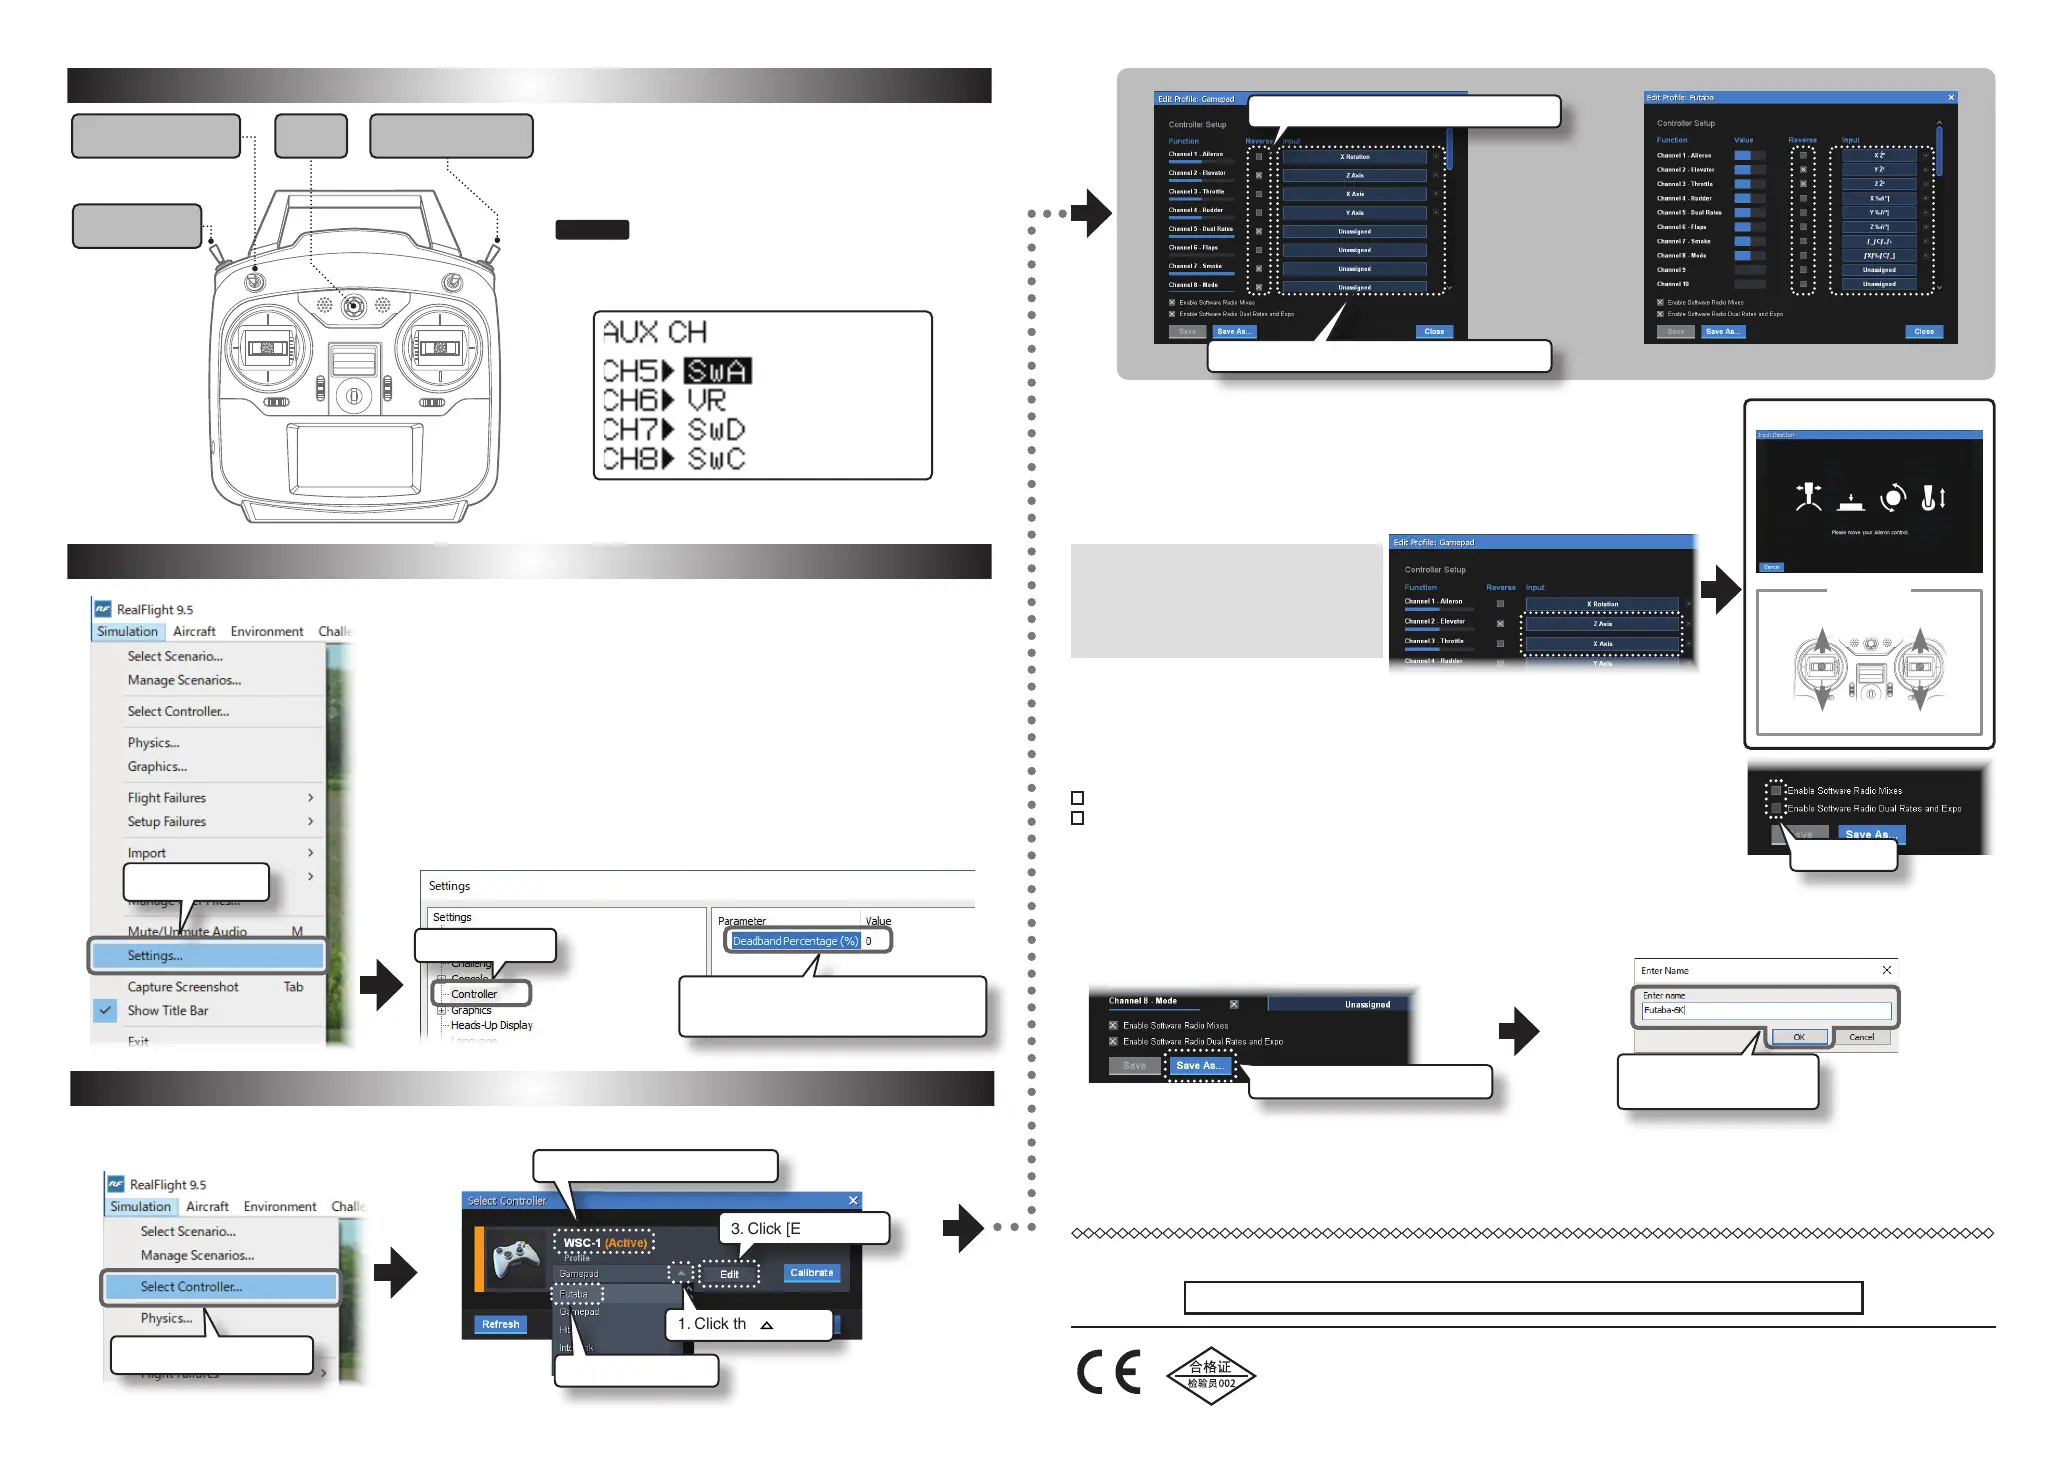
Click Settings ...
1. Click the mark
3. Click [Edit] button
Displayed as WSC-1 (Active)
2. Click the Futaba
Click Select Controller...
When using the S-FHSS 2.4GHz system Futaba transmitter with WSC-1 as a
controller for the RealFlight application, set the Deadband Percentage (%) value of
the Controller option of the RealFlight application to
"
0
"
to eliminate dead bands.
As needed.
To use it as a real ight controller, register the Futaba transmitter by following the steps below.
1
Start the Real Flight application.
2
Select "Settings ..." from the Simulation menu to display the
settings screen.
3
Click Controller on the Settings screen to display the settings
menu on the right side of the screen.
4
Set the Deadband Percentage (%) value to "0".
Transmitter settingsTransmitter settings
S-FHSS 2.4GHz system When using the Futaba transmitter
as a substitute for the real ight InterLink Controller, set the
SW / VR functions of the transmitter after CH5 as shown in
the gure.
Click Controller
Set the Deadband Percentage (%)
number to "0".
2 or 3 pos SW
CH5
3 pos SW
CH8
2 or 3 pos SW
CH7
VR
CH6
Example
For T6K
Set SW / VR with the AUX CH (AUX channel) function.
T6K AUX CH function screen
* For details on how to set SW / VR, read the instruction manual of the
transmitter you are using.
FUTABA CORPORATION
Hobby Radio Control Business Center Sales & Marketing Department
1080 Yabutsuka, Chosei-mura, Chosei-gun, Chiba-ken, 299-4395, Japan
TEL: +81-475-32-6051, FAX: +81-475-32-2915
©FUTABA CORPORATION 2020, 11 (1)
Save As...
After making changes to your controller prole, you will want to save all modications. Note that you cannot make changes to
stock proles that are included with RealFlight. Click the [Save As] button to save the prole under a dierent name.
Input (Example Mode change: Mode 2 to Mode 1)
When changing the stick movement from mode 2 to mode 1, rst change the operating
axis of the elevator channel. Channe
l
2 -Elevator Click Input at the far right of the display.
The Input Detection screen will be displayed. Operate the elevator stick in mode 2 of the
transmitter. When the elevator settings are complete, you will be returned to the Edit Prole
screen. Then perform the same operation on the throttle side. This completes the mode
change.
If you use mixing, dual rate, expo programmed on your radio.
Enable Software Radio Mixes ------OFF
Enable Software Radio Dual Rates and Expo ------OFF
*In this case, SW / VR is not set using the AUX CH (AUX channel) function of the transmitter.
*For detailed explanation, please read the instruction manual of RF8 / 9.
Reverse
If you need to change the direction of operation by operating a stick, switch, etc., click
the check box of Reverse to add or remove the mark.
Calibration
It is necessary to calibrate the stick neutral position and operating range of the
transmitter
with [Calibration]. For details,
please read the instruction manual of RF8 / 9.
1. Click the [Save As...] button.
Uncheck
For RF9 and later versions, do not click
Input for channels after Channel 7. If you
click it, either the smoke ON / OFF switch
or the throttle hold switch will not operate.
If you click it, do not save it, close the
screen, and try again.
Throttle
Elevator
Mode 1
Input Detection screen
RF8 Edit ProfileRF9 Edit Profile
Reverse:Change the operating direction
Input: Change of operation stick, switch, etc.
2. Enter a new name.
3. Click the [OK] button.
Reread manual before requesting a repair. If the problem continues, contact your local Futaba dealer.
<When requesting repair>
 Loading...