This document is an instruction manual for the FXAM1H-ZP3-210/502241745 table saw. It provides comprehensive information on the device's function, technical specifications, usage, and maintenance.
Function Description
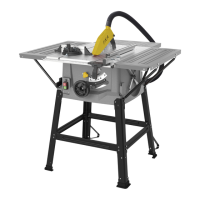
The bench-type circular saw is designed for the slitting and cross-cutting of all types of timber, commensurate with the machine’s size. It is explicitly stated that the machine is not to be used for cutting any type of roundwood. The machine is intended for domestic use only and is not suitable for commercial or professional applications.
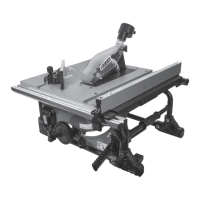
Key components and controls include:
- Main table (1): The primary work surface.
- Blade guard (2): A safety feature that must always be used during operation to cover the saw blade.
- Rip fence (3): A two-piece fence used to guide the workpiece for rip cuts. It can be adjusted and locked in position.
- Riving knife (4): Prevents the workpiece from binding as it passes through the blade and provides a connection point for the blade guard.
- Table access plate (5): Allows access to the blade and riving knife for maintenance.
- Blade (6): The cutting component.
- Extension table (7): Increases the table length for greater ripping capacity.
- Extension table locking lever (8): Secures the extension table in place.
- Push stick (9): A safety device used to push workpieces through the blade, especially for narrow stock.
- Bevel locking lever (10): Used to adjust and lock the blade's bevel angle.
- Height adjustment hand wheel (11): Controls the blade depth.
- On/Off switch (12): Green 'I' button for ON, red '0' button for OFF.
- Level scale (13): Used for setting the extension table width.
- Mitre Guide (14): Provides greater accuracy for angled cuts.
- Rip fence locking lever (15): Locks the rip fence in position.
- Bevel scale (16): Displays the blade's bevel angle.
- Dust extraction adaptor (17) and port (18): For connecting a dust collection device or vacuum cleaner.
- Carry handle (19): For transporting the machine.
- Wrench (20): Two wrenches are provided for blade changes and adjustments.
- Cable storage (21): For organizing the power cable.
- Reset button (22): An overload reset button that stops the motor automatically if it overloads or experiences low voltage.
Important Technical Specifications
- Voltage: 230V - 50Hz
- Rated input: 1500W
- No load speed: 5000min⁻¹
- Blade size: Ø210 x Ø30mm
- No. of teeth: 24
- Thickness riving knife: 2mm
- Main table size: 480 x 467mm
- Table length deploy: 375mm
- Extension table: 480 x 70mm
- Rip capacity (right): 630mm
- Cutting range: 0-45º
- Cutting height 0º: 70mm
- Cutting height 45º: 50mm
- Height adjustment: 0-80mm
- Suction port: Ø64mm & Ø41mm
- Sound Pressure Level (LpA): 91 dB(A) K=3dB(A)
- Sound Power Level (LWA): 104 dB(A) K=3dB(A)
- Weight: 14.4 kg
Usage Features
The table saw offers several cutting operations:
- Rip Cut (Fig. 29): Set the blade depth and position the rip fence. Ensure the wood is clear before starting. Use a push stick for narrow stock.
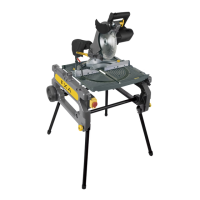
- Mitre Cut (Fig. 30): Remove the rip fence. Set blade depth and mitre gauge angle. Hold the workpiece firmly with both hands on the mitre gauge.
- Bevel Cross Cut (Fig. 31): Remove the rip fence. Unlock the bevel locking knob and adjust the angle. Set blade depth and mitre gauge to 0°.
- Compound Cut (Fig. 32): Remove the rip fence. Unlock the bevel locking lever and adjust the bevel angle. Set blade depth and mitre gauge angle.
Safety is paramount during operation. Always use the blade guard, hold the work firmly, and use a push stick when necessary. Never perform freehand cuts. Ensure all guards are in place and working correctly.
Maintenance Features
Regular maintenance is crucial for safe and efficient operation:
- Riving Knife Inspection: The riving knife is a critical component that prevents binding. It must be correctly fitted, aligned, and adjusted (3-5mm from the saw blade, tip no lower than 5mm from tooth peak). Inspect regularly and replace if worn or damaged, using only genuine FXA parts.
- Blade Change: Disconnect from power supply. Remove the top blade guard and table access plate. Raise the blade to its highest position. Use the provided wrenches to hold the motor arbor and remove the arbor nut. Fit the new blade, ensuring teeth face forward and the arrow aligns with motor direction. Reassemble and check all functions.
- General Maintenance: Keep all safety devices, air vents, and the motor housing free of dirt and dust. Clean the equipment with a damp cloth and mild soap after each use. Avoid cleaning agents or solvents that could damage plastic parts. Oil rotary parts monthly, but do not oil the motor.
- Storage: Store the device and accessories in a dark, dry, and frost-proof place, inaccessible to children (optimal temperature 5-30°C). Store in original packaging, covered to protect from dust and moisture. Keep the operating manual with the tool.
The manual also emphasizes general safety rules, electrical safety, and personal safety, including wearing appropriate personal protective equipment (hearing protection, eye protection, respiratory protection, gloves). It warns against using damaged blades, operating in dangerous environments, and accidental starting.