EasyManua.ls Logo

G.Q.F. HOVA-BATOR User Manual

G.Q.F. HOVA-BATOR
2 pages
To Next Page IconTo Next Page
Page #1 background imageLoading...
Page #1 background image
AUTOMATIC EGG TURNING - place turner in the bottom of
Hova-Bator incubator. Be sure the turner sits at on the wire oor.
The electric cord of the turner will exit the incubator through
matching notches in the top and bottom of the incubator.
Replace the top of the Hova-Bator on the bottom, making
sure that the notches in the corners line up. Check to see that
the power cord to the turner does not prevent the two halves of
the Hova-Bator from closing properly.
On 240 Volt models, attach the plug required by your country.
All units must be connected to a grounded (earthed) outlet via a 3 prong grounded male plug.
NOTE: THIS TURNER RUNS VERY SLOWLY, PRODUCING ONE REVOLUTION IN 4 HOURS
CHANGING EGG RACKS
HOVA-BATOR AUTOMATIC TURNER
1. Place the egg racks in the correct slot in
the turner frame
2. Turn the rack on its side
3. Line the egg racks up with the correct
slot in the connecting bar. Starting at one
end, press rmly to snap the rack into the
connecting bar
4. Once all racks are snapped rmly into
the connecting bar, line the connecting
bar (slot) up with the (white) swing arm
on the turner motor. Press the connecting
bar rmly so that it “snaps onto the (white)
swing arm of the turner motor.
TO DISASSEMBLE REVERSE THESE STEPS
Question and Answer IconNeed help?

Do you have a question about the G.Q.F. HOVA-BATOR and is the answer not in the manual?

G.Q.F. HOVA-BATOR Specifications

General IconGeneral
BrandG.Q.F.
ModelHOVA-BATOR
CategoryAccessories
LanguageEnglish

Summary

Automatic Egg Turning Setup

Turner Placement

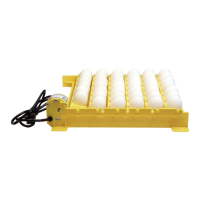
Place the turner flat on the incubator wire floor, ensuring cord routing allows proper closure.

Electrical Connection

Connect all units to a grounded outlet using a 3-prong plug; use country-specific plug for 240V models.

Changing Egg Racks

Inserting Egg Racks into Frame

Place egg racks into the correct slots in the turner frame and snap them firmly into the connecting bar.

Connecting Racks to Motor

Align the connecting bar with the white swing arm on the turner motor and snap it firmly into place.

Egg Rack Layouts

Quail and Chicken Rack Configuration

Use the (6) rack position layout for quail and chicken eggs.

Goose and Large Chicken Rack Configuration

Use the (5) rack position layout for goose and large chicken eggs; leave slot next to motor open.

Cleaning and Maintenance

Turner Cleaning Procedure

Clean turner with a damp cloth, mild soap, and mild disinfectant. Plastic racks are machine washable.

Electrical Component Safety

Do not wet down or spray the electrical cord or motor during cleaning.

Safety and Specifications

Manufacturer Usage Warning

Protection may be impaired if equipment is used in a manner not specified by the manufacturer.

Normal Operating Conditions

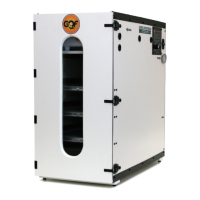
Specifies acceptable indoor use, altitude, temperature, and humidity ranges for safe operation.

Electrical Ratings

Details voltage and amperage for 110V (115VAC, 60Hz, 1.0A) and 220V (240VAC, 50/60Hz, 1.0A) units.

Limited Warranty and Restrictions

Warranty Coverage Details

Covers defects for 1 year from purchase for USA residents; requires proof of purchase.

Warranty Exclusions and Limitations

Warranty void if misused, modified, or if non-GQF parts are used; no guarantee on hatchability.

Related product manuals