EasyManua.ls Logo

G3 ZED - User Manual

G3 ZED
2 pages
Print Icon
To Next Page IconTo Next Page
Loading...
IMPORTANT WARNINGS
a. The release setting requires a specialized understanding of multiple factors.
Adjustments to release settings should only be made by a G3 authorized dealer.
Any improper adjustment of release setting by any unauthorized person will put the
skier at risk of injury and void the warranty.
b. Prior to each use the binding should be checked for any broken parts, correct
release function, and contamination. If anything is defective or broken please
return the binding to a G3 authorized dealer for service.
c. Since skiing has inherent risks, do not overestimate your ability when describing
your skiing level to the authorized dealer who will set your release setting. If in
doubt, underestimate your ability, and return to the authorized dealer to have an
increase in retention made.
d. Skiing the G3 ZED binding without a ski brake or a ski leash can put others
at risk, as well as risk the loss of the ski and binding. A ski brake alone is not
sufficient to protect against the loss of a ski in deep snow. The use of a ski leash
is not recommended in avalanche terrain.
e. Ski touring is a demanding sport in which environmental conditions and terrain
can change quickly and be hazardous. Obtain proper training and rescue
equipment before ski touring, and don’t overestimate your abilities. Always make
use of all available weather and avalanche condition information prior to touring.
Never ski tour under the influence of any drug or mind changing substance.
f. Never ski tour alone.
g. Due to the exposure to environmental conditions that are common during ski touring
(ice, snow, water, dirt) the release setting may change. Extended or incorrect storage
can also affect release setting. At the start of each season, the release setting should
be checked using specialized equipment at a G3 authorized dealer.
h. Specialized alpine touring boots with “TECH” inserts are required for use with G3
ZED bindings. Any non compliant boot or excessively worn “TECH” inserts can
alter the release setting. The boot is an integral part of the release system. The
release setting should be checked using specialized equipment at an authorized
dealer with the intended boot(s) for use.
i. During transport, bindings can become contaminated with salt, dirt and other
contaminants that can alter or impair the release function. Cover your bindings
during transport to reduce this risk.
j. Use only genuine G3 accessories for ZED bindings to ensure that the release
setting or any other design feature is not compromised
5. TIPS FOR USING THE ZED BINDING
clear ice and snow
a. Before every descent, make it your practice to check for and clear any snow under the toe assembly (P) and heel assembly (Q)
prior to skiing. After stepping into the toe, and before locking the heel down into ski mode, it is recommended to pivot the boot
on the toe pins a couple of times, to ensure any ice in the boot inserts gets cut away.
using your pole to clear snow
b. Your ski pole can be used to clear snow from the binding under the toe jaws (R).
switching from tour mode to ski mode using your ski pole
c. You can use the end of your pole to lever off your boot to switch the heel from ski tour mode
into ski mode (S).
using the leash
d. To connect the leash to the control arm tower on the toe of the binding, connect the wire loop
end of the leash by pushing the loop through the hole in the control arm tower. Then pull the
carabiner through the wire loop and snug it up.
e. When using the leash, clip the carabiner either directly to your boot buckle, or to the includ-
ed wire loops which you can girth hitch to larger boot buckles. When in avalanche terrain, or
somewhere you do not want to be leashed in, stow the leash by clipping it to itself by the
leash clip or remove it from the binding.
P
Q
R
S
Clear ice and snow from this area.
Clear ice and snow from this area. Rotating the heel into ski mode.
ZED
ZED
OPERATING
INSTRUCTIONS
1. Toe Assembly
2. Toe Pin
3. Toe Tour Mode Lever
4. Heel Assembly
5. Heel Pins
6. Heel Lift
7. Heel Assembly with Brakes
8. Brake (optional, sold separately)
9. Coiled Leash (optional, sold separately)
1
2
3
4
5
6
9
Control arm tower hole
7
8
3177-7316
G3-ISL-E002 REV F
PATENTS #US9597578, #DE202009019128, # DE202009019178 & PATENTS PENDING
BOOT COMPATIBILITY
a. The ZED bindings are only compatible with alpine touring ski boots (ISO
9523) with Tech compatible inserts.
b. Bellowed touring boots or NTN type boots with TECH inserts are
not currently supported; the flex creates an unpredictable release
environment.
WARRANTY
G3 warrants that the product will meet the specifications stated in the
instructions and G3 agrees to replace the product free of charge if the product
does not conform to the specifications. Notice for replacement must be given
within 60 days of the discovery of the defect.
In consideration of the above promises by G3, the buyer agrees to and accepts
the following conditions:
That this warranty is in lieu of all other warranties, expressed or implied;
That ALL WARRANTIES OF MERCHANTABILITY OR OF FITNESS FOR A
PARTICULAR PURPOSE ARE HEREBY EXCLUDED AND/OR WAIVED;
That the buyer’s sole remedy shall be to obtain replacement of the product
free of charge from G3; and
That this remedy is in lieu of all other remedies or claims for damages,
consequential or otherwise, which the buyer may have against G3.
G3 shall have no liability for Any loss or injury caused, in whole or in part, by its
actions, omissions, or negligence, or for contingencies beyond its control;
The warranty extends only to you, the original purchaser. It is not transferable
to anyone who subsequently purchases the G3 from you.
a. Any custom modifications to the binding will invalidate the warranty, and
could put the skier at risk of injury.
b. Any unintended use of the binding will void the warranty, and could put
people at risk.
For the most current information, videos and instructions on mounting and
using your ZED bindings go to: http://www.genuineguidegear.com
For full G3 product warranty details please visit:
http://www.genuineguidegear.com/service/g3-product-warranty
Models: ZED 9, ZED 12

Other manuals for G3 ZED

Question and Answer IconNeed help?

Do you have a question about the G3 ZED and is the answer not in the manual?

Summary

Tips for Using the Zed Binding

Clear Ice and Snow

Clear ice and snow from the binding before skiing and pivot boot on toe pins.

Using Pole to Clear Snow

Use ski pole to clear snow from the binding under the toe jaws.

Switching from Tour to Ski Mode

Use the end of your pole to lever off your boot to switch the heel from ski tour mode.

Using the Leash

Connect leash to control arm tower, clip to boot or girth hitch to larger buckles.

Important Warnings

Boot Compatibility

Compatible Boot Types

Bindings compatible with ISO 9523 alpine touring boots with Tech inserts.

Incompatible Boot Types

Bellowed touring or NTN type boots with Tech inserts are not supported.

Warranty Information

Switching from Ski Mode to Tour Mode

Changing Heel Assembly to Tour Mode

Rotate heel assembly so pins face left or right, ensure it clicks into position.

Changing Toe Assembly to Tour Mode

Place toe assembly in step-in position with lever down and jaws open.

Using the Heel Lifters

Flat Terrain Heel Lifter

Orient binding with heel lifters to the back for flat terrain.

Moderate Terrain Heel Lifter

Orient binding with one heel lifter flicked forward for moderate terrain.

Steep Terrain Heel Lifters

Orient binding with both heel lifters flicked forward for steep terrain.

Ski Mode Operation

Rotating from Tour Mode into Ski Mode

Rotate heel assembly to ski mode; pins face forward, brake deploys.

Step in Position

Ensure toe piece is in step-in position before stepping into the binding.

Stepping Out of the Zed Binding

Releasing Boot from Binding

Press tour mode lever, raise toe, pivot boot to release from heel pins.

Overview

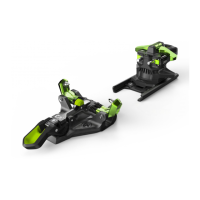
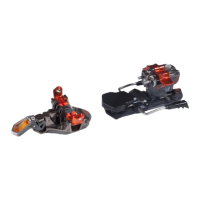
The G3 ZED binding is a specialized alpine touring ski binding designed for backcountry skiing, offering a balance of touring efficiency and downhill performance. It is compatible with alpine touring ski boots (ISO 9523) that feature Tech-compatible inserts. The binding is engineered to facilitate transitions between ski mode (for downhill travel) and tour mode (for uphill climbing), with specific features to enhance user experience and safety.

Function Description:

The primary function of the G3 ZED binding is to securely connect a ski boot to a ski, allowing for both uphill travel with a free heel and downhill skiing with a locked heel. In tour mode, the toe assembly pivots freely, enabling a natural walking motion, while the heel can be left unattached or engaged with various heel lifter settings to reduce strain on ascents. For downhill skiing, the heel assembly locks the boot in place, providing a secure connection for control and power transfer.

The binding consists of a toe assembly and a heel assembly. The toe assembly features toe pins that engage with the boot's Tech inserts and a toe tour mode lever that allows the user to lock the toe for uphill travel or unlock it for downhill skiing. The heel assembly includes heel pins that engage with the boot's heel insert in ski mode, and multiple heel lifter levels (low, medium, and high angle) to accommodate different climbing gradients. An optional brake and coiled leash are available to enhance safety and prevent ski loss.

Usage Features:

Clearing Ice and Snow: Before each descent, it is crucial to clear any ice and snow from under both the toe and heel assemblies. After stepping into the toe, pivoting the boot a couple of times helps to cut away any ice in the boot inserts. A ski pole can be used to clear snow from under the toe jaws.

Switching from Tour Mode to Ski Mode:

  • Heel Assembly: To transition the heel from tour mode to ski mode, the heel assembly is rotated so the heel pins face forward. If a brake is present, it should be held down while rotating the heel to prevent finger catching. The heel rotation is spring-aided, and the brake (if used) will deploy when correctly in ski mode. It is vital to ensure the heel assembly clicks fully into the touring position to confirm it's locked.
  • Toe Assembly: The toe assembly should be in the 'step in position' with the toe lever pushed down and the jaws open. Step into the jaws with a forward sliding motion from the rear, aiming for the central BootStop. Once the toe piece snaps firmly into the boot toe inserts, step the heel down firmly to engage the heel pins with the boot heel insert.

Switching from Ski Mode to Tour Mode:

  • Heel Assembly: To change the heel assembly from ski mode to tour mode, it needs to be rotated so the heel pins face to the left or right. If using a brake, depressing it slightly helps avoid catching fingers during rotation. Ensure the heel assembly rotates fully and clicks into its correct touring position.
  • Toe Assembly: Before stepping into the toe, push down on the toe lever with a ski pole to ensure the toe assembly is in 'step in position'. Click into the toe with a forward sliding motion from the rear, aiming for the central BootStop. When positioned correctly, the toe pins will snap tightly into the boot's Tech inserts. Once the boot is in the toe piece, step firmly down onto the brake (if used) to lock it into tour mode. In tour mode, it is recommended to lock out the toes by lifting the toe tour mode lever to its tightest setting.

Using Heel Lifters: The binding offers three levels of heel lifters for climbing:

  • Flat Terrain: Orient the binding with the heel lifters to the back.
  • Moderately Steep Terrain: Flick one heel lifter forward.
  • Steep Terrain: Flick both heel lifters forward.

Stepping Out of the Binding: To exit the binding, simply press down on the tour mode lever with a pole or hand and raise the boot toe. Pivoting the boot toe left or right will release the boot from the heel pins.

Using the Leash: The leash connects to the control arm tower on the toe of the binding. The wire loop end is pushed through the hole in the tower, and the carabiner is pulled through the wire loop and snugged up. The carabiner can be clipped directly to a boot buckle or to included wire loops girth-hitched to larger buckles. In avalanche terrain or situations where a leash is undesirable, it can be stowed by clipping it to itself or removed.

Important Warnings:

  • Release settings require specialized understanding and should only be adjusted by a G3 authorized dealer. Improper adjustment voids the warranty and poses an injury risk.
  • The binding should be checked for broken parts, correct release function, and contamination before each use. Defective or broken parts require service by a G3 authorized dealer.
  • Do not overestimate skiing ability when describing it to the authorized dealer for release setting. Underestimate if in doubt, and return to the dealer for retention increase.
  • Skiing without a ski brake or leash can risk injury to others and loss of ski/binding. A ski brake alone is insufficient in deep snow. Leashes are not recommended in avalanche terrain.
  • Ski touring is demanding; obtain proper training and rescue equipment, and always check weather and avalanche conditions. Never ski tour under the influence of drugs or alone.
  • Environmental conditions (ice, snow, water, dirt) can change release settings. Extended or incorrect storage can also affect settings. Release settings should be checked annually by a G3 authorized dealer.
  • Only specialized alpine touring boots with "TECH" inserts are compatible. Non-compliant or excessively worn inserts can alter release settings. The boot is integral to the release system, and settings should be checked with the intended boot(s).
  • During transport, bindings can become contaminated. Cover bindings to reduce this risk.
  • Use only genuine G3 accessories to ensure release setting and design features are not compromised.
  • The G3 ZED binding is only recommended to be skied with the tour mode lever unlocked in 'ski' mode. Skiing with the tour mode lock engaged effectively removes safety release features, posing a risk of injury or death, and may void the warranty if damage occurs in a fall.
  • Bellowed touring boots or NTN type boots with TECH inserts are not supported, as their flex creates an unpredictable release environment.

Maintenance Features:

  • Regular Inspection: Before each use, inspect the binding for any broken parts, proper release function, and contamination. Any issues should prompt a return to a G3 authorized dealer for service.
  • Annual Check-up: At the start of each season, the release setting should be checked by a G3 authorized dealer using specialized equipment. This is crucial due to potential changes from environmental exposure or storage.
  • Boot Compatibility: Ensure that only alpine touring ski boots (ISO 9523) with Tech compatible inserts are used. The boot is an integral part of the release system, and its condition directly impacts the binding's performance.
  • Transport Protection: Cover the bindings during transport to prevent contamination from salt, dirt, and other substances that could impair release function.
  • Warranty: G3 warrants that the product will meet specifications and will replace defective products free of charge if notice is given within 60 days of defect discovery. The warranty is in lieu of all other warranties, expressed or implied, including merchantability or fitness for a particular purpose. The buyer's sole remedy is product replacement. Custom modifications or unintended use will invalidate the warranty and may pose a risk of injury.

G3 ZED Specifications

General IconGeneral
TypeTrampoline
ShapeRound
Frame MaterialGalvanized Steel
Spring Count96
Safety EnclosureYes
Ladder IncludedYes
Size14 feet
Jumping Surface MaterialPolypropylene
Weather ResistanceYes

Related product manuals