FIG.01
1
2
3
4
5
6
7
La prima volta che usate il pannarello, dovete ...
The first time you use the frother, you must...
Bei erstmaliger Verwendung des Schaumschlägers müssen Sie ….
La première fois que vous utilisez le mixeur, il faut.....
La primera vez que usa el esquema, siga las instrucciones que se detallan a continuación
De eerste keer dat u het stoompijpje voor het opschuimen van melk gebruikt, moet u .....
Quando se usa o bico pela primeira vez, deve-se ...
I
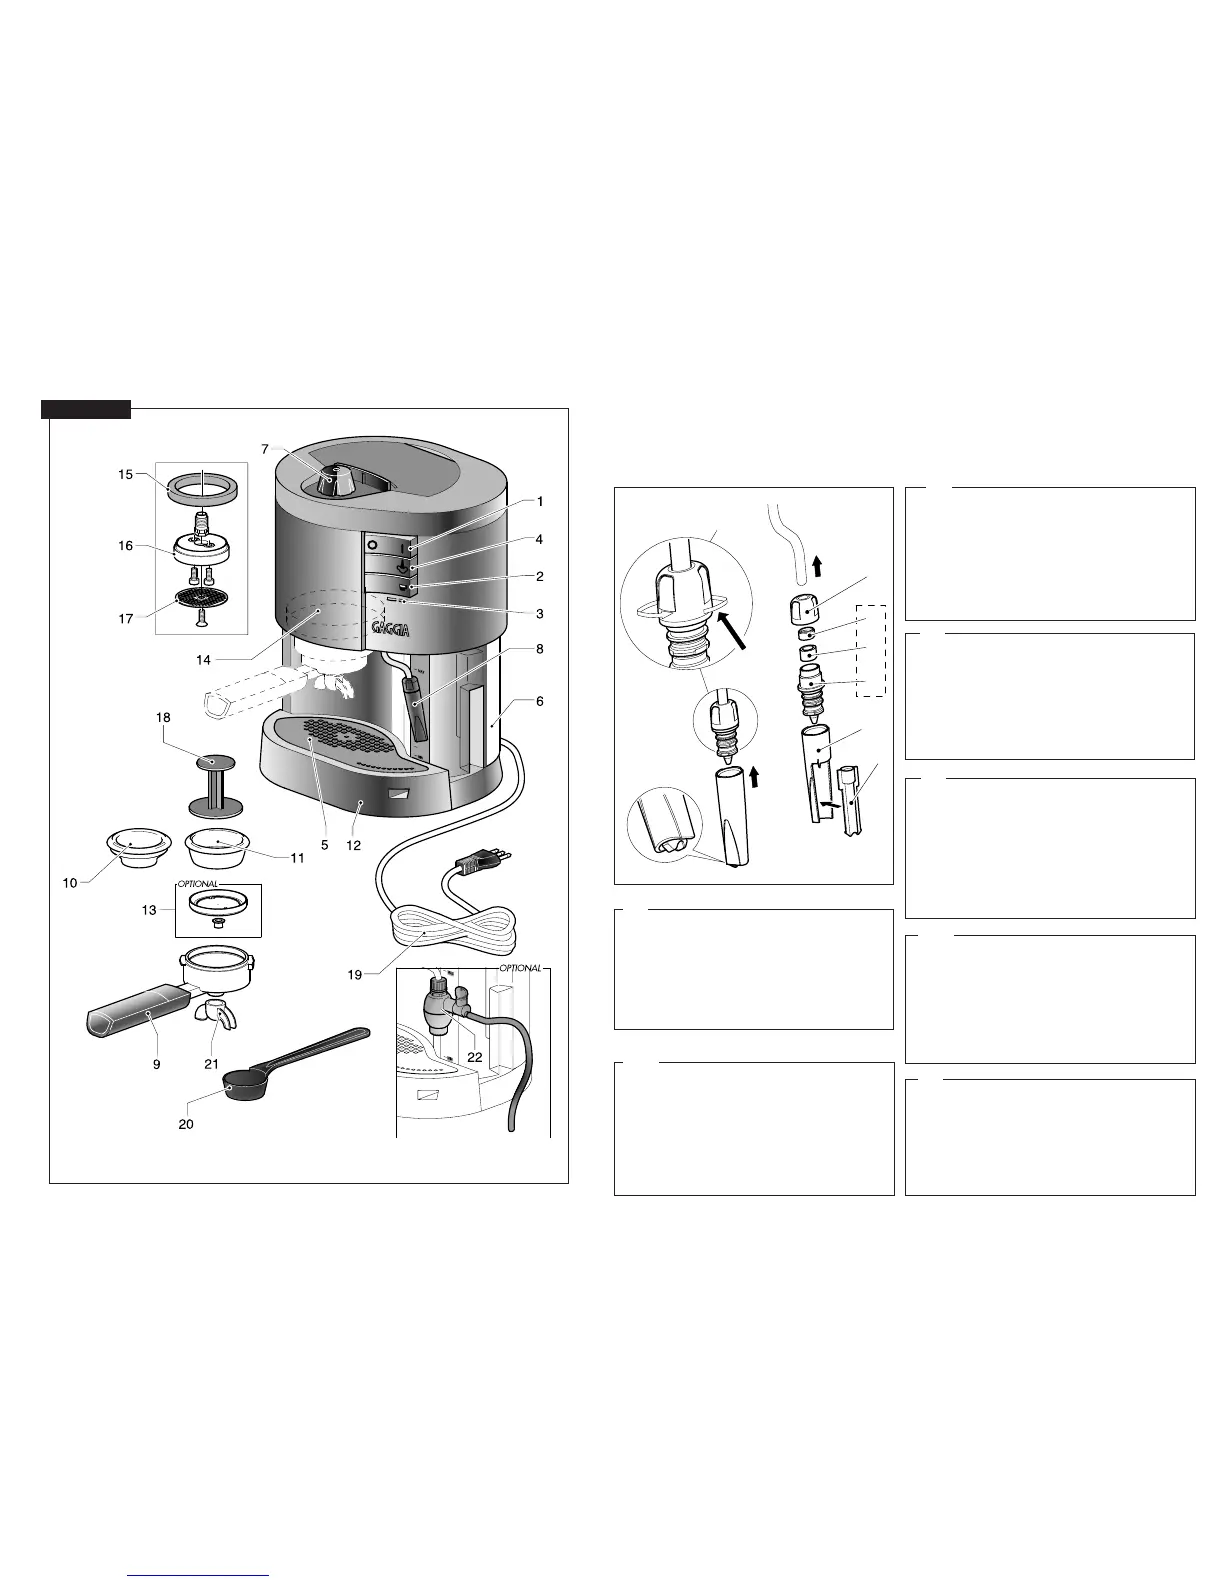
- Infilare la Ghiera filettata 1 sul tubo vapore.
- Inserire il gommino 3 nell’Iniettore 4, inserire il Premi-
gommino 2 sopra al Gommino 3, calzare l’assieme
2-3-4 sul tubo vapore.
- Avvitare la Ghiera 1 sull’Iniettore 4. Serrare 5.
- Inserire il canotto esterno 6 come in figura.
- Il canotto interno 7 va montato correttamente, facen-
do sporgere la parte inferiore dal canotto esterno,
come evidenziato nella figura.
GB
- Slide the Ring Nut 1 onto the steam hose.
- Place the Gasket 3 into the Injector 4, and place the
Gasket Press 2 over the Gasket 3. Slide the assembly
2-3-4 over the steam hose.
- Screw the Ring Nut 1 onto the Injector 4. Tighten 5.
- Attach the external housing 6 as shown in the Figure.
- The internal sleeve 7 must be correctly installed, by
protruding the lower part of the external sleeve, as
shown in figure.
F
- Glisser la douille filetée 1 sur le tuyau de la vapeur.
- Insérer le caoutchouc 3 dans l’injecteur 4, insérer le
presse-caoutchouc 2 sur le caoutchouc 3, emmancher
l’ensemble 2-3-4 sur le tuyau de la vapeur.
- Visser la douille 1 sur l’injecteur 4. Serrer 5.
- Insérer le manchon externe 6 comme il est indiqué sur la figure.
- Le manchon intérieur 7 doit etre installé de la façon
correcte, en laissant dépasser la partie inférieure du
manchon extérieur, comme indiqué par la figure.
D
- Gewindenutmutter auf Dampfrohr aufsetzen.
- Gummiring 3 in Düse 4 einsetzen, Gumminiederhalter 2
auf Gummiring 3 aufsetzen, Komplex 2-3-4 in Dampfrohr
einführen.
- Gewindenutmutter 1 auf Düse 4 schrauben.
Festschrauben 5.
- Außenbüchse 6 gemäß Abbildung einfügen.
- Das innere Rohr 7 ist korrekt anzubringen, wobei der
untere Teil des Außenrohrs herausragt, wie es auf
Abbildung zu ersehen ist.
P
- Enfie o casquilho roscado no tubo de vapor.
- Introduza a borracha 3 no injector 4. Introduza o
pressionador da borracha 2 por cima da borracha 3; a
seguir introduza o grupo 2-3-4 no tubo de vapor.
- Enrosque o casquilho roscado 1 no injector 4.
- Introduza o canote externo 6 como ilustrado na figura.
- O pequeno tubo interno 7 deve ser montado
corretamente, fazendo sair a parte inferior do pequeno
tubo externo, como evidenciado na figura.
NL
- Schuif de getapte sluitring op het stoompijpje.
- Schuif het rubbertje 3 in het spuitstuk 4, schuif de
rubberhouder 2 op het rubbertje 3, zet het geheel 2-
3-4 op het stoompijpje.
- Draai het einddopje 1 op het spuitstuk 4.
- Bevestig het buitenste mondstuk 6 op het spuitstuk,
volgens de afbeelding.
- De binnenste schuif 7 wordt op de juiste manier
gemonteerd door het onderste gedeelte van de buitenste
schuif uit te laten steken zoals getoond wordt in figuur.
E
- Introduzca el casquillo roscado 1 en el tubo de vapor.
- Introduzca la empaquetadura de anillo 3 en el inyector
4, introduzca el aprieta-empaquetadura 2 en la
empaquetadura 3. Acto seguido, ubique el grupo 2-
3-4 en el tubo de vapor.
- Enrosque el casquillo roscado 1 en el inyector 4.
Enroscar hasta el tope 5.
- Introduzca el forro exterior 6 como se aprecia en la figura.
- Monte correctamente el tubo interior 7, sobresaliendo
el lado inferior del tubo exterior, como señalado en
la figura.