Do you have a question about the Gaggia MDF Grinder and is the answer not in the manual?
Remove all beans from the hopper and coffee from the ground coffee dispenser.
Locate and remove two rubber stoppers and their screws at the bottom of the bean hopper.
Carefully lift the bean hopper away from the grinder housing.
Unscrew the faceplate and then the brass hex bolts to remove the adjustment ring.
Remove the top burr plate by rotating it counter-clockwise, using the hopper for leverage.
Thoroughly clean the grinding chamber, burrs, threads, and chute, avoiding liquids.
Replace the burr plate clockwise until snug, then plug in the machine with the hopper.
Find the point where burrs touch while spinning, indicated by a high-pitched chirp.
Verify absolute zero by motor sound when winding down after brief operation.
Turn off the grinder after calibration and unplug it from the power source.
Reinstall the adjustment ring with setting #1 facing front, secure with bolts, then reattach faceplate.
Replace the bean hopper, screws, and rubber stoppers to their original positions.
Plug the machine back in and check that all operations are functioning correctly.
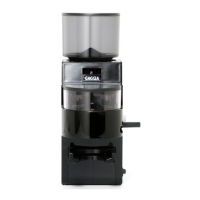
The provided manual details the cleaning and calibration procedures for the Gaggia MDF Grinder, a device designed for grinding coffee beans.
The Gaggia MDF Grinder is a coffee grinder that processes whole coffee beans into ground coffee. Its primary function is to provide a consistent grind for various brewing methods, with an adjustment ring allowing users to select different grind fineness settings, ranging from 1 to 39. The grinder is capable of producing very fine grinds, described as having a texture similar to powdered sugar, which is achieved at its "absolute zero" setting where the burrs are at their closest point without obstruction.
While the manual does not explicitly list technical specifications such as motor power or burr material, it does provide insights into the grinder's construction and operational characteristics:
The Gaggia MDF Grinder offers several features that enhance its usability:
The manual provides comprehensive instructions for cleaning and calibration, which are key maintenance aspects for the Gaggia MDF Grinder:
| Brand | Gaggia |
|---|---|
| Model | MDF Grinder |
| Category | Coffee Grinder |
| Language | English |