This document is a user manual for Galaxy Electric Countertop Fryers, specifically models EF10E and EF20E.
Function Description
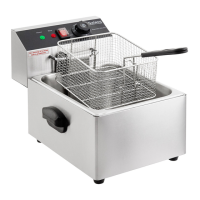
The Galaxy Electric Countertop Fryers are designed for commercial use to deep-fry various food items. They are available in two models: a single-tank fryer (EF10E) and a double-tank fryer (EF20E). The double-tank model allows for frying two different types of food simultaneously. The fryers feature a temperature regulator with a yellow "hot light" that indicates when the desired temperature has been reached. An automatic shut-off feature activates if the oil reaches a maximum allowable temperature of 446°F (230°C). For safety, a micro-switch at the bottom of the electrical enclosure cuts power if the enclosure is removed without unplugging the power cable. The units are equipped with removable stainless steel oil inserts that have calibration marks for oil levels, and heating coils are protected by a stainless panel base.
Important Technical Specifications
Model EF10E (Deep Fryer Single 6 Liter):
- Voltage: 110V/60Hz
- Power: 1600W
- Number of oil tanks: 1
- Number of frying baskets: 1
- Size of frying baskets: 7¼" x 8¼" x 4½" (18.4 cm x 21 cm x 11.4 cm)
- Cooking temperature range: 140°F - 370°F (60°C - 188°C)
- Temperature safety cut-off: 446°F (230°C)
- Overall Dimensions: 12½" x 16¾" x 11½" (31.8 cm x 42.5 cm x 29.2 cm)
Model EF20E (Deep Fryer Double 6 Liter (x2)):
- Voltage: 110V/60Hz
- Power: 2 x 1600W (Total 3200W)
- Number of oil tanks: 2
- Number of frying baskets: 2
- Size of frying baskets: 7¼" x 8¼" x 4½" (18.4 cm x 21 cm x 11.4 cm)
- Cooking temperature range: 140°F - 370°F (60°C - 188°C)
- Temperature safety cut-off: 446°F (230°C)
- Overall Dimensions: 25" x 16¾" x 11½" (63.5 cm x 42.5 cm x 29.2 cm)
General Warnings:
- Unplug the cord when not in use and before cleaning.
- Do not move or transport the fryer until the oil has completely cooled to prevent severe burns.
- Do not use the unit for purposes other than its intended use.
- Not for outdoor use.
- Always cook on a firm, dry, and level surface.
- High temperatures can cause scalding; avoid standing over the fryer or touching any part of the machine (except basket handle and power controls) during operation.
- Do not use the unit with a damaged cord or plug, or if the appliance malfunctions or has been damaged.
- Keep children and animals away from the fryer.
- Do not modify the unit.
- Any incorrect installation, alterations, adjustments, or improper maintenance can lead to property loss and injury. All repairs should be done by authorized professionals only.
- Keep all flammable and combustible liquids away from the product.
- The maximum quantity of food to be placed in the fryer should not exceed 1.98 lbs/pot (0.9 kg/pot).
- Limit food volume to avoid oil overflowing.
- Limit foods that do not absorb oil easily to avoid overflowing.
- Place large foods into the fryer carefully to prevent oil overflow and spatter.
- This equipment must be operated by trained cooks or professionals.
- Do not touch any hot surfaces.
- Do not immerse the unit, cord, or plug in liquid at any time.
Usage Features
Pre-Operation:
- Ensure the power supply and voltage are adequate for continuous fryer use. A surge protector or circuit breaker is advisable.
- Fill the oil receptacle with vegetable oil between the minimum and maximum levels, allowing for food volume.
- Ensure the temperature regulator knob is in the "OFF" position before plugging the machine into an outlet.
- Once plugged in, a green "Power Light" will illuminate.
Operation:
- Rotate the temperature regulator knob clockwise to the desired temperature.
- When the desired temperature is reached, the yellow "Hot Light" will turn off and cycle, as the temperature controller automatically maintains the set temperature.
- Lift the food basket up and away from the machine to load food.
- Carefully place the loaded basket into the machine to avoid splashing.
- After frying, gently shake off excess oil from the food when removing it from the tank.
- The enclosed frying basket is suitable for small foods like French fries and onion rings. Larger foods can be placed directly into the basket or oil tank.
Daily Check - Before Using:
- Make sure the machine is on a level surface.
- Check to see if the power cord is frayed or damaged.
Daily Check - During Use:
- Check the control panel for damage.
- Check for any electrical smells.
- Check for any strange sounds coming out of the machine.
- Watch for oil spattering.
Maintenance Features
Cleaning and Maintenance Procedure:
- After use, turn the power controller counterclockwise to the "OFF" position.
- Remove the plug from the power supply.
- Wait for the oil to cool down completely before removing the tank from the outer case.
- To remove the electrical unit and oil tank:
- Remove the protective panel bottom using a large fork or tongs. Do not stick your hand into the oil.
- Gently lift the electrical box unit from the back of the machine and place it in a safe, dry location.
- Note: The micro-switch on the bottom of the electrical box unit will automatically cut off power if the electric plug is not removed from the power supply.
- Lift the oil tank out of the outer case.
- Carefully dispose of the used oil, removing any sludge.
- Gently wash the oil tank with soap and water, dry it thoroughly, and then place it back into the machine.
- Always use fresh vegetable oil for every use; never reuse old oil.
- After the oil has cooled and the unit is not in use, cover the fryer tank with the provided night cover.
Troubleshooting (for reference only; discontinue use and do not attempt repairs if a fault occurs, as this will void the warranty):
- Indicator light not on, unit not heating: Check if the plug is properly inserted (reinsert), or if the micro-switch is not closed (adjust limit distance).
- Heating indicator not on, temperature not increasing: Check if electric heater tubes are properly connected (tighten both sides), or if the heater is defective (change electric heating tube).
- Power indicator on, but desired temperature not reached: Check if the temperature controller is burned out (change temperature).
- Temperature control normal, but indicator not on: Check if the indicator light is burned out (change indicator).
- Temperature indicator on, but heater tube not hot: Check if the temperature limiter has tripped (reset overheating protection button on the bottom of the electrical box).
- Temperature cannot be controlled: Check if the temperature limiter is out of order (change temperature limiter).
Transportation and Storage:
- During transportation, handle the machine carefully using the handles on the sides of the unit.
- The packaged machine should not be stored in the open.
- Store in a ventilated warehouse without a corrosive atmosphere, placed right side up.