Do you have a question about the GAME OF BRICKS 76989 and is the answer not in the manual?
Unpacking components and making initial wire connections for the base assembly.
Continuing the assembly of the Tallneck's leg structure and routing wires.
Placing assembled parts onto the main base and completing wire connections.
Unpacking and installing the yellow LED components onto the Tallneck's body.
Connecting main LED strip lights and routing wires through the body.
Connecting the body lights to the base unit and managing wires.
Assembling the head section and placing small LEDs within it.
Preparing multiple light strips and connecting them to the head/body.
Connecting and routing light strips into the Tallneck's main structure.
Finalizing all wire connections and routing on the base section.
Unpacking and connecting the red flower light components to the base.
Preparing, connecting, and routing the final wires to the model.
Connecting the light kit to a USB power source for the Classic Version.
Connecting the receiver module for the Remote Version of the light kit.
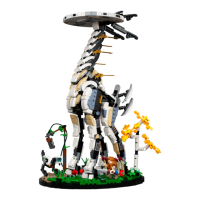
Shows the completed model with lights active for the Remote Version.
Final step: connecting the kit to the battery box and power source guidelines.
| Brand | GAME OF BRICKS |
|---|---|
| Model | 76989 |
| Category | Toy |
| Language | English |