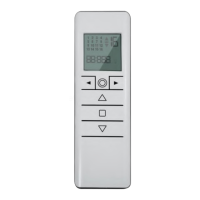
The QCTZ16SY is a 16-channel handheld display remote with a timer, designed to wirelessly control up to 16 motors or groups of motors.
Function Description:
This remote allows users to manage multiple motorized systems, such as shutters or awnings, with precision and flexibility. It supports both single-channel and group control modes, enabling individual operation or synchronized control of multiple units. The integrated timer function allows for the creation of schedules, automating the movement of motors at specified times and days. The device offers three operational modes: Manual, Automatic, and Random. In Manual Mode, commands are sent only by manually pressing buttons. Automatic Mode executes schedules automatically in addition to manual control. Random Mode introduces a delay of 0-30 minutes to scheduled operations, providing a more natural, less predictable pattern of movement.
Important Technical Specifications:
- Radio frequency: 434.15 MHz
- Protection rating: IP 30
- Operating temperature: 0°C to +60°C (+32°F to +140°F)
- Dimensions: 150 x 47 x 12 mm
- Power supply: 1 x 3V 2450 Lithium battery
Usage Features:
- LCD Display: Provides clear visual feedback for channel selection, group identification, and timer settings.
- Channel/Group Control:
- Single Channel Mode: Allows control of individual motors. Channels are scrolled using arrow buttons and identified by a number.
- Group Control Mode: Enables control of pre-defined groups of motors. The "ALL" channels group is available, and users can scroll through up to 8 custom groups.
- Group Customization:
- Users can create up to 8 custom groups by selecting individual channels to be included.
- Channels are selected using arrow buttons, and the group is confirmed with the UP, STOP, or DOWN buttons.
- Groups are identified by a number, taking the first available number from 1 to 8.
- Group Deletion: Saved groups can be deleted from the group screen.
- Channel Hiding: Unused channels can be hidden from the selection screen, simplifying the interface. Hidden channels can be unhidden using the same process.
- Timer Functions:
- Clock Set-up: The clock can be set in 24-hour format, including hour, minutes, and day of the week. Users can choose whether the clock is displayed in stand-by mode.
- Schedule Creation/Editing: Up to 6 schedules can be created or edited. For each schedule, users can select specific days of the week, set the hour and minutes, and choose a command (UP, DOWN, or Intermediate Position). Channels to be included in the scene are also selected.
- Schedule Deletion: Existing schedules can be deleted.
- Operational Modes: Easily switch between Manual, Automatic, and Random modes using the Left and Right arrow buttons.
- Programming Transmitter:
- The remote can be programmed to a motor by powering up the motor, holding SYNC until the motor moves, releasing SYNC, and then pressing the corresponding UP or DOWN button within 5 seconds to synchronize rotation.
- Adding Transmitter: New transmitters can be added by holding SYNC on an already paired transmitter, then pressing UP or DOWN on the new transmitter.
- Checking/Changing Direction: The motor's direction can be reversed by holding SYNC until the motor moves, then pressing STOP. This is crucial before setting limit switches.
- Limit Switch Setup (for electronic limit switch motors):
- The UP limit switch must be set first. Press LIMIT, then hold UP to run the motor to the desired UP position, and press STOP.
- Similarly, hold DOWN to run to the desired DOWN position, and press STOP.
- Accurate limit setting can be achieved by pressing LIMIT a second time for slow, step-by-step movement.
- Automatic Setting of Limits (for torque sensor motors): For motors with torque sensors, press and hold UP until the bottom bar hits the cassette or shutter box. A short jog indicates the UP position is memorized. The same applies to DOWN limits for roller shutters.
- Intermediate Position Setup (for electronic limit switch motors): Stop the motor at the desired intermediate position, then simultaneously press UP and DOWN until the motor makes a brief movement.
Maintenance Features:
- Erasing Transmitters: Individual transmitters can be deleted from motor memory by simultaneously pressing SYNC and STOP on the transmitter until the motor makes a brief movement in both directions.
- Reset Motor Memory:
- Option 1 (with programmed transmitter): Press and hold SYNC and STOP buttons until the motor makes two jogs (brief then long).
- Option 2 (without programmed transmitter): Power cycle the motor, then within 8 seconds, press and hold SYNC and STOP on any Gaposa transmitter until the motor makes a long jog.
- Transmitter Factory Reset:
- Remove the battery.
- Press and hold the circle button while reinserting the battery.
- Release the button when "-E SEE" appears.
- After approximately 3 seconds, the transmitter will restart, un-hide all channels, and delete all custom groups.
- Cleaning: Do not use abrasive products or solvents. Clean the product surface with a soft, damp cloth.