EasyManua.ls Logo

Garageio Blackbox - User Manual

Garageio Blackbox
2 pages
Print Icon
To Next Page IconTo Next Page
Loading...
1 Door Installation
Thank you for purchasing Garageio!
Installation can be completed in as little as 15 minutes per door
and requires no special tools. You’ll just need:
A screwdriver
A stepladder
Masking tape
Your Android phone, iPod Touch, or iPhone.
Step 1 of 9
Unpack the contents of your box
Your kit should contain the following:
A. Garageio Blackbox
B. Power Adapter
C. Activator Package (containing 1 white activator and 4 screws)
D. Opener Cable (red-banded, 6- long with black connector)
E. Package of Adhesive-backed Cable Clips (containing 10 clips)
F. Sensor Cable (green-banded, 32- long)
Step 2 of 9
Power up the Garageio Blackbox
While inside of your home, plug the power adapter (Part B)
into the DC IN port on the Garageio Blackbox (Part A).
The front light on the Blackbox will blink orange, and will
continue to blink orange as you connect your Blackbox to your
wireless network during the next step.
Step 3 of 9
Connect the Blackbox to your wireless network
Download the iPhone or Android Garageio app. Open the
app, select “Setup Your Garageio,” and connect your phone
to WiFi.
Select “Send BlinkUp” and hold your screen to the Blackbox
SETUP port for 10 seconds. The Blackbox’s front light must be
blinking orange for BlinkUp to work.
TIP: If the Blackbox’s front light is not blinking orange, restart
the Blackbox by toggling the power switch, and select the
“Clear Wireless Settings” option in the app.
Once BlinkUp is complete, the front light will flash green
several times while it connects to the Garageio service, then
turn off.
Enter your 16-character Blackbox code online at
garageio.com/verify to check that BlinkUp has been
successfully connected.
Step 4 of 9
Install the Blackbox
Mount the Blackbox to the side of your garage door opener
using the adhesive strips on the back of the Blackbox.
TIP: You can also mount the Blackbox to another surface
nearby (such as the ceiling or wall) using the tabs on the side
of the unit.
Step 5 of 9
Connect the Blackbox to your opener
Locate the opener cable (Part D). Plug the black connector
into the Blackbox OPENERS port labeled 1.
Connect the other end of the opener cable to your garage
door opener. Use the provided cable clips (Part E) to secure
the wires.
View sample connection diagrams for your specific opener
model at garageio.com/opener.
ALCOHOL WIPE
(x10)
(x4)
PAGE 1
Questions? Visit garageio.com/support to view solutions to the most common installation issues.
Question and Answer IconNeed help?

Do you have a question about the Garageio Blackbox and is the answer not in the manual?

Summary

Garageio 1 Door Installation Guide

Unpack Garageio Kit Contents

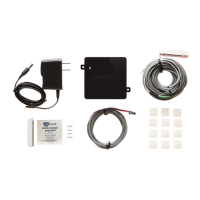
Identify and unpack all components included in the Garageio kit for single door installation.

Power Up Garageio Blackbox

Connect the power adapter to the Garageio Blackbox and a power outlet.

Connect Blackbox to Wireless Network

Use the Garageio app to connect the Blackbox to your home Wi-Fi network via BlinkUp.

Install Garageio Blackbox

Mount the Blackbox to the garage door opener or a nearby surface.

Connect Blackbox to Garage Door Opener

Connect the opener cable between the Blackbox and your garage door opener.

Mount Activator to Garage Door

Attach the activator to the edge of the garage door for sensor alignment.

Install Garage Door Sensor

Mount the sensor on the wall to align vertically with the door-mounted activator.

Finalize Blackbox Power Up

Power cycle the Blackbox to complete network connection and setup.

Complete Garageio Account Setup

Create a Garageio online account to finalize the installation and setup process.

Overview

The Garageio 1 Door Installation manual outlines the setup process for a smart garage door opener system designed to provide remote control and monitoring of a single garage door. This device aims to integrate your existing garage door opener with your wireless network, allowing you to manage your garage door from a smartphone or other internet-connected device. The installation is presented as a straightforward process, typically taking about 15 minutes per door, and does not require specialized tools, making it accessible for most users.

Function Description

The Garageio system consists of a central "Blackbox" unit, an activator, and a sensor, all working in conjunction with your existing garage door opener. The Blackbox serves as the brain of the system, connecting to your home's wireless network and communicating with the Garageio app on your smartphone. This connectivity enables you to remotely open, close, and monitor the status of your garage door. The activator is a component that attaches to your garage door, while the sensor is mounted on the wall, ensuring that the system can accurately detect whether the garage door is open or closed. This feedback is crucial for both remote monitoring and for preventing accidental operations. The system is designed to be compatible with a wide range of existing garage door openers, extending their functionality into the realm of smart home automation. By leveraging your wireless network, Garageio provides a convenient way to manage garage access, whether you're at home or away, enhancing security and peace of mind.

Usage Features

The Garageio system offers several key usage features that enhance convenience and control over your garage door.

  • Remote Control and Monitoring: The primary feature is the ability to control your garage door from anywhere using the Garageio app on your Android phone, iPod Touch, or iPhone. This means you can open the door for a delivery, check if it's closed after leaving home, or let someone in without being physically present. The app also provides real-time status updates, so you always know whether your garage door is open or closed.
  • Easy Setup Process: The installation guide emphasizes a quick and tool-free setup, making it user-friendly. The step-by-step instructions cover everything from unpacking the components to connecting the Blackbox to your wireless network and integrating it with your garage door opener. The "BlinkUp" process for connecting to the wireless network is designed to be intuitive, requiring you to hold your phone screen to the Blackbox's SETUP port.
  • Wireless Network Integration: The Blackbox connects to your home's WiFi network, providing a reliable communication channel for remote operations. The setup process includes clear instructions for troubleshooting network connection issues, such as restarting the Blackbox or clearing wireless settings if the indicator light isn't blinking as expected.
  • Physical Installation Flexibility: The Blackbox can be mounted to the side of your garage door opener using adhesive strips or to another nearby surface like the ceiling or wall using side tabs. This flexibility allows for optimal placement based on your garage's layout and personal preference.
  • Sensor-Based Status Detection: The system uses a green-banded sensor cable and an activator to accurately determine the open/closed status of the garage door. The sensor is mounted on the wall, and the activator on the door, ensuring they align vertically when the door is closed. This precise detection is vital for reliable remote monitoring and operation, preventing false readings.
  • Cable Management: The kit includes adhesive-backed cable clips to secure the opener and sensor cables, keeping them tidy and preventing interference with moving parts of the garage door. This attention to detail helps maintain a clean installation and ensures the longevity of the cables.
  • Account Management: After physical installation, users are guided to create a Garageio account online to finalize the setup. This account likely serves as the central hub for managing your device, settings, and potentially multiple garage doors if you expand your system.
  • Troubleshooting Support: The manual directs users to garageio.com/support for solutions to common installation issues, indicating a commitment to user assistance and a smooth experience. This resource-rich support system helps users overcome any challenges they might encounter during setup or daily use.
  • Visual Indicators: The Blackbox features a front light that provides visual cues during the setup process. For instance, a blinking orange light indicates it's ready for BlinkUp, a flashing green light signifies connection to the Garageio service, and a red light during power-up indicates it's connecting to the wireless network. These indicators help users understand the device's status at a glance.
  • Compatibility Information: The manual mentions viewing sample connection diagrams for specific opener models at garageio.com/opener, ensuring users can verify compatibility and find tailored instructions for their particular garage door opener. This feature helps streamline the integration process with various existing systems.

Maintenance Features

While the manual primarily focuses on installation, it implicitly suggests certain maintenance aspects through its design and troubleshooting guidance.

  • Self-Contained System: The Garageio system is designed to be largely self-contained and low-maintenance once installed. There are no explicit routine maintenance tasks mentioned, suggesting that the components are built for durability and long-term operation without frequent intervention.
  • Cable Integrity: The use of cable clips for securing wires is a maintenance-oriented feature. By preventing cables from interfering with moving parts of the garage door, it reduces wear and tear, thereby extending the lifespan of the cables and ensuring consistent performance of the system.
  • Adhesive Backing for Mounting: Both the Blackbox and the sensor/activator components use adhesive backing for mounting. While convenient for installation, it's important to ensure the surfaces are clean and dry for optimal adhesion, which contributes to the long-term stability of the mounted components.
  • Troubleshooting Resources: The availability of an online support portal (garageio.com/support) serves as a maintenance feature. Users can consult this resource for solutions to common issues, which might include troubleshooting connectivity problems or sensor malfunctions, effectively guiding them through self-maintenance steps.
  • Firmware Updates (Implied): While not explicitly stated, smart devices like Garageio often receive firmware updates to improve performance, add features, or address security vulnerabilities. Such updates, typically managed through the app or online account, would be a form of ongoing maintenance to keep the system running optimally.
  • Power Adapter Reliability: The system relies on a power adapter for continuous operation. Ensuring the power adapter is securely plugged in and not damaged is a basic maintenance check to prevent power interruptions to the Blackbox.
  • Wireless Network Stability: The system's reliance on a stable wireless network means that maintaining a strong and reliable WiFi signal in the garage area is crucial for consistent performance. This might involve occasional checks of your home router or network configuration if connectivity issues arise.
  • Physical Component Integrity: Periodically checking the physical components—the Blackbox, activator, and sensor—for any signs of damage or dislodgement can help ensure the system continues to function correctly. For instance, ensuring the sensor and activator remain properly aligned is key for accurate door status detection.

In summary, the Garageio system is designed for ease of use and installation, providing remote control and monitoring capabilities for a single garage door with minimal ongoing maintenance requirements, supported by online resources for troubleshooting.

Garageio Blackbox Specifications

General IconGeneral
CompatibilityiOS, Android
Mobile AppGarageio App
Voice ControlAmazon Alexa, Google Assistant
Number of Doors Supported1
Remote MonitoringYes
Remote ControlYes
ConnectivityWi-Fi
AlertsDoor status
InstallationDIY