8
IRIS
Versión motor por fuera:
Motor version on the outside:
E
GB
Option moteur a l´exterieur:
Versione motore x esterno:
F
I
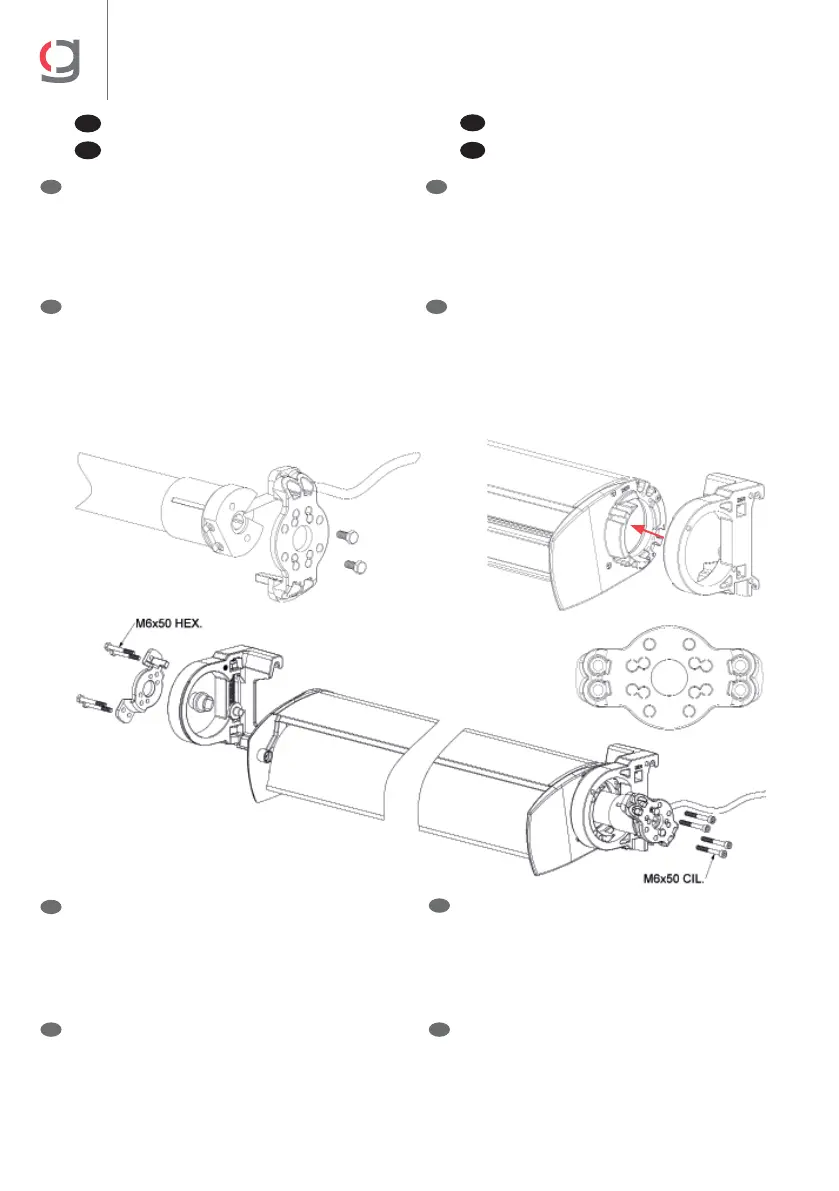
a). En el extremo motor, atornillar el motor al
soporte motor, ensamblar el soporte fi jo
(extremo del cofre que llevará el motor), con
el soporte móvil y fi nalmente, introducir el
conjunto soporte/motor en el eje. Con los
tornillos M6, atornillar los tres soportes.
b). En el extremo punto, colocar por este orden:
1. Soporte fi jo.
2. Bócola punto.
3. Soporte punto.
Colocar los tornillos M6 para sujetar las
piezas al soporte móvil. No apretar.
a). At the motor side, screw down the motor
to the motor support, assemble the fi xed
support (box side that will incorporate the
motor) with the mobile support and fi nally,
introduce the motor/support set into the
tube. Tighten then the three supports with
the M6 screws.
b). Place the parts in the round pivot side of the
tube following this order:
1. Fixed support.
2. Plastic bearing for round pivot.
3. Motor/round pivot support.
Put the M6 screws for fi xing the pieces to
the mobile support. Do not tighten.
a). Au côté moteur, visser le moteur au support
moteur, assembler le support fi xe (extrémité
du co re qui portera le moteur), avec le
support réglable et fi nalement, introduire
l´ensemble support/moteur dans l´axe.
Avec les vis M6, visser les trois supports.
b). Au côté opposé, placer dans l´ordre suivant:
1. Support fi xe.
2. Boucle pour côté opposé.
3. Support côté opposé.
Placer les vis M6 pour fi xer les pièces au
support réglable. Ne pas serrer.
a). Al lato motore, avvitare al supporto
motore, assemblare il supporto fi ssato
(lato cassonetto che incorporerà il motore)
con l’appoggio mobile e successivamente
introdurre il supporto motore nel tubo.
Stringere poi i tre appoggi con le viti M6.
b). Porre l pezzi in questo ordine, nel lato perno
rotondo.
1. Supporto fi sso.
2. Plastica per perno rotondo.
3. Supporto Perno rotondo motore.
Porre le viti M6 x il fi ssaggio dei pezzi al
supporto mobile. Non stringere.
E
E
GB
GB
F
F
I
I
 Loading...