Do you have a question about the Gazebo penguin 430133 and is the answer not in the manual?
Lists all components and their identifiers for the cooler cart assembly.
Install the 4 plastic clips (C) on the tablets using self-tapping screws (D).
Screw legs (L1/L2) to top box (B) with bolts (G, F) and washers (I) using allen wrench (O).
Attach shelf handle (S) to top box (B) using bolt (F), washer (I), plastic washer (K) and nylon lock nut (J).
Fix the corners of the bottom panel (P) under the brackets of the legs (L1/L2) using bolt (F) and washer (I).
Fix the sides of the bottom panel (P) under the brackets of the legs (L1/L2) using bolt (H) and washer (I).
Install the wheels (E) onto the bottom of the cooler cart legs.
Turn the unit back to its standing position and ensure shelf handles are lifted.
Insert drain tube (M) into drain fittings (E3, E4) and lock with drain fastener (E2).
Insert the rubber plug (L) into the drain hole.
Screw the bottle opener (A) onto the side of the cooler cart using bolts (F).
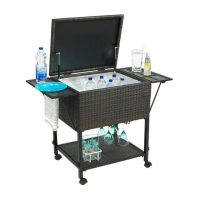
Fill the cooler cart with ice and beverages and enjoy its use.
Provides important advice for maintaining the cooler cart and preventing damage.
Details the warranty period and coverage for material and manufacturing defects.
Outlines how to exercise the warranty and specific conditions that may void it.
| Brand | Gazebo penguin |
|---|---|
| Model | 430133 |
| Category | Outdoor Cart |
| Language | English |