EasyManua.ls Logo

Gazebo penguin 43224 - User Manual

Gazebo penguin 43224
19 pages
Print Icon
To Next Page IconTo Next Page
Loading...
43224
12’x14’ GAZEBO
ASSEMBLY INSTRUCTIONS
DO NOT DESTROY THE BOXES UNTIL COMPLETELY ASSEMBLED
PLEASE VERIFY THE CONTENT OF EACH BOX AGAINST THE LIST OF PARTS
Assembly with more than one person recommended
Tools required (not provided):
6ft (1.8m) stepladder, Robinson #2 Screwdriver, mallet, safety gloves & glasses, tarp or
protective material for placing parts on during assembly, tape measure, 1'X2"X4" wood.
customerservice@gazebopenguin.com
Question and Answer IconNeed help?

Do you have a question about the Gazebo penguin 43224 and is the answer not in the manual?

Summary

Gazebo Assembly Instructions

Step 1: Assemble Base Frame

Assemble beams and plates to create the main rectangular base structure for the gazebo.

Step 2: Attach Foot Plates to Legs

Attach foot plates to each of the gazebo legs using specified bolts.

Step 3: Attach Legs to Frame

Lift the beam assembly and attach each leg to a corner, securing with bolts.

Step 4: Install Joint and Corner Covers

Install middle joint covers and corner covers at the beam junctions using screws.

Step 5: Attach Rafters to Hub and Frame

Attach mounting brackets to rafters, lift the central hub, and connect rafters to the hub and frame.

Step 6: Install Top Cap

Install the top cap over the central hub, securing it with washers and acorn nuts.

Step 7: Install Flashings

Install flashings onto the beam assembly using screws, ensuring notched ends go into corners.

Step 8: Install Curtain Rails

Install curtain rails on the inside of the beam assembly using bolts.

Step 9: Slide Polycarbonate Roof Panels

Slide polycarbonate panels into the grooves between rafters, ensuring the sun-facing side is outward.

Step 10: Insert Middle Roof Joints

Insert middle roof joints between rafters and under panels, tapping lightly to secure.

Step 11: Install Remaining Roof Panels

Slide remaining polycarbonate panels into the lower grooves of rafters and roof joints.

Step 12: Install Edgings and End Caps

Install edgings and end caps at junctions and corners, securing them with bolts.

Step 13: Install Upper and Lower Crossbars

Install upper crossbars on the roof interior using bolts, tightening them after all are in place.

Step 14: Secure Foot Plates to Ground

Secure foot plates to the ground using screws and washers, or lag shields if needed.

Step 15: Install Curtains and Rail Caps

Install screen curtains in the interior groove and privacy curtains in the exterior groove of curtain rails.

Final Assembly Checks and Notes

Ensure all screws and bolts are tight and consider cable guides for windy conditions.

Product Information and Support

Maintenance Notes

Advised maintenance includes keeping roof clear of snow and ensuring all fasteners are tight.

One Year Limited Warranty

Product is warranted against defects for one year, excluding damage from weather or improper installation.

Overview

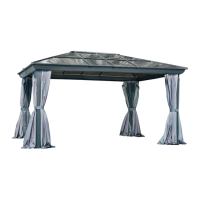
This document provides assembly instructions and a parts list for the Gazebo Penguin Inc. 12'x14' Gazebo, model number 43224. It also includes important notes on installation, maintenance, and warranty information.

Function Description:

The Gazebo Penguin Inc. 43224 is a 12'x14' gazebo designed to provide a sheltered outdoor space. It features a roof structure with polycarbonate panels, curtain rails for screen and privacy curtains, and a sturdy frame. The gazebo is intended for four-season use, provided the roof is kept free of snow accumulation.

Important Technical Specifications:

  • Model Number: 43224
  • Dimensions: 12'x14' (referring to the base dimensions). The roof overhang dimensions are 13'-4" x 15'-11 1/4".
  • Height: 110" (2.79m) at the central hub.
  • Frame Material: Aluminum (implied by "Aluminium Roof Joint" in Sketch 10).
  • Roof Material: Polycarbonate panels.
  • Curtains: Includes screen curtains ("Ww") for the interior groove and privacy curtains ("Xx") for the exterior groove of the curtain rails.
  • Color Options: Available in Dark Brown (43224-22) and Slate (43224-32), as indicated by the parts lists.
  • Anchoring: Designed to be anchored on a solid base with provided screws; alternative anchors may be needed for different surfaces.

Usage Features:

  • Outdoor Shelter: Provides a covered area for various outdoor activities.
  • Four-Season Design: Engineered for year-round use, with the caveat of snow removal from the roof.
  • Curtain System: Equipped with dual curtain rails to accommodate both screen curtains (for insect protection) and privacy curtains.
  • Spacious Design: The 12'x14' footprint offers a substantial area.
  • Robust Construction: The assembly involves securing beams, legs, and rafters with numerous bolts and screws, suggesting a stable structure.
  • Aesthetic Appeal: The design includes decorative elements like top caps, edgings, and covers for joints, contributing to a finished look.

Assembly Features:

  • Multi-Person Assembly Recommended: The manual explicitly suggests assembly with more than one person, indicating that some steps may require lifting heavy components or coordinating multiple actions.
  • Step-by-Step Instructions: The manual provides detailed, numbered steps with corresponding sketches (Sketch 1 through Sketch 15) to guide the assembly process.
  • Clear Part Identification: Parts lists are provided for both Dark Brown and Slate versions, including part numbers, descriptions, quantities, and diagrams, making it easy to identify components.
  • Tools Required (not provided):
    • 6ft (1.8m) stepladder
    • Robinson #2 Screwdriver
    • Mallet
    • Safety gloves & glasses
    • Tarp or protective material for placing parts on during assembly
    • Tape measure
    • 1'X2"X4" wood (for specific tapping actions)
  • Sequential Construction: The assembly progresses logically from the base frame to the legs, roof structure, roof panels, edgings, crossbars, and finally the curtains.
  • Pre-Drilled Holes: The use of bolts and screws implies pre-drilled holes for accurate alignment.
  • Adjustable Components: Instructions for "tapping" panels into grooves and adjusting middle roof joints suggest some flexibility and fine-tuning during assembly.

Maintenance Features:

  • Snow Removal: Crucially, the roof must be kept free of snow accumulation to prevent collapse, despite its four-season design.
  • Anchoring Verification: It is important to ensure the gazebo is properly anchored to a solid base to withstand environmental conditions.
  • Tightening Fasteners: A final "IMPORTANT NOTES" section emphasizes making sure all screws and bolts are tight.
  • Wind Resistance: In windy conditions, adding cable guides at the corners is recommended.

Warranty and Support:

  • One-Year Limited Warranty: The product comes with a one-year limited warranty covering material and manufacturing defects from the date of purchase.
  • Warranty Conditions: The warranty applies to the original purchaser with a bill and requires adherence to installation instructions and proper anchoring. It does not cover damages from vandalism, abuse, falling objects, snow accumulation, extreme weather (thunderstorms, hail, strong wind, snow storms), or acts of God.
  • Customer Service: For defective or damaged parts, or other product questions, customers are directed to contact Gazebo Penguin Customer Service directly, rather than returning the product to the place of purchase. Contact numbers are provided for Montreal (514-276-3485) and elsewhere (1-800-737-7174). An online claim form is also available.
  • Parts Ordering: Customers should have the parts list and part numbers on hand when ordering replacement parts.
  • Repair/Replacement Discretion: Gazebo Penguin reserves the right to replace or repair any defective product or parts at their discretion.

Installation Considerations:

  • Location: The gazebo should not be installed adjacent to trees or a sloped roof, as snow and ice may slide onto it and cause collapse.
  • Base: It is important to anchor the gazebo on a solid base. If the provided screws are insufficient for the surface, appropriate anchors must be used.
  • Box Retention: Customers are advised not to destroy the boxes until the gazebo is completely assembled, likely for part identification and potential returns.
  • Part Verification: It is crucial to verify the content of each box against the list of parts before starting assembly.

Gazebo penguin 43224 Specifications

General IconGeneral
BrandGazebo penguin
Model43224
CategoryOutdoor Furnishing
LanguageEnglish

Related product manuals