Do you have a question about the Gazebo penguin W1207 and is the answer not in the manual?
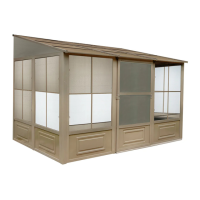
Essential reading for safe and correct assembly, including important warnings.
Position and prepare door frames D3 and B3 using specific joints.
Slide vertical guides Vv-3, Ww-3 and top frame connectors Yy-3, Zz-3 into place.
Assemble and secure wall track and vertical tracks to the wall.
Mount polycarbonate panels onto horizontal guides using specified joints and screws.
Secure the primary rafters (T-3, S-3) to the frame using provided hardware.
Manually install U-3 rafters on panels and joints using screws.
Insert roof panels into the rafter grooves, ensuring correct orientation for sunlight.
Fit the middle roof joint between rafters and secure it with specific connectors.
Insert the second set of roof panels into the lower rafter grooves.
Install edging and brackets manually along the roof structure.
Install threaded inserts and screws into the top rafter rows for panel securing.
Assemble the door unit by sliding tracks and attaching stoppers and end caps.
Mount the assembled door unit onto the solarium opening and attach the latch.
Securely anchor the solarium to the deck or floor using supplied hardware.
Instructions on how to remove screens and wind panels from the solarium.
Guidance on cleaning, clearing snow, and contacting manufacturer for issues.
Details of the product warranty, covering defects for one year from purchase.
Steps to follow for claiming warranty, including inspecting parts and contacting service.
Exclusions from warranty coverage, such as vandalism or extreme weather.
| Brand | Gazebo penguin |
|---|---|
| Model | W1207 |
| Category | Outdoor Furnishing |
| Language | English |