EasyManua.ls Logo

Gazebo penguin FLORENCE User Manual

Default Icon
54 pages
Go to English
To Next Page IconTo Next Page
Page #1 background imageLoading...
Page #1 background image
1
FLORENCE - 12 x 15 TOIT DACIER SABLE
F L E N C E - 12 x 15 M E T A L R O O F
MANUEL D'INSTRUCTIONS
INSTR UCT ION MANUAL
sku: 41215MR-GP-12
sku: 41215MR-GP-32

Other manuals for Gazebo penguin FLORENCE

Question and Answer IconNeed help?

Do you have a question about the Gazebo penguin FLORENCE and is the answer not in the manual?

Gazebo penguin FLORENCE Specifications

General IconGeneral
BrandGazebo penguin
ModelFLORENCE
CategoryGarden Houses
LanguageEnglish

Summary

Solarium Safety and Assembly Preparation

Key Solarium Safety Warnings

Important safety precautions for solarium use, including snow removal and outdoor environment considerations.

Pre-Assembly Checks and Requirements

Essential steps before assembly: foundation checks, tool gathering, and environmental awareness.

Secure Solarium Anchoring Guidelines

Solarium Care and Maintenance

Cleaning Solarium Roof Panels

Recommended methods for gently cleaning roof panels without abrasive materials or harsh chemicals.

Cleaning Solarium Structure

Instructions for cleaning the solarium frame, emphasizing mild soap and water solutions.

Solarium Assembly: Initial Steps

Essential Tools for Solarium Assembly

List of necessary tools for assembly, noting that some items are not included with the product.

Step 1: Assembling Door Frames

Door Panel Connection Tips

Tips for smoothly connecting door frame parts, ensuring proper fit and operation.

Step 2: Installing Gap Cover Bars

Step 3: Door Rail and Stopper Installation

Step 4: Sliding Door Component Installation

Sliding Door Adjustment Guidance

Advice on adjusting the sliding door for optimal and smooth movement after installation.

Step 5: Connecting Roof Rafters

Rafter Angle Adjustment Tip

Note advising against immediate full tightening of bolts to facilitate roof panel angle adjustments.

Step 6: Installing Remaining Rafters

Rafter Alignment and Tightening

Guidance on aligning rafters and brackets, with a reminder to delay final bolt tightening.

Step 7: Securing Roof Finishing Bars

Final Tightening Check

Reminder to ensure all screws and bolts are tight upon completion of finishing bar installation.

Step 8: Brackets and Bars Installation

Bar Installation Tightening

Emphasis on ensuring all screws and bolts are securely tightened after installing the bars.

Step 9: Installing Bottom Roof Panels

Bottom Roof Panel Placement

Instruction to use stickers for correct placement of bottom roof panels.

Step 10: Installing Upper Roof Panel (Aa)

Upper Roof Panel Placement

Guidance to consult stickers for accurate placement of upper roof panels.

Step 11: Securing Roof Panels

Step 12: Installing More Roof Panels

Step 13: Attaching the Top Cap

Step 14: Installing the Last Roof Panel

Step 15: Final Roof Panel Cover Installation

Step 16: Unit Securing and Anchoring

Drainage Hole Installation

Inserting plastic plugs into drain holes and securing the unit with anchoring suitable for the floor.

Flooring Drainage Recommendations

Concrete Floor Drainage Tips

Recommended method for drilling panel holes to ensure drainage on concrete flooring.

Wooden Deck Drainage Tips

Guidance on drilling through wooden decks to facilitate drainage at designated hole locations.

Solarium Dimensions and Specifications

Product Warranty Details

One-Year Manufacturing Warranty

Warranty coverage for one year against defects in material or workmanship.

Warranty Limitations and Exclusions

Details of conditions and events that are not covered by the product warranty.
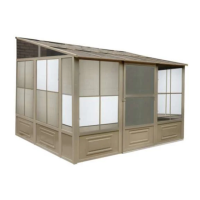
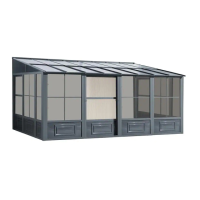
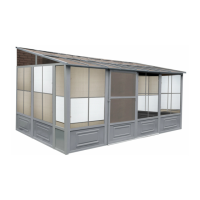
Related product manuals