EasyManua.ls Logo

Gazelle T8 - User Manual

Gazelle T8
4 pages
Print Icon
To Next Page IconTo Next Page
Loading...
T8 CAMPING TENT
ASSEMBLY AND USE INSTRUCTIONS
BEFORE YOU BEGIN
Locate a level site clear of all debris and sharp objects to
prevent tears while setting up your tent.
Do not set up your tent under any overhead obstructions in
case of falling objects or lightning strikes in inclement weather.
The Gazelle 2-room camping tent can be set up and taken down
with the oors installed in the unit. It is recommended that the
rain y and gear lofts be taken down before collapsing the tent.
SET-UP INSTRUCTIONS
1. Remove the camping tent from the carrying bag. Remove the tie strap from around the unit. [ SEE FIGURE 1 ]
2. Lay the tent at on the ground and check that there is no material twisted or overlapping the ends of any poles. DO NOT force
shelter when folding or unfolding. Watch for the entanglement of poles. [ SEE FIGURE 2 ]
NOTE: For easy set-up in windy conditions, make sure to position a narrow end of the tent into the wind, and stake down both corners
through the provided grommets.
3. Grasp the webbing loop sewn onto the eyelet located in the center of one of the walls and pull outward until the wall pops open.
[ SEE FIGURE 3 ]
NOTE: For added assistance, grasp the top seam of the panel and place your foot on the bottom edge when popping open a side wall
panel to help hold the tent in place.
4. Proceed by walking around the entire tent, pulling out on each webbing loop until all the side walls are popped out.
[ SEE FIGURE 4 ]
NOTE: At this time the rain y can be assembled. See INSTALLING THE RAIN FLY.
Detachable oors
Detachable overhead
gear lofts
Tie-down ropes
Gazelle™ T8 Camping Tent
Ground stakes/storage bag
Detachable rain y
WHAT’S INCLUDED IN THE BAG
SIDE WALL
FIGURE 2
FIGURE 3
FIGURE 4
FIGURE 1
ROOF
WALL
34137
|
REV1 03/30/2020
|
© Copyright 2020 Ardisam, Inc.
|
All Rights Reserved.
WARNING
READ AND UNDERSTAND ALL ASSEMBLY, INSPECTION, & USE
INSTRUCTIONS PROVIDED BEFORE EACH USE. FAILURE TO FOLLOW
INSTRUCTIONS COULD RESULT IN SERIOUS INJURY OR DEATH.
NEVER ALLOW CHILDREN TO PLAY IN THIS PRODUCT UNATTENDED.
KEEP ALL FLAME AND HEAT SOURCES AWAY FROM THIS TENT FABRIC.
THIS TENT IS MADE WITH FLAME RESISTANT FABRIC WHICH MEETS
CPAI-84 SPECIFICATIONS. IT IS NOT FIREPROOF. THE FABRIC WILL
BURN IF LEFT IN CONTINUOUS CONTACT WITH ANY FLAME SOURCE.
THE APPLICATION OF ANY FOREIGN SUBSTANCE NOT THE TENT FAB-
RIC MAY RENDER THE FLAME RESISTANT PROPERTIES INEFFECTIVE.
THE USE OF ELECTRICAL DEVICES IS NOT RECOMMENDED INSIDE THE
GAZELLE CAMPING TENT.
Question and Answer IconNeed help?

Do you have a question about the Gazelle T8 and is the answer not in the manual?

Summary

Warning and Safety Precautions

Whats Included in the Bag

Set-up Instructions

Remove Tent from Bag

Remove the camping tent from the carrying bag and untie the strap.

Lay Tent Flat and Check Poles

Lay tent flat, ensure no material is twisted or overlapping poles.

Pop Open Side Walls

Pull webbing loop on eyelet to pop open a side wall panel.

Complete Side Wall Setup

Walk around tent, pulling webbing loops to pop out all side walls.

Freestanding and Securing Tent

Pop Up Roof Hub

Push up on the roof hub from inside the tent to pop it into position.

Secure Tent to Ground

Fasten tent to ground using stakes and tie-down ropes for proper tension.

Installing the Floor

Align Floor Tabs

Spread floor loosely and align colored tabs with tent wall panel color tabs.

Attach Hook and Loop

Press hook and loop strips together starting from the center of each wall.

Installing the Rain Fly

Slide Rain Fly Over Tent

Slide rain fly loosely over the tent roof with short poles underneath.

Connect Rain Fly Poles

Insert rain fly poles into corresponding roof pole sockets for each corner.

Fasten Rain Fly

Fasten plastic hook to eye-bolt and unroll side panels for full rain protection.

Removing the Rain Fly

Unhook Rain Fly

Unhook plastic hook and release tie-down ropes.

Pull Down Roof Hubs

Enter tent and pull down the roof hubs.

Remove Rain Fly Poles

Pull all four rain fly poles out of roof pole sockets.

Slide Off Rain Fly

Slide the rain fly off of the tent.

Take-Down Instructions

Remove Stakes and Ropes

Remove all stakes and tie down ropes.

Collapse Roof Hub

Pull the center hub downward to collapse the roof.

Collapse Side Walls

Push inward on side walls to collapse them after zipping doors shut.

Fold Tent for Storage

Gather corners, fold tent, and secure with tie strap for carry bag insertion.

Safety and Maintenance Instructions

UV Ray Protection

Limit UV exposure to prevent fading and degradation of tent fabric.

Wind and Weather

Take down tent when not in use and use extra tie-downs during excessive winds.

Drying and Storage

Never put tent away wet; always dry and clean it to avoid mildew.

Long Term Storage

Warranty Information

Overview

The Gazelle T8 Camping Tent is a portable shelter designed for recreational outdoor use, offering a quick and straightforward setup process. It is constructed with flame-resistant fabric that meets CPAI-84 specifications, though it is important to note that the fabric is not fireproof and will burn if left in continuous contact with a flame source. The application of any foreign substance not native to the tent fabric may compromise its flame-resistant properties. The use of electrical devices inside the tent is not recommended.

Function Description:

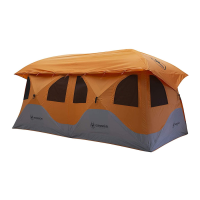
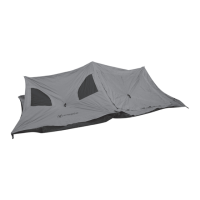
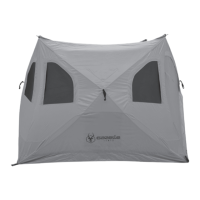
The Gazelle T8 Camping Tent serves as a temporary outdoor shelter, providing protection from the elements. It is designed for easy assembly and disassembly, making it suitable for camping and other outdoor activities. The tent features a two-room design and includes detachable floors, detachable overhead gear lofts, and a detachable rain fly for versatile use in various weather conditions.

Important Technical Specifications:

  • Fabric: Flame-resistant (meets CPAI-84 specifications, but not fireproof).
  • Design: 2-room camping tent.
  • Included Components:
    • Gazelle T8 Camping Tent
    • Ground stakes/storage bag
    • Detachable rain fly
    • Detachable floors
    • Detachable overhead gear lofts
    • Tie-down ropes

Usage Features:

  • Setup:
    1. Preparation: Remove the tent from the carrying bag and untie the strap. Lay the tent flat on the ground, ensuring no material is twisted or overlapping poles. Avoid forcing the shelter during folding or unfolding to prevent pole entanglement. For windy conditions, position a narrow end of the tent into the wind and stake down both corners through the grommets.
    2. Side Wall Expansion: Grasp the webbing loop sewn onto the eyelet in the center of a wall and pull outward until the wall pops open. For added assistance, grasp the top seam of the panel and place a foot on the bottom edge to hold the tent in place. Repeat this process for all side walls by walking around the tent and pulling on each webbing loop.
    3. Roof Expansion: Once freestanding, locate a zippered door and enter the tent. Place one hand on the bottom of a roof hub and push up until the roof pops into position. This step requires caution due to tension in the roof hub and pole assemblies.
    4. Securing: Move outside the tent and secure it to the ground using provided stakes and tie-down ropes. Stakes can be fastened through tent grommets, and tie-down ropes can be tied around hub eye-bolts and tightened to stakes in the ground using adjustment slides. Hammer stakes through the grommets in each corner.
  • Installing Floor:
    1. The tent must be set up before installing the floor.
    2. Spread the floor loosely inside the tent.
    3. Align colored tabs on the floor with corresponding colored tabs on the wall panels to ensure correct fit.
    4. Press the hook and loop strips together, starting at the center of each wall and working towards the corners. The floor can remain attached when taking down and storing the tent.
  • Installing Rain Fly:
    1. The tent must be freestanding with all six walls popped out and the roof collapsed.
    2. Slide the rain fly loosely over the tent roof, ensuring short connecting poles are on the underside.
    3. Orient the rain fly correctly: the small triangular flap with a plastic hook should be along the narrow panel of the permanent sleeping portion of the tent.
    4. Starting at one corner, insert the male end of the short poles attached to the rain fly into the female end of the roof pole. Repeat for all four corners.
    5. Enter the tent and push up to pop up the roof panels. Ensure everyone keeps a safe distance from the outer perimeter when popping the roof panel open and closed.
    6. Outside the tent, fasten the plastic hook to the eye-bolt of the back panel.
    7. For full rain protection, unroll the large side panels along the length of each side of the rainfly. The corners can be fastened to the ground stake also used for the tie-down rope. When not in use, these large side panels can be rolled up and stored along the upper seam of the rain fly. The tent is usable with or without the rain fly installed.
  • Removing Rain Fly:
    1. Unhook the plastic hook from the back panel and release tie-down ropes if secured.
    2. Enter the tent and pull down the roof hubs.
    3. Pull all four rain fly poles out of roof pole sockets.
    4. Slide the rain fly off the tent.
    5. Enter the tent and push up on the roof to re-open those panels.
  • Take-Down Instructions:
    1. Remove all stakes and tie-down ropes.
    2. If the rain fly is installed, remove it first.
    3. If gear lofts are installed, partially remove them by unhooking two adjacent corners to allow the roof hub to move freely.
    4. Enter the tent and pull the center hub downward to collapse the roof. This step requires caution due to tension.
    5. Move outside the tent and zip all doors shut to prevent pole tangling. Push inward on each side wall to collapse them.
    6. The tent will now be flat. Gather all corners and fold together. Do not force the tent and watch for pole entanglement. Partially separating the hook and loop connection between the floor and tent wall can help air escape for quicker, more condensed packing.
    7. Wrap the provided tie strap around the folded tent for easier insertion into the carry bag. Place the folded tent into the carry bag with the hubs always towards the closed end. Place stakes, tie-down ropes, gear lofts, rain fly, and floors into the bag. The tent can be taken down and stored with or without the floor attached.
  • Optional Features:
    • Gear Lofts: To attach gear lofts, insert toggles into the "O" rings on the inside of the roof.

Maintenance Features:

  • UV Protection: Ultraviolet (UV) rays can cause fibers to fade and degrade. To prolong the tent's life, limit its exposure to UV rays by pitching it in shade when possible and not leaving it up longer than necessary. Fading or discoloring of fabric is not covered under warranty.
  • Damage Prevention: Take down the tent when not in use to avoid unnecessary damage. Use extra tie-downs during excessive winds.
  • Cleaning and Storage: Never put the tent away wet. Always ensure the tent is dry and clean before storing to avoid mildew and other problems. For long-term storage, ensure the tent is completely dry and clean, then store it in a cool, dry place away from rodents.

Warranty:

Ardisam, Inc. provides a one-year limited warranty for the Gazelle T8 Camping Tent, covering defects in materials or workmanship for twelve consecutive months from the date of original purchase by the first retail consumer or commercial end user. "Consumer use" refers to personal recreational use, while "commercial use" or "commercial application" includes all other uses, such as commercial, income-producing, or rental purposes. Once a product has been used commercially, it is considered a commercial use product for warranty purposes.

This warranty does not cover tent tears or bent poles resulting from high wind, inclement weather, unattended use, or uses not listed in the owner's manual. It applies to the original owner with proof of purchase and is non-transferable. The warranty period begins on the purchase date for the first retail consumer or commercial end user and continues for twelve consecutive months. For commercial applications, the warranty period is 90 days after purchase. To validate the warranty, the product must be registered by filling out the warranty card and submitting it to Ardisam, Inc. within 30 days of purchase. Ardisam, Inc. is not obligated to ship repair or replacement products to locations outside the United States of America or Canada.

Gazelle T8 Specifications

General IconGeneral
BrandGazelle
ModelT8
CategoryTent
LanguageEnglish

Related product manuals