EasyManua.ls Logo

GE 46211 - User Manual

GE 46211
3 pages
Print Icon
To Next Page IconTo Next Page
Loading...
User Manual of Product 1:
GE 24-Hour Heavy-Duty Indoor Plug-in Mechanical Timer, 2
Pack, 2 Grounded Outlets, 30-Minute Intervals, Daily ON/OFF
Cycle, Lamps, Seasonal, Christmas Tree Lights, Holiday
Decorations, 46211
User Manual of Product 2:
GE 24-Hour Indoor Basic Outlet Timer, 1 Polarized Timer
Outlet, Plug In Timer, Daily On/Off Cycle, 30 Minute Interval, for
Lamps, Seasonal Appliances, & Portable Fans, Light Timer,
15119
Question and Answer IconNeed help?

Do you have a question about the GE 46211 and is the answer not in the manual?

Overview

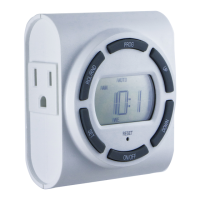
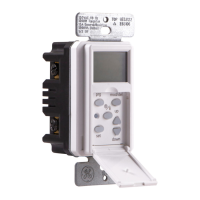
This document provides user manuals for two GE 24-Hour Indoor Mechanical Timers: Product 1 (Model 46211) and Product 2 (Model 15119). Both products are designed to automate the ON/OFF cycling of various indoor electrical devices.

Product 1: GE 24-Hour Heavy-Duty Indoor Plug-in Mechanical Timer (Model 46211)

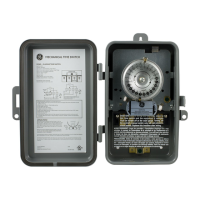
Function Description: The GE 24-Hour Heavy-Duty Indoor Plug-in Mechanical Timer (Model 46211) is a robust mechanical timer designed to automate the power supply to indoor electrical devices. It allows users to set daily ON/OFF cycles for lamps, seasonal decorations, Christmas tree lights, and other holiday decorations. The timer operates on a 24-hour cycle with 30-minute intervals, providing precise control over when connected devices receive power.

Important Technical Specifications:

  • Type: 24-Hour Heavy-Duty Indoor Plug-in Mechanical Timer
  • Outlets: 2 Grounded Outlets
  • Intervals: 30-Minute
  • Cycle: Daily ON/OFF
  • Power Rating: Users must not exceed the rated load. To determine total watts, multiply the ampere rating (found on the appliance's nameplate) by 125 volts. For lamps with multiple bulbs, sum the wattage of all bulbs.
  • Grounding: This is a GROUNDED device, featuring a grounded plug and two grounded outlets.

Usage Features:

  1. Programming Segments: The timer features segments around the outer edge of its dial, each representing 30 minutes. These segments can be pushed down to set "ON" periods and pulled up for "OFF" periods. All segments should be pulled up before programming. To set an ON period, push down all segments corresponding to the desired ON/OFF times. For example, to turn a lamp on at 10:00 PM and off at 2:00 AM, push down the segments representing 10:00 PM, 2:00 AM, and all intervals in between. The dial may need to be rotated clockwise to access specific segments.
  2. Setting Current Time: Rotate the timer's dial clockwise until the pointer on the dial face aligns with the current time of day. Nighttime hours (6:30 PM to 6:30 AM) are indicated by a grey background.
  3. Master Switch: The timer has a master switch with two positions:
    • TIMER ON: In this position, the timer controls the connected appliance according to the programmed schedule.
    • OUTLET ON: This position overrides the timer function, causing the timer to act as a standard outlet, continuously supplying power to the connected device. The timer's dial will still show the current time of day.
  4. Connection: Plug the timer into a convenient electrical outlet. Then, plug the lamp or device into either of the timer's outlets. Ensure the lamp's switch is turned ON for automatic control; the timer will not operate if the lamp's switch is OFF. The programmed ON/OFF cycle will apply to both outlets simultaneously.
  5. Power Failure Reset: In the event of a power failure, the time of day will need to be reset as described in step 2.

Maintenance Features:

  • Cleaning: Unplug the timer before cleaning.
  • Safety: Do not use in wet locations. Use indoors only. Keep children away.
  • Appliance Compatibility: Do not use to control appliances with heating elements (e.g., cooking appliances, heaters, irons) due to fire risk.

Product 2: GE 24-Hour Indoor Basic Outlet Timer (Model 15119)

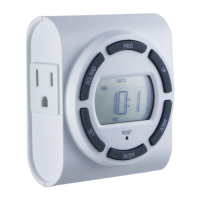
Function Description: The GE 24-Hour Indoor Basic Outlet Timer (Model 15119) is a basic mechanical timer designed for indoor use, providing automated daily ON/OFF cycling for lamps, seasonal appliances, portable fans, and other light-duty applications. It offers precise control over power delivery with 30-minute intervals.

Important Technical Specifications:

  • Type: 24-Hour Indoor Basic Outlet Timer
  • Outlets: 1 Polarized Timer Outlet
  • Intervals: 30-Minute
  • Cycle: Daily ON/OFF
  • Power Rating: Users must not exceed the rated load. To determine total watts, multiply the ampere rating (found on the appliance's nameplate) by 125 volts. For lamps with multiple bulbs, sum the wattage of all bulbs.
  • Polarization: This is a POLARIZED device. It features a polarized plug (one blade wider than the other) and a polarized outlet (one slot longer than the other). The polarized plug is designed to mate with the polarized outlet in only one way (longer slot with wider blade) and is not intended for use with non-polarized outlets.

Usage Features:

  1. Programming Segments: Similar to Product 1, this timer has segments around the outer edge of its dial, each representing 30 minutes. These segments can be pushed down to set "ON" periods and pulled up for "OFF" periods. All segments should be pulled up before programming. To set an ON period, push down all segments corresponding to the desired ON/OFF times. For example, to turn a lamp on at 10:00 PM and off at 2:00 AM, push down the segments representing 10:00 PM, 2:00 AM, and all intervals in between. The dial may need to be rotated clockwise to access specific segments.
  2. Setting Current Time: Rotate the timer's dial clockwise until the pointer on the dial face aligns with the current time of day. Nighttime hours (6:30 PM to 6:30 AM) are indicated by a black background.
  3. Master Switch: The timer has a master switch with two positions:
    • TIMER ON: In this position, the timer controls the connected appliance according to the programmed schedule.
    • OUTLET ON: This position overrides the timer function, causing the timer to act as a standard outlet, continuously supplying power to the connected device. The timer's dial will still show the current time of day.
  4. Connection: Plug the timer into a convenient electrical outlet. Then, plug the lamp or device into the timer's outlet. Ensure the lamp's switch is turned ON for automatic control; the timer will not operate if the lamp's switch is OFF.
  5. Power Failure Reset: In the event of a power failure, the time of day will need to be reset as described in step 2.

Maintenance Features:

  • Cleaning: Unplug the timer before cleaning.
  • Safety: Do not use in wet locations. Use indoors only. Keep children away.
  • Appliance Compatibility: Do not use to control appliances with heating elements (e.g., cooking appliances, heaters, irons) due to fire risk.

GE 46211 Specifications

General IconGeneral
BrandGE
Model46211
CategoryTimer
LanguageEnglish

Related product manuals