This document is a user manual for the Geek Chef Espresso & Cappuccino Maker, model CJ-265E (Item No.: GCF20A).
Function Description
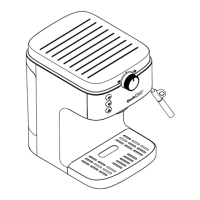
The Geek Chef Espresso & Cappuccino Maker is designed to brew espresso and cappuccino. It features a rotating knob for controlling brewing and steaming functions, as well as buttons for single cup, double cup, and steam. The device includes a porta-filter system for holding ground coffee and a steam tube with a nozzle for frothing milk. It can also dispense hot water.
Important Technical Specifications
- Model No.: CJ-265E
- Item No.: GCF20A
- Rated Voltage: 120V~60Hz
- Rated Power: 1300W
- Water tank capacity: 900ml
- Product Dimension: 256x193x283(mm) / 10.1x7.6x11.1(inch)
Usage Features
Before First Use:
- Unpack the box and check for all parts.
- Before using, test the product with only water. Clean parts that come into contact with food.
- Connect the machine, check that the ON/OFF button is not pressed, and the Rotating Control Knob is in the central position "0". Test with water.
- Follow steps to fulfill the priming of the unit when first starting:
- Ensure the water tank is filled to the MAX mark.
- Do NOT overfill the Max mark.
- Plug in and turn on the machine. The buttons on the control panel will flash red and blue by turns.
- Keep the rotating knob in the middle position. Don't rotate the knob.
- Press any button, the unit will start pumping a small amount of water and exit to the drip tray. Wait until the water finishes, then the unit will enter the pre-heating mode.
- The button will stop flashing when pre-heating is finished. Gently remove the drip tray and pour out the dispensed water. The unit is ready for use.
- Above simple operation ensures optimum dispensing and must be carried out: when first starting, when the machine has been out of use for a long time (1 or 2 weeks), and when the tank has run out of water.
- Fill water into the water tank, not exceeding the MAX line. Set up the water tank vertically and align the buckles to the hole on the back of the machine, and press it down to be parallel to the top of the machine.
- Plug in the power cord, press the power switch to the "on" position, all blue indicator lights will flash as the appliance starts heating.
- Place a cup on the drip tray, turn the knob to the coffee brewing side. Pour away the water of the cup.
- Press the Single Cup or Double Cup button.
Making Espresso:
- Fill water into the water tank, not exceeding the MAX line. Set up the water tank vertically and align the buckles to the hole on the back of the machine, and press it down to be parallel to the top of the machine.
- Plug in the power cord, press the power switch to the "on" position, all blue indicator lights will flash as the appliance starts heating.
- Select the desired filter and insert it into the porta-filter. To remove the filter, use the edge of one filter to pop out the other filter, for filter exchanging or cleaning.
- Use the measure scoop to measure the quantity of fine ground coffee to your desired filter. Evenly press down the ground coffee into the filter with the flat end of the measure scoop. Please keep the rim of the filter clean after each filling.
- Install the porta-filter into the coffee outlet at the "Unlock" position. Hold the machine by one hand, using another hand to twist the porta-filter anticlockwise from the direction of "Unlock" to "Lock".
- Place a cup on the drip tray, turn the knob to the coffee brewing side. Pre-heated cups are recommended. Press down the coffee button (Single or Double cup, the button will start to flash. The unit will start the pre-brewing for 3 seconds, and then coffee brewing.
- The unit will stop automatically when coffee brewing is finished. Coffee button indicators will stay on.
- During coffee brewing, you can press the coffee button again to stop the operation if you like.
- Rotate the knob again to the "0" position to enter Standby mode after each use. This will help to remove the porta-filter easily.
Frothing Milk:
- Fill water into the water tank, not exceeding the MAX line. Set up the water tank vertically and align the buckles to the hole on the back of the machine, and press it down to be parallel to the top of the machine.
- Plug in the power cord, press the power switch to the "on" position, all blue indicator lights will flash as the appliance starts heating.
- Press the Steam button, the Steam indicator will flash as steam preheating. When the indicator stays on, the machine is ready to steam.
- Pour desired amount of milk into the milk jug. Place the milk jug under the steam tube & nozzle. Dip the steam nozzle into the milk. The milk must be at refrigerator temperature (not hot!).
- Rotate the knob to the steam position. The steam button will illuminate. The unit will start making steam out of the steam tube & nozzle.
- Rotate the milk jug with slow movements from the bottom upwards. Until your desired foaming is reached, rotate the knob back to the "0" position and your milk froth is ready with steam button light off, two coffee buttons light on.
- Remove the milk jug away. Use a damp cloth to remove the milk residue on the steam tube & nozzle.
Hot Water:
- Rotate the knob to the steam position when the unit is on standby mode.
- Place a cup right under the steam tube & nozzle.
- Press the Single Cup coffee button. The Single Cup coffee button will flash.
- The unit will start making hot water from the steam tube & nozzle. When the desired water volume is reached, rotate the knob back to the "0" position to stop hot water making.
- The unit will back to standby mode with coffee button light on.
Maintenance Features
Basic Cleaning:
- Disconnect the appliance from the mains and let it cool before cleaning it with a damp cloth.
- Do not let water or any other liquid get into the machine.
- After washing, dry all parts before fitting them together and storage.
- To clean the steam tube and nozzle after milk frothing, use a damp cloth to remove milk residue on the steam nozzle cover and wash it by clean water. Use the wet cloth to remove milk residue on the steam tube after removing the steam nozzle cover. Repeat with steam function after cleaning finished to make sure steam can come out from the nozzle. In case no steam comes out, carefully use a needle to lose the milk residue from the steam nozzle to remove the blockage. Rinse with clean water and dry it.
- Detach the Drip Tray, pour away the water of the Drip Tray, rinse with clean water and dry it.
Tips for Cleaning the Steam Nozzle:
- Warning: Please mind the hot water and operate carefully. In order to prevent the steam nozzle from blocking and make it easier to clean, it is suggested to clean immediately after frothing milk.
- Note: If it is not cleaned in time, it will produce bacteria and bad smell which is not good for health.
- After the blue indicators stop flashing, turn the knob to the Steam side. If the steam is weak, check whether the hole of the froth nozzle is blocked. You can use a cleaning pin to clean and unblock the steam nozzle.
- Press and hold the frothing wand, separate the stainless sleeve and pull it out. Clean the nozzle with a wet sponge.
Tips for Cleaning the Seal Ring:
- Uninstall the porta-filter in parallel from the coffee outlet from the direction of "Lock" to "Unlock", then put it down. Pour away the coffee powder.
- After the blue indicators stop flashing, turn the knob to the coffee brewing side, press the Single Cup or Double Cup Button. The water will come out and flush out the coffee powder inside.
- Turn the knob back to "0" position to stop. Let the machine cool down first, then rinse the seal ring with cloth.
Descaling:
Step 1:
- Fill in the water tank with Detergent and water till Max mark.
- Select any filter to put into the porta-filter. Position the porta-filter to the machine. Place a larger container right under the brewing outlet and the steam tube & nozzle.
- Rotate the knob to the coffee position. Press the steam button for more than 5 seconds. The unit will start the descaling of the coffee brewing system for 5 minutes. During the descaling, the button lights of single cup, double cup and steam will flash once one by one. When the cycle is finished, the buttons of single cup, double cup and steam will flash simultaneously.
- Rotate the knob back to steam position to start the descaling of the steam system. During the descaling, the button lights of single cup, double cup and steam will flash once one by one. The cycle will take 5 min and when it finishes, lights of single cup button and double cup button will flash one by one, and steam button light will be on. This means the descaling completes.
Step 2:
- Pour out the mixture of detergent from the water tank. Add fresh water into the water tank to max mark, and put water tank back to the unit.
- Rotate the knob back to steam position, press the steam button to start the steam system cleaning. The button lights of single cup, double cup and steam will flash twice one by one. The cycle will take 1 min. When it finishes, the button lights of single cup, double cup and steam flash simultaneously.
- Rotate the knob back to coffee function to start again the cleaning of coffee brewing system. The button lights of single cup, double cup and steam will flash twice one by one. The cycle will take 1 min. When it finishes, the unit will enter pre-heating mode.
Volume Adjusting:
- Notice:
- Min. Volume for single cup or double cup: 25g
- Max. Volume for single cup: 100g (Default volume: approx.40g)
- Max. Volume for double cup: 200g (Default volume: approx.80g)
- Select any filter to put into the porta-filter. Position the porta-filter to the machine. Press any coffee button and keep pressing it down until desired volume is reached. Then release the selected button, the desired volume will be reached.
Reset to Default Setting:
- Fill water into the water tank NOT exceed the MAX line. Plug the machine in.
- Switch off the unit. Rotate the control knob to steam function.