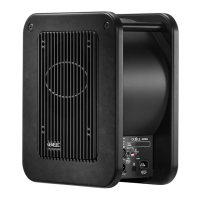
function can be disabled by setting the
“ISS” switch to the “OFF” position. Then
the subwoofer is continuously powered and
can be turned o using the power button on
the remote control or connector panel.
LED Off
This switch deactivates the status indicator
LED on the “foot” of the subwoofer.
Roll-Off
These two switches attenuate the sub-
woofer’s bass response below 27 Hz.
Attenuation levels are -2, -4 and -6 dB
(both switches “ON”).
Phase
These two switches provide phase adjust-
ment for the subwoofer in -90 degree incre-
ments. See chapter “Phase Alignment”.
Link
This switch selects the analog inputs and
disables input channel selection. In addi-
tion, it disables the remote control and sets
the subwoofer’s level to maximum. Set this
switch to “ON”, when using the subwoofer
as a “slave” in a multiple subwoofer system.
See chapter “Using Multiple Subwoofers”.
Level
These two switches allow adjusting the
subwoofer’s level by -10 dB or +10 dB,
providing level matching with different
main speaker models. See Table 2 for some
examples.
Subwoofer Level
This rotary adjustment adjusts the play-
back level of the subwoofer. The level is
increased by turning the adjustment clock-
wise and reduced by turning it counter-
clockwise.
Select
This button allows signal input selection
between the two digital inputs and the
analog input and initiation of the match-
ing procedure for IR remote controls (see
Matching IR Remote Controls).
Power
This button switches the subwoofer
between Standby and Power mode. Note
that this button does not completely dis-
connect the subwoofer from the mains
power. If this is necessary, the subwoofer’s
mains cable must be disconnected. This
button can also be used for restoring the
factory settings by keeping it depressed for
10 - 15 seconds. This returns the volume
setting on the remote control to factory
level and deletes possible remote control
pairing and IR remote control matching.
Also the source selection returns to auto-
matic, which is the factory setting.
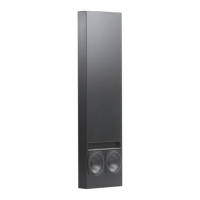
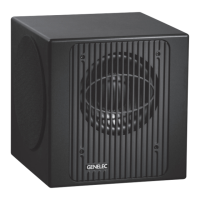
Positioning In The Room
The placement of the subwoofer in the
room aects the overall frequency response
and sound level of the system dramatically,
as at low frequencies the effects of the
room are strong. Even a slight change in
the location of the subwoofer can cause a
marked dierence in the frequency balance
and often patient and methodical experi-
mentation and testing is needed to nd the
optimum placement.
The placement will also aect the bass
roll-off rate and the phase difference
between the main loudspeakers and the
subwoofer. These eects can be compen-
sated using the controls in the subwoofer
but we recommend that at rst you leave
the switches untouched and concen-
trate on finding the position where the
subwoofer gives the smoothest response,
and only then use the controls to ne-tune
the balance and phase alignment between
the subwoofer and the main loudspeakers.
Start by placing the subwoofer close to the
center of the front wall. We recommend
a distance of less than 60 cm / 24” to the
wall. This position gives increased acous-
tic loading and sound pressure level due to
the proximity of the front wall and oor. Ide-
ally the subwoofer and main loudspeakers
should be positioned symmetrically and at
an equal distance from the listening position.
If the frequency balance is not quite right,
try moving the subwoofer to the left or right
along the wall so that dierent room modes
are excited at dierent levels. Positioning
the subwoofer close to a corner will boost
the bass level at lower frequencies and
may cause asymmetrical spatial imaging.
ISS
TM
Autostart
The automatic power saving function ISS
(Intelligent Signal Sensing) can be activated
by setting the “ISS” switch on the connec-
tor panel to “ON.” Automatic powering
down to standby mode happens after a
certain time when playback has ended. The
power consumption in standby mode is
typically less than 0.5 watts. Playback will
automatically resume once an input signal
is detected from any source.
Alternatively, the subwoofer can be acti-
vated by pushing any button on the remote
control.
There is a slight delay in the automatic
powering up. If this is undesirable, the
ISS
TM
function can be disabled by setting
the “ISS” switch on the connector panel to
“OFF.” In this mode, the subwoofer is pow-
ered on and o using the remote control or
the power button on the connector panel.
The “ISS SENSITIVITY LOW” switch
lowers the triggering sensitivity of the
ISS function. This can be necessary if the
subwoofer “wakes up” even if there is no
audio signal.
Setting The Playback Level
The “LEVEL +10 dB and LEVEL -10 dB”
switches and the rotary “SUBWOOFER
LEVEL” level adjustment can be used for
matching the subwoofer’s playback level
with the main loudspeakers (See Table 2).
Fine tuning can be done with the rotary
adjustment knob.
Setting The Bass Roll-Off
Switches
The acoustic response of the subwoofer
may have to be matched to the charac-
teristics of the room and the positioning in
which it will be used (see Table 1). To adjust
the subwoofer to match these character-
istics use the ‘’BASS ROLL-OFF’ control
switches located on the connector panel.
When all Roll-O switches are ‘OFF’, a at
anechoic response is obtained.
Setting The Phase Control
The effect of incorrect phase alignment
between the main loudspeakers and
the subwoofer is a drop in the frequency
response of the whole system at the main
loudspeaker / subwoofer crossover fre-
quency. The phase dierence between the
main loudspeakers and subwoofer at the
listening position is dependent upon the
distance from the listener to the subwoofer
in relation to the main loudspeakers. To
avoid phase differences between the
left and right main loudspeakers and
the subwoofer, the subwoofer should be
placed close to the center of the front loud-
speaker array.
Two phase matching switches allow
compensation for incorrect phase align-
ment. Four settings are provided between
0° and -270°.

 Loading...