Do you have a question about the General International DP2003 and is the answer not in the manual?
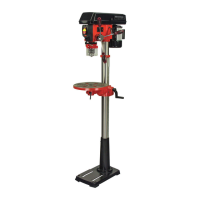
This document is a setup and operation manual for the General International Model # DP2003, a 13-inch floor-mount drill press.
The General International DP2003 is a floor-mount drill press designed for drilling operations. It features a head assembly, a column assembly, a table assembly, and a base. The drill press is equipped with a motor that drives a spindle through a belt and pulley system, allowing for 16 different speeds. A chuck is attached to the spindle to hold drill bits.
A key feature is the patented cross-pattern precision laser alignment and centering guide, which helps illuminate the workpiece and ensure accurate drilling. A built-in LED work light further enhances visibility on the work table.
The machine incorporates safety features such as an easy-access safety switch with a removable security key to prevent unauthorized use and accidental starts. A transparent flip-up chuck safety guard is also included to protect the operator during use.
The table height can be adjusted using a hand crank and a table support lock handle, and it can also rotate around the column and tilt from 0 to 45 degrees, offering versatility for various drilling tasks. A depth stop with a scale allows for precise and repeatable drilling depths.
The drill press is operated using large, soft-grip ergonomic feed handles to control the quill stroke.
Assembly and Setup: The manual provides detailed instructions for assembling the base, column, table, and head assembly. It emphasizes the importance of securely fastening the drill press to the floor to prevent tipping or movement during operation due to its top-heavy design. The rack collar and table support arm are installed on the column, followed by the table and its locking mechanisms. The heavy head assembly requires assistance for safe installation onto the column.
Speed Adjustment: The drill press offers 16 speeds, adjusted by repositioning the drive belts on the pulleys. A speed chart inside the pulley cover and in the manual guides the user in selecting the appropriate speed based on the material being drilled and the drill bit size. Small drill bits and soft materials generally require higher speeds, while large drill bits and hard materials require lower speeds. Belt tension is adjusted using a tensioning handle and lock knobs, ensuring proper belt engagement and preventing slippage.
Chuck and Arbor Installation: The arbor, with its JT3 taper, is inserted into the chuck socket, and then the MT2 taper of the arbor is installed into the quill assembly socket. The chuck key is used to tighten the drill bit securely into the chuck jaws. It is crucial to ensure the drill bit is centered and does not wobble to prevent vibration and inaccurate drilling.
Laser Alignment and Work Light: The patented cross-pattern laser alignment guide projects two lines that intersect at the drilling point, aiding in precise centering. The laser can be adjusted if needed using hex set screws. A built-in LED work light illuminates the work table, reducing shadows and improving visibility.
Table Adjustments: The table height is adjusted by loosening a lock handle and turning a crank handle. The table can rotate around the column and can also be tilted from 0 to 45 degrees using a bevel lock bolt, allowing for angled drilling. The manual stresses the importance of re-tightening all locking mechanisms before operation.
Depth Stop: A depth gauge with a scale and adjustable nuts allows the operator to set and control the drilling depth for consistent and repeatable holes. The lower nut sets the desired depth, and the upper nut locks it in place. A third nut can limit upward retraction of the bit.
Drilling Operation: After selecting the speed, inserting and tightening the drill bit, and adjusting the laser and depth stop, the operator uses the feed handles to slowly lower the drill bit into the workpiece. The manual advises easing pressure when drilling through wood to prevent splintering on the underside. The safety switch requires a removable key to turn the drill press ON, and pressing the switch down turns it OFF. The key can be removed to lock the switch in the OFF position, preventing unauthorized use.
General Maintenance: Regular maintenance is crucial for optimal performance and safety. This includes examining the tool for loose screws, misalignment, binding parts, or damaged components before each use. The power cord should be inspected for wear or damage. Any abnormal noise or vibration requires immediate shutdown and troubleshooting. The tool should be kept clean, dry, and free of oil and grease, using mild soap and a damp cloth for cleaning. Sawdust and metal chips should be vacuumed or blown out from the motor, belt, pulley housing, and table after use.
Lubrication: Ball bearings are factory-greased and sealed, requiring no further lubrication. However, the grooves in the spindle and the teeth of the quill should be lubricated every three months. A light coat of paste wax can be applied to the column and table to prevent rust. The table bracket and locking knobs should be lubricated if they become difficult to use.
Removing the Chuck and Arbor: Instructions are provided for safely removing the chuck and arbor using a drift key. The quill assembly is lowered to its lowest position, the drift key is inserted, and a hammer tap or sharp upward movement of the quill assembly dislodges the arbor and chuck. Caution is advised to catch the falling chuck assembly to prevent damage.
Spindle Play Adjustment: If excessive play is detected in the spindle, the lock nut on the lower left side of the drill press head can be loosened, and a screw turned clockwise to eliminate play. The lock nut must then be re-tightened.
Quill Return Spring Adjustment: The quill return spring, which pulls the spindle back to its resting position, can be adjusted if necessary. This involves unplugging the drill press, locating the spring housing, holding the spring in place with pliers or a screwdriver, loosening two housing nuts, pulling the housing out to clear a raised boss, rotating it to the next notch to increase or decrease tension, and then re-tightening the nuts. The manual warns against overtightening the nuts, as this can restrict spindle movement.
Safety Precautions: The manual includes extensive safety warnings and cautions, covering work area safety, personal safety, tool safety, electrical warnings, and specific rules for drill press operation. It emphasizes wearing safety glasses, avoiding loose clothing, securing the workpiece, and disconnecting power before making adjustments or servicing. The laser safety section warns against staring directly into the laser beam.
| Brand | General International |
|---|---|
| Model | DP2003 |
| Category | Power Tool |
| Language | English |