ASSEMBLY
• With a flashlight, look into the mounting hole that will receive the anemometer axle shaft, on the
back of the wind cups. Check that the set screw is backed off appropriately, not obstructing the
opening.
• Place the wind cups over the axle shaft protruding from the anemometer housing and gently slide
into place.
• Insert the Allen wrench tool provided into the wind cups opening and tighten the small set screw
i
nside.
• Test to assure the wind cups are securely mounted on the anemometer shaft and spin freely
BATTERY INSTALLATION
• Remove four (4) screws from the battery compartment with a small Phillips screwdriver.
• Open the battery compartment and install 2 “AA” batteries (not included) matching the polarities
shown.
• Replace the battery compartment door and secure the screws.
A
LIGNING
• Point the wind direction vane to the North (use a compass or map if necessary).
• Press “SET” opening located inside battery compartment with a paper clip or similar tool. This will
“SET” the local wind direction to North. Continued pressing of “SET” alternately toggles wind
direction between the factory default preset or user set direction.
NOTE
: Repeat this procedure every time after whenever changing the batteries.
MOUNTING
Securely mount the anemometer base to an appropriate vertical surface, using the fittings provided.
PLACEMENT TIPS:
• The anemometer should be mounted in an open area with unobstructed air flow; away from the
nearby trees, buildings or other structures.
• Aim for a maximum exposure of the anemometer to the most common wind directions in the area.
• The suggested mounting height for the anemometer is 33 feet (10meters) above the ground.
MAIN UNIT
The main unit should be placed indoors. It measures: pressure, indoor temperature, humidity, and
receives the US Atomic Clock data and data from each of the remote weather sensors.
FEATURES
Time
• Precise time and date set via RF signals from US Atomic clock
• Selectable 12 or 24 hour time format
• Manual adjustment of time and date
• Calendar displaying date with month and day in 6 languages: English, German, French, Italian,
Spanish and Dutch
• Sunrise/set calculation for over 100 pre-programmed world cities in accordance with the
geographical information entered by the user
• Moon Phase calendar and historical data for the past and future 39 days
• Dual crescendo alarms with programmable snooze
Weather
• Weather forecast for the next 12 to 24 hour in seven large icons: Sunny, Partly Cloudy, Cloudy,
Light Rain, Heavy Rain, Snowy and Unstable.
• Barometric pressure in imperial or metric units
• Altitude adjustment for pressure compensation
• 24 hour barometric pressure history chart
• Multiple weather alarms
• Indoor/Outdoor Temperature & Humidity in up to 3 remote locations (additional sensors required)
• Dew point and comfort level indicators
• Wind speed and wind gust averages and memory
• Wind direction
• Rainfall amount with minimum and maximum memory
• Operating range from 100 feet (30 meters) up to 328 feet (100 meters)
Display
• Light sensor detects low light conditions and LCD lights up automatically when adapter is
connected
Power
• 7.5 V AC/DC adapter for automatic remote control
• 4 “AA” batteries
BATTERY INSTALLATION
• Open the battery compartment door on the back of the main unit.
• Insert 4 “AA” batteries according to the polarities shown and replace the battery compartment
door.
• Connect 7.5 V AC/DC adapter provided to the main display unit and plug into to the wall power
outlet.
NOTE
: The AC/DC adaptor connection is required for automatic backlight control function. When the
main unit operates on battery power alone, the auto backlight control function is disabled.
• Connect the table stand to the back of main unit when placing on a table or other horizontal
surface.
• When mounting the main unit on the wall or vertical surface, detach the table stand and use the
mounting hardware provided.
Placement tips
•
Make sure that the main unit is locating within the operating range of all remote weather sensors.
• Ideally the remote weather sensors should be mounted within the line-of-sight of the main unit.
•
Transmission range may be affected by trees, metal structures and electronic appliances.
• Test reception before permanently mounting all the remote weather sensors.
A
void placing the main unit in the following areas:
• Direct sunlight and surfaces emitting and radiating heat, such as heating ducts or air conditioners.
•
Areas with interference from the wireless devices (such as cordless phones, radio headsets, baby
listening devices) and electronic appliances.
OPERATION
Once the main unit is powered, the display will show all available LCD segments for a moment.
IMPORTANT: All of the display functions will be locked, allowing setting your local altitude or sea level
pressure parameters.
The locked display will show the pressure and weather forecast icon and abbreviation “hPa/
mBar” flashing, indoor temperature and humidity readings and default time “12:00pm”.
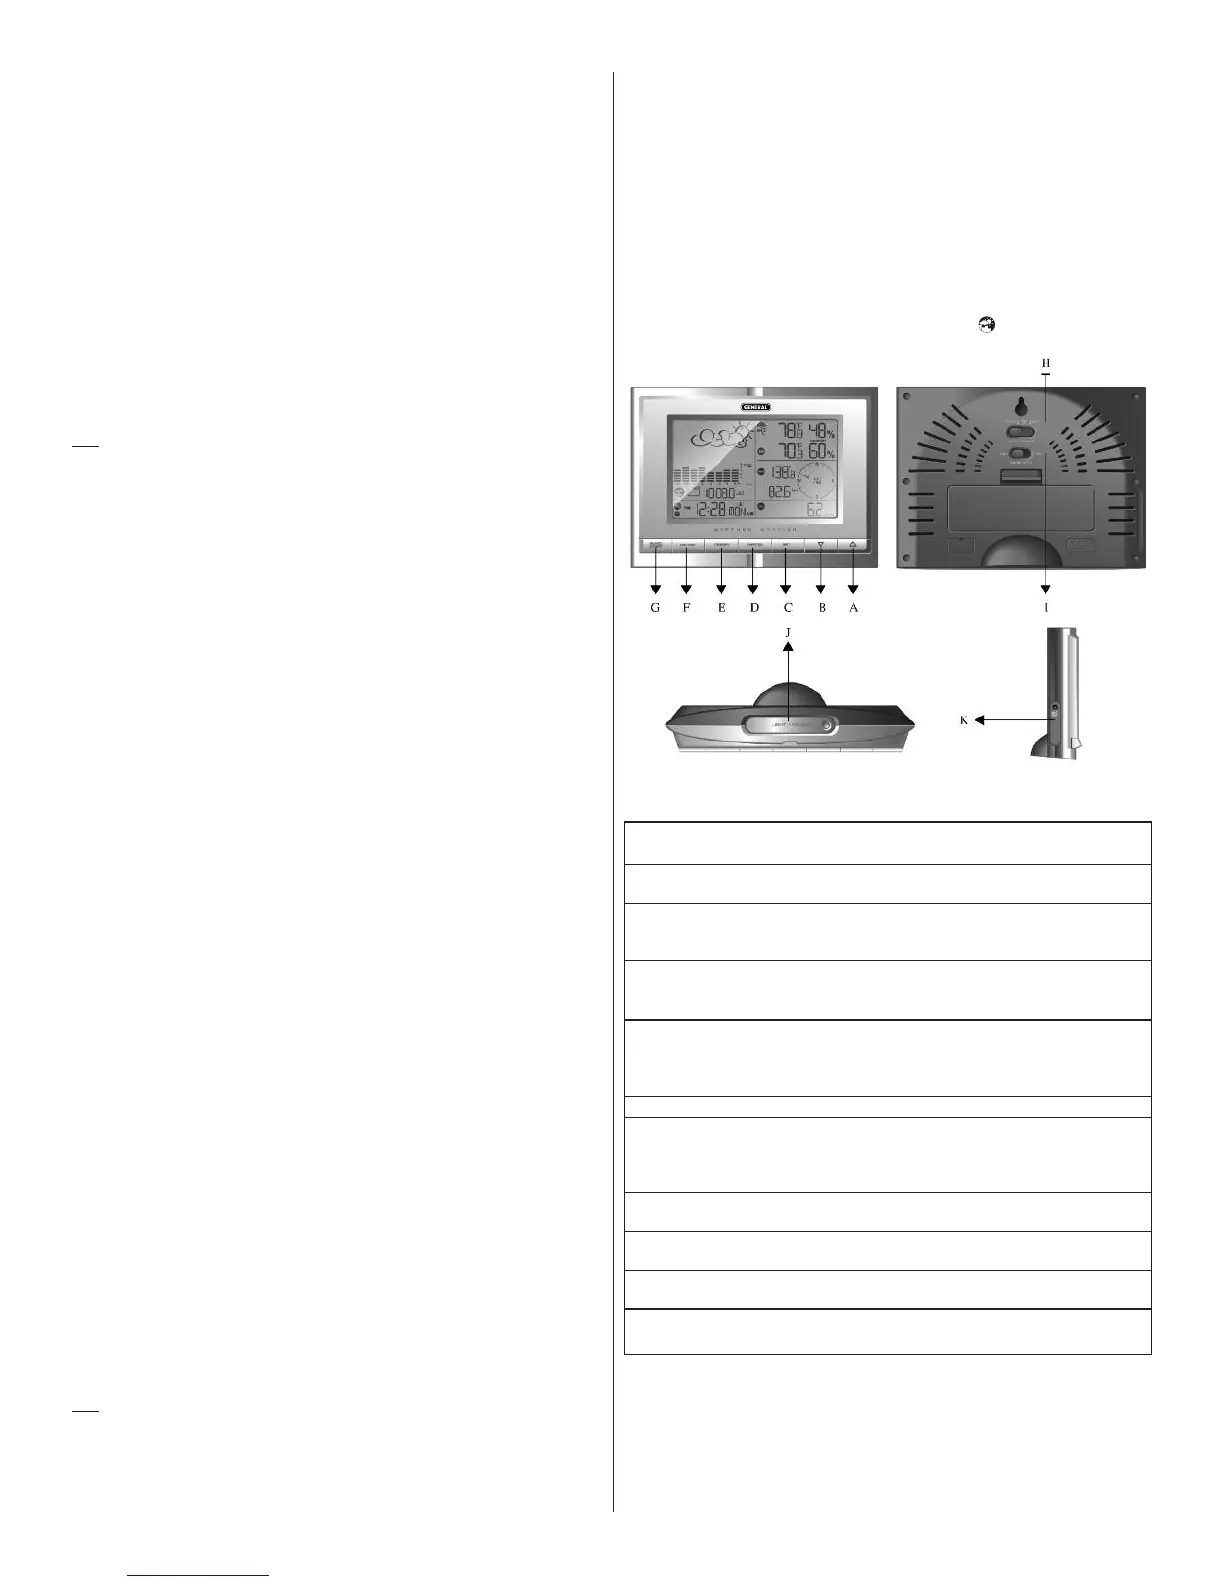
BUTTONS AND CONTROLS
A. UP ▲ - Mode Selection: selects the next available mode counter-clockwise
- When programming: increases parameters
B. DOWN ▼ - Mode Selection: selects the next available mode clockwise
- When programming: decreases parameters
C. SET - Rotates display for current mode
- Press and hold: to enter the programming mode
- Locks in: set parameters
D. CHANNEL - Manually selects the channel # for receiving temperature and humidity
sensor data
- Enables the temperature and humidity channel auto-scan mode
E. MEMORY - Records: moon phase, temperature, humidity, rainfall and wind records.
Then stores in memory
- Moon phase: determined by the day of month interval
- Sets and stores pressure & altitude units in Memory
F. HISTORY - Allows displaying the sea-level pressure history
G. ALARM/CHART - Displays alarm times and programmed alerts for temperature,
rainfall and wind
- Press and hold, to enter the alarm/alert programming mode
- Press and hold in pressure and forecast window, to view different bar charts
H. LIGHT SENSOR - Sets the light sensor to: automatic, on or off
– AUTO, ON, OFF
I. SENSITIVITY - Adjusts the automatic light sensor sensitivity
– HIGH/LOW
J. LIGHT/SNOOZE - Illuminates the display backlight for 5 seconds
- Activates Snooze delay for alarms (programmable 1 to 15 minutes)
K. AC/DC ADAPTOR - Connects main unit to the power outlet through the AC to 7.5V DC adapter
INPUT provided
3
 Loading...