• Lock washers
• Grounding nuts
Note: Keep bolts and any unused side panels at customer site for future Tower add-ons
Remove the Base and Power Cord (US Nema 5-15P) from the shipping box and examine for signs of
physical damage. For damaged items, request an RMA from Technical Support at:
technicalsupport.eu@genmarkdx.com, providing a description of the damage.
Remove UPS from box, remove the front plate, and connect the power leads. Plug UPS into power
source. (To allow pre-charge.)
Remove tape from all leveling feet.
All Base feet should be flush to the bottom of the Base.
Position the Base on the clean work bench, leaving enough room and clearance to install the
Tower(s).
If installing a 1-Tower system, remove one cosmetic panel from the Base by loosening the rear thumb
screws (2 on each panel). Remove both panels for 2-Tower or greater installations.
If installing a single Tower on the right side of the Base, or a multi-Tower system utilizing the right
side of the Base, inspect the 3 mounting holes. There could be a misalignment between the frame
and threaded hole.
If there is interference, thread the long mounting bolt into the upper right mounting hole without a
Tower attached. Carefully rotate the end of the bolt in a round motion. The process of working the
bolt should provide the clearance needed for mounting the Tower and allowing the torque wrench
to be used properly.
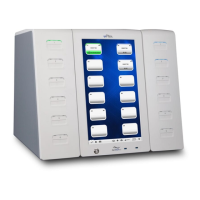
Remove the Base top cover and set aside.
Remove the plastic protective film from the touchscreen.
Verify the cleanable air filter is present on the rear side of the Base.
Visually inspect the Base and fascia(e) for physical damage.
Remove the right Base side panel.
Verify the mounting nuts are properly assembled by threading a long mounting bolt into each
location and inspecting whether the bolt is parallel to the bench.
Note: This will allow an easier attachment of the tower.
 Loading...