Essential settings
Your Solo II will start to show you your energy consumption as
soon as it is installed. To get the most out of your display, enter
your current electricity tari and set a budget.
Set a budget
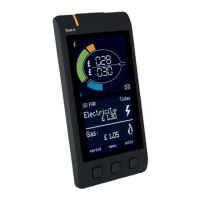
Your Solo II can indicate if you are using more or less energy -
and hence cost - than you have budgeted for. A green g means
the display predicts you will be under budget and a red cross h
the opposite, based on previous usage patterns.
To set a budget:
• Press and hold b until [BASIC] is shown;
• Press b repeatedly until you see BUDGET;
• Use a and c to select from DAY, MTH (month) and YR (year)
for how you plan to budget and then press b to set;
• Finally use a and c once more to set the budget and
press b when you have nished.
Your Solo II will now show you your performance against the
budget and start to learn your energy usage patterns.
Enter your tari
Do you know what your electricity tari is? Is there a standing
charge and are certain times of the day priced dierently? You
may need to speak to your utility or check a recent bill to nd
the answers to these questions before you set up your Solo II.
To congure your tari:
• Press and hold b until [BASIC] shows;
• Press b until you see TARIFF1 and a number ashing;
• Use a and c to change the tari and then press b to set.
• If you have a tari that changes during the day (known as
a ‘time of use’ tari), then you can set the start and end
times of two further taris. Use a and c to change the
times and the rate.
Once your tari has been entered in to your Solo II it will start
to show you how much your energy has cost. Refer to the
online user manual for further details on setting up taris.
Settings
For information on other settings for your Solo II, refer to the
online user manual.
Troubleshooting
My display is not showing any information
This could be because your display is out of range and is not
communicating with the transmitter / meter.
The signal strength to the transmitter is shown on the top left
of the display. The more bars shown, the better the signal and
performance of the display.
Try moving your display closer to the transmitter and meter. If
problems persist, please refer to our website.
My display is blank or has switched itself o
The display backlight may have turned itself o if congured to
do so. Press any button on the display to switch it back on.
The backlight can be set to switch o between certain hours of
the day. To make a change to this setting, enter the [A D VA N CED]
settings and change DISPLAY OFF and DISPLAY ON to your
requirements.
If the display remains o even after pressing a button, check
the power supply connection and then refer to our website if
the problem persists.
Safety notice
It is important to observe some simple safety precautions
when using this product. Safe operation of your Solo II
is impaired if used in a manner not specied by the
manufacturer.
j
Keep the Solo II away from water and other liquids.
Disconnect from the mains power supply before
cleaning (with a soft, dry cloth only). Please contact
your supplier if any components appear damaged or
faulty.
l
Your Solo II is designed to be used in an indoor,
domestic environment only.
n
To protect the environment, this product and its
batteries must be disposed of safely at the end of its
life.
o
This product is CE approved.
m
This product complies with RoHS regulations.
Further information
This guide is designed to introduce you to the Solo II. In it
you’ll nd some basic information about the key features and
functionality.
User manual
A full online user manual is available at
http://www.greenenergyoptions.co.uk/solo2
Technical specications
Solo II display
This product is intended to be used indoors in a domestic
environment. It is not suitable for outdoor use.
Display model Solo II (3CT) / PCK-S2-007
Supply voltage 240Vac, 50Hz
Operating voltage 5Vdc
Operating power < 0.6W
Operating temperature 0 to 40ºC
Operating humidity 0 to 85% non-condensing
Manufacturer
Green Energy Options Ltd.
3 St. Mary’s Court, Main Street, Hardwick, Cambridge
CB23 7QS, UK
This unit has been tested and conforms to the following
standards:
Health & Safety (Article 3.1a) EN 60950-1:2005 (2
nd
edition), Am 1:2009 *
EMC (Article 3.1b) EN 301 489-3 V1.4,1
EN 301 489-1 V1.8.1
EN 5502:2006 / A1:2007 (Class B) *
EN 61000-3-2:2006 *
EN 61000-3-3:2008 *
EN 55024:1998 / A1:2001 / A2:2003 *
Spectrum (Article 3.2) EN 300 220-2 V2.3.1
* Denotes specic standards for the power supply
SOL2-A-QSG-002_1.indd
Solo II
QUICK START GUIDE
SOL2-A-QSG-002_1.indd 1 18/11/2014 10:12