Configuraon
The Stopwatch allows you to measure the energy used over a
specific period.
To START and STOP the Stopwatch, press the buon.
To toggle the units used by the Stopwatch, press the buon.
To RESET the Stopwatch press and hold the buon.
To move back to the Today screen, press the buon.
The Stopwatch can be le running in the background, as
indicated by the stopwatch symbol.
The Stopwatch can run up to maximum of 24 hours non stop.
Solo II
QUICK START GUIDE
Technical Specificaons
FAQs
Energy Stopwatch
Energynote is an online service where you can upload data from
your Solo II display to your own webpage to see all the data that
has been stored on your display.
You can use the USB cable to upload your consumpon or
generaon data, which the display stores in the internal memory,
to our servers. Once uploaded you will be able to see graphical
informaon for energy generated or consumed.
With the oponal Bridge you can use the Energynote online
service to monitor your display from anywhere as long as you
have internet connecon.
To get started on using the free Energynote online service please
visit www.energynote.co.uk
Energynote Online Service
Rated Voltage (Display) 5Vdc
Rated Voltage (Power Supply) 230Vac, 50Hz
Input Power (Display) 0.5W
Operang Temperature 0 to 40C
Operang Humidity 0 to 85% non-condensing
Basic Configuraon: Advanced Configuraon:
1. Time and Date
2. *Budget
3. *Tariffs and standing change
4. Temperature Set-point
1. Mode (This lets you select between
Consumpon or Micro-gen)
2. Currency
3. Temperature units
4. PV Array size
5. Calibraon figure
6. Display sleep Time
7. Day of the week
Rated Voltage (Sensor) 4.5Vdc, 3 x AA alkaline baeries
Rated Voltage (P1 Power Supply) 230Vac, 50Hz
Input Power (Sensor) 0.1W
Operang Temperature 0 to 40C
Operang Humidity 0 to 85% non-condensing
Oponal Bridge
Navigaon
Bridge:
The Bridge enables you to monitor your home and control
appliances remotely via your Energynote online service.
1. Plug the power supply into a mains socket and insert the
other end into the power socket at the back of the bridge.
2. Using the Ethernet cable, connect the Bridge to your
broadband router. (The Bridge uses DHCP and will get an IP
address automacally from your router).
Enter the configuraon menu by pressing and holding the buon.
You will now see the word “BASIC,” you can toggle between “BASIC”
configuraon or “ADVANCED ” configuraon by using the
and buons and select by pressing the buon.
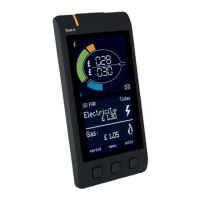
LEFT BUTTON
To view previous usage, press the buon to see the
consumpon from yesterday, day before yesterday, last
week etc.
A long press of the buon (> 3 seconds) takes you back to
the main screen – whole of house consumpon, today.
MIDDLE BUTTON
To change the units, press the buon to view the power
and energy in cost, CO₂ or kW.
Long press (> 3 seconds) takes you into the configuraon menu.
RIGHT BUTTON
To enter and exit Energy Stopwatch mode, press the right
buon. See Energy Stopwatch for further informaon.
PAIRING MODE
If you need to pair addional sensors press and hold the
and buons simultaneously to enter pairing mode,
you can then select the sensor that you wish to pair.
*If you need help seng your budget and tariff please visit
www.greenenergyopons.co.uk/solo2
For FAQs and troubleshoong ps please visit
www.greenenergyopons.co.uk/solo2