Thank you for buying GERBER products!
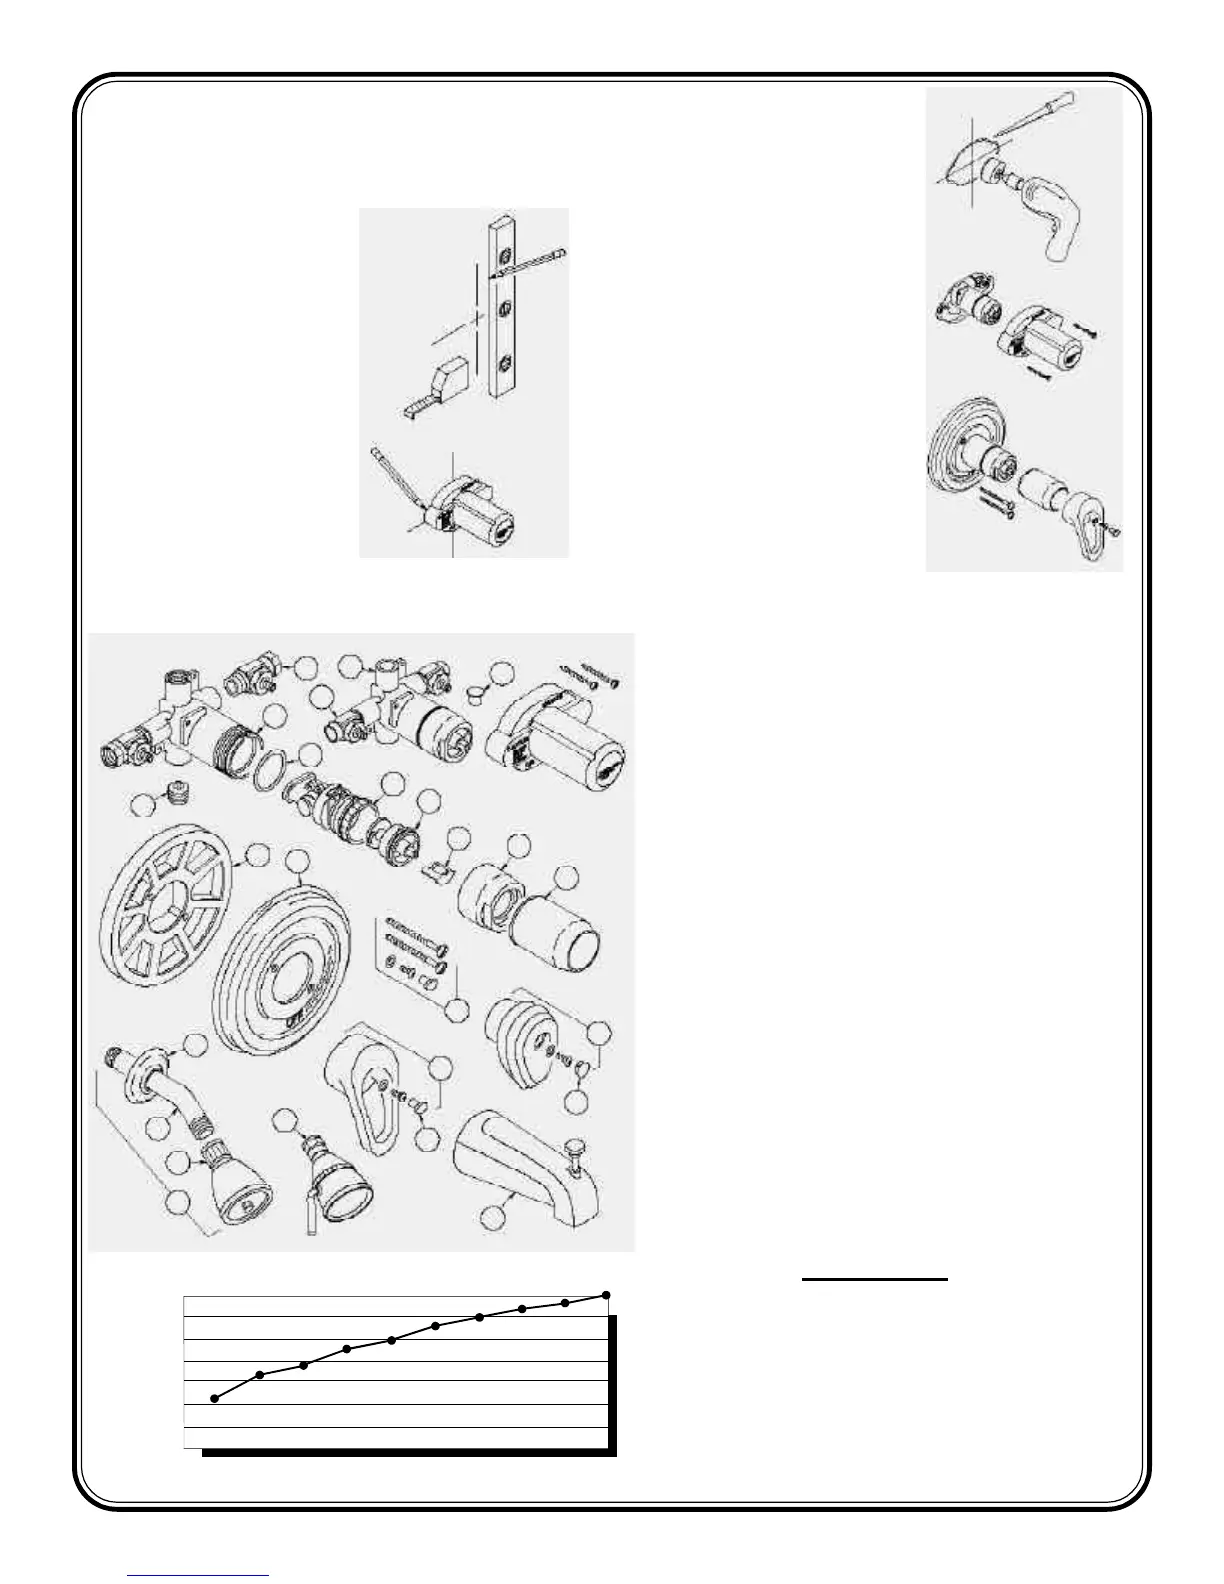
ID# Description Chrome
1 ....... Shower Assy. .................... Not Sold
2 ....... Shower Head ..................... 49-199
3 ....... Shower Arm ...................... 49-111-G
4 ....... Flange ............................... 92-021
5 ....... Delux Showerhead ............ Not Sold
6 ....... Slip Spout ......................... 98-241
......... Spout w/IPS ...................... 92-573
7 ....... Safetemp
Escutcheon ........ 97-018
8 ....... Trim Sleeve ....................... 92-330
9 ....... Loop Hndl. Botton ............ 92-276
10 ..... Safetemp Handle ............... 97-020
11 ..... Hrdwtr. Hndl. Button ........ 94-211
12 ..... Hrdwtr. Handle Assy. ........ Not Sold
13 ..... Screw Package .................. 97-016
ID# Description Unfinished
14 ..... Cast Body w/IPS Connections ......................... Not Sold
15 ..... 1/2”MIPSx1/2”FIPS ......
.................................. Not Sold
16 ..... Cast Body w/Solder Connections .................... Not Sold
17 ..... 1/2”Cx1/2”C Stop / Solder .............................. Not Sold
18 ..... O-Ring ............................................................. 92-257
19 ..... Pressure Balance Cartridge S/A ....................... 97-014
20 ..... Pressure Balance Stem & Bonnet S/A ............. 97-022
21 ..... Safetemp Temper
ature Limit ............................ 92-294
22 ..... Bonnet for Pressure Balance Shower ............... 92-329
23 ..... 1/2” NPT Plug ................................................. 97-302
24 ..... Plug for Solder Connection ............................. 97-333
FLOWRATE (gpm)
PRESSURE (gpm)
GERBER SAFETEMP & HARDWATER
PRESSURE BALANCE VALVE
1.0
2.0
3.0
4.0
5.0
6.0
7.0
0.0
10 20 30 40 50 60 70 80 90 100
CAUTION:
Do not use scouring pads,
acid-based chemicals, or abrasive
cleaners to clean your faucet!
This will cause damage to the plated
or painted finishes!
The Anatomy of Your Product
Be sure that you’re buying genuine
GERBER
replacement parts!
23
16
7
4
3
2
1
5
9
6
11
12
13
8
22
20
19
18
14
15
16
24
10
PLASTER
GUARD
21
17
1. Use a level, tape measure,
and pencil to locate center
lines of valve body, shower
arm, and tub spout.
2. Align the plaster guard
with the drawn lines and
trace an outline of the
plaster guard.
4. Cut out the traced plaster
guard outline 1/8” larger than the
original tracing. Use hole saws
and a fine-toothed handsaw to
remove wall material.
5. Mount valve body per rough-
in or thin wall
application.
Attach water supply lines and
outlet lines.
Attach plaster guard
for grouting tiles or other forms
of interior finishing.
6. Install the trim and hardware.
Flush the piping system for one
minute. Attach the spout and
showerhead.
Balance Instructions
Simplified:
Safetemp™ Pressure
GERBER
 Loading...