1
PREPARATION INSTRUCTIONS / INSTRUCCIONES
DE PREPARACIÓN / INSTRUCTIONS DE PRÉPARATION:
INSTALLATION / INSTALACIÓN / INSTALLATION
• WATER SUPPLY LINES MUST BE SIZED TO PROVIDE
AN ADEQUATE VOLUME OF WATER FOR EACH
FIXTURE.
DEBE EVALUARSE EL TAMAÑO DE LOS CONDUCTOS
DE ALIMENTACIÓN DE AGUA PARA OBTENER UN
VOLUMEN DE AGUA ADECUADO EN CADA APARATO
SANITARIO.
LES CONDUITES D’EAU DOIVENT ÊTRE DE LA BONNE
DIMENSION POUR FOURNIR LE VOLUME D'EAU ADÉ-
QUAT À CHAQUE APPAREIL.
• FLUSH ALL WATER LINES PRIOR TO INSTALLING
FLUSHOMETER.
ENJUAGUE TODOS LOS CONDUCTOS DE AGUA ANTES
DE INSTALAR LA VÁLVULA DE LIMPIEZA
AUTOMÁTICA.
RINCER TOUTES LES CONDUITES D’EAU AVANT
D’INSTALLER LE ROBINET DE CHASSE D’EAU.
Gerber Plumbing Fixtures LLC.
2500 Internationale Parkway, Woodridge, IL 60517, U.S.A.
(Sales Office/Oficina de ventas/Bureau de vente)
Toronto: 189 Earl Stewart Drive, Unit #5, Aurora, ON L4G 6V5, Canada
(CS & Tech/SC y Tec./SC et Tech)
Montreal: 4610 Bois Franc, Montreal, QC H4S 1A7, Canada
www.gerberonline.com 1-888-648-6466
®
P
R
O
F
E
S
S
I
O
N
A
L
P
E
R
F
O
R
M
A
N
C
E
GERBER
SAFETY TIPS
•
•
•
•
•
•
Caution: If you use soldering for the installation of this faucet, the seata
cartridges and washers will have to be removed before turning on the
flame. Damage to the cartridge and seats will occur if left intact while
soldering and will result in the warranty being void on these parts.
Cover your drain to avoid loosing parts.
CONSEJOS DE SEGURIDAD
Advertencia: Si usa soldadura para la instalación de este grifo, remueva los
componentes internos y las arandelas antes de encender la llama. Si no se
remueven, estas piezas se dañarán durante la soldadura, lo que resultará
en la anulación de la garantía para estas piezas.
Tape la boca del desagüe para prevenir la pérdida de piezas pequeñas.
CONSEILS DE SÉCURITÉ
Attention : Si vous effectuez l’installation de ce robinet par soudage, vous
devez enlever les èges de cartouche et les rondelles avant d’allumer la
flamme. La cartouche et les sièges seront endommagées s’ils sont laissés
en place lors du soudage, entraînant ainsi l’ annulatio de la garantie de
ces pièces.
Couvrez le drain à fin de ne pas perdre de pièces.
Shown
/ Mostrado
/ Illustré
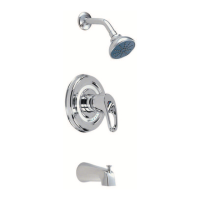
49-730
49-731
49-733
Ruler
Regla
Règle
Driller
Taladradora
Perceuse
Marking pencil
Marqueur
Lápiz marcador
TOOLS REQUIRED:/HERRAMIENTAS NECESARIAS: /
OUTILS REQUIS:
Safetemp
™
Pressure Balance Tub And
Shower Faucet
Safetemp
™
Grifo de presión balanceada
para bañera y ducha
Safetemp
™
Robinet à régulateur de
pression pour bain et douche
Please note: For proper function, this valve has to be used with shower
heads rated at 2.0 GPM (7.57 LPM) or higher.
10/17