2060R-INS-LAB-RevB14
1
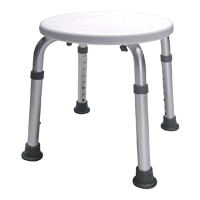
2060R ROUND BATH STOOL: ASSEMBLY & OPERATION
INSTRUCTIONS
PLEASE SAVE THESE INSTRUCTIONS FOR FUTURE USE
WARNING: Important! Read and understand these instructions before assembling or using
the Round Bath Stool. If you do not understand any part of these warnings, cautions or
instructions, contact a healthcare professional for direction in the use of this product. If the
Round Bath Stool is not properly assembled, personal injury and damage to the Round Bath
Stool could result.
WARNING:
If components are damaged or missing, contact your GF authorized distributor
immediately. DO NOT use substitute parts. Use only Lumex replacement parts. The use of non-
Lumex replacement parts could cause personal injury, property damage, and void the warranty.
WARNING: This product's maximum weight capacity is 300 lb, EVENLY DISTRIBUTED.
DO NOT exceed the maximum weight capacity.
WARNING: Notice for California Customers- California Proposition 65 WARNING: This product
contains a chemical known to the State of California to cause cancer and reproductive or
developmental harm.
WARNING: GF Health Products, Inc. assumes no responsibility for any damage or injury
caused by improper assembly or use of this product.
INTENDED USE
The 2060R Round Bath Stool is intended as a bath aid.
UNPACKING
Remove bath stool components from carton and protective
packaging. Check for obvious damage to the carton or its
contents. If damage is evident, do not use the product;
please notify the carrier and your GF authorized distributor
for further instruction.
ASSEMBLY
Upper Leg and Seat Assembly
1. Lay seat upside down (holes up) on a at, dry surface.
2. Lay upper legs upside down on seat, holes aligned, in “X” pattern as shown
at right. Ensure legs are tted together as shown.
WARNING: Legs must be positioned exactly as shown at right for a safe
and proper t.
3. Install screw knob through both legs and center of seat; turn knob clockwise
just enough to connect legs to seat.
4. Insert four screw knobs through outer leg holes and into seat bottom, and
turn clockwise just enough to connect legs to seat.
5. Turn all ve screw knobs clockwise to tighten; ensure screw knobs are tight
without overtightening.
Leg Assembly
1.
Attach lower leg by pushing in the adjustment button and sliding the lower leg
over the upper leg to the desired height position until it clicks into place.
2. Repeat for other three legs.
3. Ensure all legs are locked at the same height and all screw knobs are tight.
WARNING: Before use, ensure knobs are securely installed, all buttons protrude fully from
height adjustment holes, and all legs are adjusted to the same height.
bath stool components
lower leg
knob
seatupper leg
upper leg / seat
assembly
2060R
assembled