This document is a construction manual for a "Camper Van Construction Kit," designed to allow users to build a model camper van. The kit is produced by Apples to Pears Ltd. and is recommended for ages 10 to adult. It is presented as a "GIFT IN A TIN," suggesting it comes in a compact, gift-ready package.
Function Description:
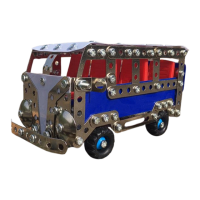
The primary function of this kit is to provide a hands-on, step-by-step building experience to construct a detailed model of a camper van. It serves as an educational and recreational toy, promoting fine motor skills, spatial reasoning, and the ability to follow instructions. Once assembled, the model can be used for display or imaginative play. The final product is a multi-colored camper van, predominantly red, blue, and metallic silver, with functional wheels.
Important Technical Specifications (Kit Components):
The kit includes a variety of parts, categorized and labeled for easy identification:
- Structural Panels:
- A1 (x2), A2 (x1), A3 (x1) - Likely larger body panels. A3 is specifically identified as the "blue back panel."
- Connectors/Brackets:
- B (x10), C (x10), D (x2), E (x2), F (x6), G (x8), H (x4), I (x10), J (x1), K (x1), L (x2), M (x1), N (x6), O (x2), P (x4), Q (x1), R (x2), S (x2), T (x8), U (x12), V (x2), W (x12), X (x4), Y (x4), Z (x8) - These are various shapes and sizes of metallic plates and brackets used to form the structure. Some are specifically mentioned for certain parts, like 'I' brackets for the right door panel, 'P' bolts for headlights, and 'S' and 'G' for seat supports.
- Fasteners:
- Bolts x 100
- Nuts x 112
- Small bolts (mentioned in step 2) - Implies there are at least two sizes of bolts, standard and small.
- Tools:
- Spanner & screwdriver (x1 each) - Essential for assembly.
- Wheels:
- Four wheels are assembled using specific parts (B, Z) and plastic washers.
- Other Components:
- Round domes (O x 2) - Used for headlights.
- Plastic washers (mentioned in step 46) - Used in wheel assembly.
Usage Features (Assembly Process):
The manual provides a detailed, 48-step assembly guide, broken down into logical sections:
- Initial Setup: Users are instructed to lay out all parts on a flat surface and verify they have everything. Standard bolts are to be used unless specified otherwise.
- Right Hand Door Panel (Steps 1-2): Begins with parts A1, B, C, D to construct the right-hand door panel, using small bolts.
- Left Hand Door Panel (Steps 3-4): Similar construction to the right panel, but in the opposite direction.
- Right Window Frame (Steps 5-6): Uses parts E, F, G, H, I, X to create the right window frame, which is then attached to the right door panel.
- Left Window Frame (Steps 7-8): Similar construction to the right window frame, using parts N, F, C, X, E, G, H.
- Bonnet (Steps 9-12): Parts L, J, K, N, M are used to construct the bonnet, assembled with 5 bolts.
- Headlights and Front Bumper (Steps 13-16): Round domes (O) form the headlights, attached with 'P' bolts. Parts Q, R form the front bumper.
- Attaching Bonnet and Roof Panel (Steps 17-20): The bonnet is attached using 4 nuts and bolts. Parts A2, N are used to make the roof panel, which is then attached to the front panel with 1 bolt.
- Attaching Side Panels (Steps 21-24): The left and right hand door panels (made in steps 3-4 and 1-2 respectively) are attached to the main body with 4 bolts each. The model is then turned over to reveal the camper van shape.
- Joining Front to Sides and Back Panel (Steps 25-28): Parts G, I, P, X are used to join the front to the sides, using a 'P' bolt at the top and a standard bolt at the bottom. Parts N, F, C, X are used to construct the back panel, which is then assembled.
- Solid Frame and Back Panel Attachment (Steps 29-30): The camper van now has a solid frame. The blue back panel 'A3' is attached using 4 bolts.
- Seats Construction (Steps 31-36): Parts U, T, S, G are gathered to build the seats. This involves forming two long seat supports (S, G), attaching brackets, and assembling two halves of each seat. The seats are then bolted into the 4th, 8th, and 12th holes from the front.
- Attaching Seats to Van (Steps 37-40): Parts T, V are used to attach the seats to the inside of the camper van. The seat supports are attached, and then the runs of seats are slid into the upside-down van. Each seat support is bolted at the front.
- Final Parts and Wheels (Steps 41-48): The remaining parts (W, Z, Y, B, X) are used to complete the model. The wheels are assembled using long bolts 'Z', parts 'B' inside each wheel, and plastic washers. The wheels are then attached to the van by pushing a long bolt 'Z' through a hole above the wheel arch, adding washers, and fixing the wheel with a nut. This process is repeated for all four wheels.
Maintenance Features:
- Instructions for Future Reference: Users are explicitly asked to "PLEASE KEEP THESE INSTRUCTIONS FOR FUTURE REFERENCE," indicating that the manual may be needed for future reference, potentially for disassembly, reassembly, or troubleshooting.
- Part Verification: The first step of checking all parts ensures that the kit is complete before starting assembly, preventing frustration due to missing components.
- Tool Inclusion: The provision of a spanner and screwdriver means users have the necessary tools for assembly and potential future adjustments or repairs.
The manual includes a prominent "WARNING" section:
- CHOKING HAZARD: "Small parts, not suitable for children under 3 years." This is a standard safety warning for kits with small components.
- FUNCTIONAL SHARP POINT: "Adult supervision recommended." This suggests that some parts may have sharp edges or points, requiring caution during assembly, especially for younger users.
Overall, the Camper Van Construction Kit is a comprehensive building set designed for engagement and skill development, resulting in a tangible model. The clear, illustrated instructions guide users through a complex assembly process, making it accessible for its target age group.