Do you have a question about the Gigabyte A520M DS3H V2 and is the answer not in the manual?
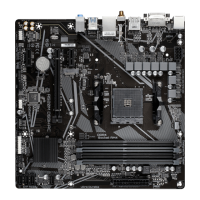
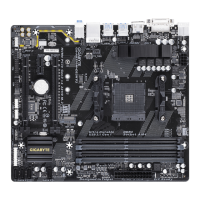
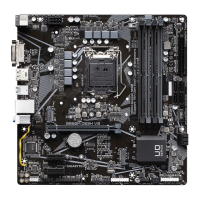
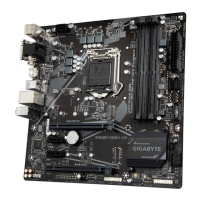
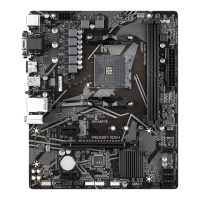
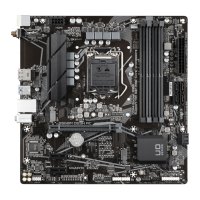
Diagram and labels of the motherboard's physical layout and connectors.
Essential safety guidelines and procedures before installing hardware components.
Detailed technical specifications of the motherboard's components and features.
Step-by-step instructions for correctly installing the Central Processing Unit (CPU).
Guide on how to properly install RAM modules, including Dual Channel configuration.
Procedure for installing expansion cards into available slots on the motherboard.
Description and function of all external connectors on the motherboard's rear panel.
Explanation and pinouts for various internal motherboard connectors and headers.
How to enter and navigate the BIOS Setup utility using keyboard keys.
Information on using Q-Flash and @BIOS for updating the system BIOS.
Details about the startup logo screen and key functions for BIOS navigation.
Step-by-step guide for installing the operating system, including RAID driver installation.
Instructions for installing necessary system drivers and GIGABYTE applications via APP Center.
Guide on setting up RAID arrays (RAID 0, RAID 1, RAID 10) on the motherboard.
Statements regarding compliance with FCC, CE, and RoHS directives for the product.
Information on battery handling and disposal of electronic equipment according to WEEE directive.
Contact information and links for GIGABYTE technical support and eSupport.
This document is a user manual for the GIGABYTE A520M DS3H V2 motherboard, providing comprehensive information for its installation, setup, and maintenance. It is designed to guide users through the process of building and configuring a computer system using this motherboard.
The manual begins with essential copyright and disclaimer information, emphasizing GIGABYTE's intellectual property rights and the importance of adhering to the provided instructions. It also highlights GIGABYTE's commitment to environmental responsibility by reducing paper use and promoting recyclable packaging materials. Users are encouraged to check the motherboard's revision number before performing any updates or seeking technical support, as this information is crucial for compatibility and accurate assistance.
The "Product Introduction" chapter offers a detailed motherboard layout diagram, visually identifying key components and connectors. This section is invaluable for users to familiarize themselves with the physical arrangement of the motherboard, which is critical for correct hardware installation.
The "Hardware Installation" chapter provides critical precautions and step-by-step instructions for installing various components. It stresses the importance of electrostatic discharge (ESD) prevention, advising users to wear an ESD wrist strap or touch a metal object to eliminate static electricity before handling delicate components like the motherboard, CPU, and memory. Users are reminded to always disconnect AC power before installing or removing hardware to prevent damage. The manual also emphasizes the importance of ensuring that all components are securely connected and that no screws or metal parts are left loose within the computer casing.
Detailed instructions are provided for installing the CPU, including how to properly lift the CPU socket locking lever, align the CPU with the pin one indicator, and apply thermal grease. A strong warning is issued against forcing the CPU into the socket, as this can cause irreversible damage. For memory installation, the manual explains the dual-channel memory configuration, recommending the use of memory modules with the same capacity, brand, speed, and chips for optimal performance. It also specifies the recommended sockets for installing a single memory module.
The installation of expansion cards is covered, with instructions on how to identify compatible slots, remove chassis slot covers, and secure the cards. Users are advised to install necessary drivers after physically installing the cards.
The "Back Panel Connectors" section provides a comprehensive overview of the external ports, including USB 2.0/1.1, PS/2 keyboard/mouse, DisplayPort, HDMI, USB 3.2 Gen 1, and RJ-45 LAN ports. It describes the functionality of each port and provides important notes, such as setting the default sound playback device for DisplayPort/HDMI and understanding the LAN port LED indicators. The audio jack configurations are also detailed, explaining how to use the audio software to configure 7.1-channel audio. A crucial warning is included regarding the proper method for removing cables from back panel connectors to prevent electrical shorts.
The "Internal Connectors" section guides users through connecting various internal devices. It includes diagrams and pin definitions for connectors such as ATX_12V/ATX power, CPU_FAN/SYS_FAN1 (fan headers), SATA3 0/1/2/3 (SATA 6Gb/s connectors), M2A_CPU (M.2 Socket 3 connector), F_AUDIO (front panel audio header), F_PANEL (front panel header), F_U32 (USB 3.2 Gen 1 header), F_USB1 (USB 2.0/1.1 header), TPM (Trusted Platform Module header), BAT (battery), and CLR_CMOS (Clear CMOS jumper). Each connector description includes specific instructions and warnings, such as ensuring correct orientation for fan cables, understanding the different types of M.2 SSDs, and properly connecting front panel modules. The section on the battery also provides instructions for clearing CMOS values, emphasizing the need to turn off the computer and unplug the power cord before replacing the battery.
The "BIOS Setup" chapter explains the function of the BIOS and how to access the BIOS Setup program. It introduces the GIGABYTE Q-Flash and @BIOS utilities for updating the BIOS, cautioning users about the potential risks of BIOS flashing and recommending against altering default settings unless necessary.
The "Installing the Operating System and Drivers" chapter outlines the process of installing the operating system and necessary drivers. It provides steps for loading RAID drivers during Windows installation, if required, and guides users on how to download and install drivers and GIGABYTE applications via the APP Center.
Finally, the "Appendix" chapter focuses on "Configuring a RAID Set," detailing RAID levels (RAID 0, RAID 1, and RAID 10) and the minimum number of hard drives required for each. It also lists the items needed before configuring a RAID array and notes that an M.2 PCIe SSD cannot be used to set up a RAID set with a SATA hard drive.
Throughout the manual, GIGABYTE emphasizes user safety and proper handling of components to ensure the longevity and optimal performance of the motherboard and the entire computer system. Users are consistently directed to GIGABYTE's website for the latest support lists, software, and troubleshooting information, reinforcing the idea that the manual is a foundational guide complemented by online resources.
| Processor manufacturer | AMD |
|---|---|
| Compatible processor series | AMD Ryzen 3 3rd Gen, AMD Ryzen 5 3rd Gen, AMD Ryzen 7 3rd Gen, AMD Ryzen 9 3rd Gen, AMD Ryzen Threadripper 3rd Gen, AMD Ryzen Threadripper Pro 3rd Gen |
| Supported processor sockets | Socket AM4 |
| Maximum number of SMP processors | 1 |
| Maximum internal memory supported by processor | 128 GB |
| ECC | Yes |
| Memory channels | Dual-channel |
| Memory slots type | DIMM |
| Number of memory slots | 4 |
| Supported memory types | DDR4-SDRAM |
| Supported memory clock speeds | 2133, 2400, 2667, 2933, 3200, 3333, 3600, 4000, 4400, 4733 MHz |
| Supported memory module capacities | 1GB, 2GB, 4GB, 8GB, 16GB, 32GB |
| Wi-Fi | No |
| Ethernet interface type | Gigabit Ethernet |
| Number of Parallel ATA connectors | 0 |
| USB connector type | USB Type-A |
| DisplayPort version | 2.0 |
| USB 2.0 ports quantity | 2 |
| RAID levels | 0, 1, 10 |
| Supported storage drive types | HDD & SSD |
| Number of storage drives supported | 5 |
| Supported storage drive interfaces | M.2, SATA III |
| Cables included | SATA |
| Bundled software | Norton Internet Security (OEM version) Realtek 8118 Gaming LAN Bandwidth Control Utility |
| BIOS type | UEFI AMI |
| ACPI version | 5.0 |
| BIOS memory size | 128 Mbit |
| Desktop Management Interface (DMI) version | 2.7 |
| Maximum resolution | 5120 x 2880 pixels |
| Number of displays supported | 3 |
| Parallel processing technology support | - |
| Audio chip | Realtek ALC887 |
| Cooling type | Active |
| Component for | PC |
| Product color | Black |
| Power source type | ATX |
| PC health monitoring | CPU, LED, Power supply, Temperature, Voltage |
| Audio output channels | 7.1 channels |
| Motherboard form factor | micro ATX |
| Windows operating systems supported | Windows 10 x64 |
| Package width | 265 mm |
| Package height | 54 mm |
| Package weight | 810 g |
| Country of origin | China |
| Quantity per shipping (inner) case | 1 pc(s) |
| Warranty period | 3 year(s) |
| Battery type | CR2032 |
| Battery weight | 3 g |
| Battery technology | Lithium-Manganese Dioxide (LiMnO2) |
| Width | 244 mm |
|---|---|
| Height | 35 mm |