Do you have a question about the Gigabyte GA-990XA-UD3 and is the answer not in the manual?
Details compliance with FCC Part 15, Subpart B, Class B Digital Device standards.
Information on types of documentation provided for the product.
Guidance on how to locate and identify the motherboard revision number.
Lists optional accessories available for purchase with the motherboard.
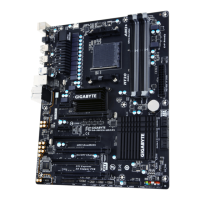
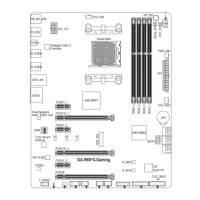
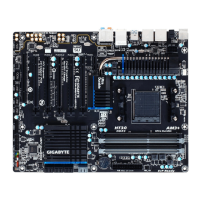
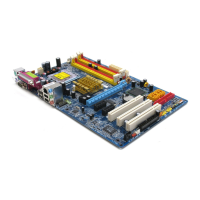
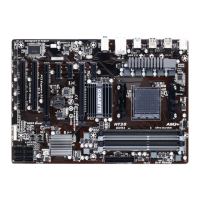
Details CPU socket type, memory types, and capacity supported.
Lists PCI Express slots, PCI slots, and SATA interface details.
Describes I/O controller chip and hardware monitoring functions.
Lists BIOS chip type, features like DualBIOS, and supported standards.
Specifies supported OS and motherboard physical dimensions.
Identifies pin one on the CPU and socket for correct orientation.
Instruction to lift the CPU socket locking lever completely.
Guidance on aligning CPU pins and inserting into the socket.
Instruction to apply an even, thin layer of thermal grease on the CPU.
Steps for placing the cooler and securing it using clips and handles.
Connecting the CPU cooler's power connector to the CPU_FAN header.
Explains how to configure memory for dual channel performance.
Guidance on orienting the memory module and inserting it into the socket.
Ensuring the retaining clips snap into place to secure the module.
Step-by-step guide for installing expansion cards into slots.
Demonstrates installing a PCI Express graphics card.
Lists necessary hardware and software for CrossFireX.
Steps for physically connecting cards and configuring the driver.
Describes USB and PS/2 keyboard/mouse ports.
Details optical audio, FireWire, USB 3.0, and LAN ports.
Explains the function of Line In and Line Out jacks for audio input/output.
Details microphone connection and safe cable removal practices.
Details ATX, ATX_12V, CPU FAN, System FAN, and Power FAN headers.
Describes SATA, Front Panel, and Front Panel Audio headers.
Explains the 4-pin or 8-pin ATX 12V connector for CPU power.
Details the 24-pin ATX connector for motherboard power supply.
Describes the 4-pin CPU_FAN and system fan headers for cooling.
Details SATA 6Gb/s connectors and RAID support.
Connects Power LED, HDD Activity LED, and related switches.
Connects the system speaker and reset switch for system feedback.
Connects chassis intrusion detection sensor for security.
Supports Intel HD Audio and AC'97 audio standards.
Connects to S/PDIF digital audio cable for external audio output.
Details headers for USB 2.0/1.1 ports, supporting optional brackets.
Details header for USB 3.0/2.0 ports, supporting optional front panels.
Describes the header for IEEE 1394a ports via optional bracket.
Describes the header for serial ports via optional COM port cable.
Details the header for connecting a Trusted Platform Module.
Explains the battery's role in retaining BIOS settings and how to clear CMOS.
Instructions on how to enter the BIOS Setup program by pressing the DELETE key.
Mentions Q-Flash and @BIOS utilities for updating the BIOS.
Describes the default GIGABYTE logo screen shown during boot.
Explains the POST screen and function keys for BIOS access and utilities.
Details the items and navigation within the BIOS Main Menu.
Lists and explains the function keys used in BIOS Setup.
Menu for CPU, memory, and voltage adjustments.
For configuring system time, date, and drive parameters.
For boot order, peripheral configurations, and security.
For configuring onboard devices like SATA, LAN, Audio.
For configuring power-saving functions and ACPI states.
Displays system temperatures, voltages, and fan speeds.
Options for setting passwords, saving, or exiting BIOS setup.
Controls CPU clock ratio and frequency for performance tuning.
Adjusts memory clock, timings, and DRAM configuration settings.
Configures CPU host clock, PCIE clock, and related frequencies.
Adjusts Hyper Transport Link and memory clock settings.
Allows manual adjustment of various DDR3 memory timing parameters.
Configures drive strength and address/command timing for memory.
Covers command timing, latency, and various delay settings.
Adjusts drive strength for memory signals like DQS, Data, Addr/Cmd.
Enables or disables memory channel and bank interleaving for performance.
Controls CPU PLL, DRAM, VTT, NB, HT Link, and NB/PCIe/PLL voltages.
Adjusts DRAM voltage and DDR VTT voltage for memory stability.
Configures North Bridge and HT Link voltages for system stability.
Allows manual adjustment of CPU North Bridge VID and CPU core voltage.
Sets system date, time, and determines halt behavior on POST errors.
Configures IDE/SATA channels, drive detection, and access modes.
Selects which errors will stop the system during POST.
Displays base and extended memory information.
Configures AMD C1E Support and Cool'n'Quiet features.
Enables Virtualization and controls CPU core activation.
Sets the order for booting from hard drives, CD/DVD, USB, or LAN.
Configures BIOS passwords and HDD S.M.A.R.T. capability.
Controls initial display output and AMD IOMMU support.
Configures SATA controller mode (IDE, RAID, AHCI) and RAID support.
Configures SATA ports 4/5 mode and SATA 3.0 support.
Enables or disables SATA ports for hot-plug detection.
Configures USB 3.0 controller and onboard LAN functions.
Enables/disables onboard audio and IEEE 1394 functions.
Configures USB controllers, legacy USB, and onboard serial port.
Configures ACPI S1 and S3 sleep states for power saving.
Settings for power button behavior and wake-up events.
Enables system power-on via keyboard/mouse and sets passwords.
Configures AC power recovery and low-power shutdown (ErP).
Enables CPU overheating protection and adjusts core voltage/ratio.
Tracks chassis intrusion status and allows resetting the record.
Displays system voltages, CPU temperature, and fan speeds.
Configures CPU and system fan speed control based on temperature.
Loads the safest BIOS default settings for system stability.
Loads the optimal BIOS default settings for performance.
Sets a supervisor password to restrict BIOS setup changes.
Sets a user password for viewing BIOS settings only.
Saves configuration changes to CMOS and exits BIOS setup.
Exits BIOS setup without saving any changes.
Guides through installing chipset drivers using the utility disk.
Lists and describes available application software for installation.
Provides access to application guides and motherboard manuals.
Provides contact details for GIGABYTE headquarters and branch offices.
Displays basic system information such as motherboard model and BIOS version.
Links to GIGABYTE website for downloading BIOS, drivers, and applications.
Provides quick links to install GIGABYTE's latest developed utilities.
Introduces Xpress Recovery2 for system data backup and restoration.
Steps for installing Windows and partitioning the drive for recovery.
How to access and use the backup function of Xpress Recovery2.
Instructions for restoring system data using Xpress Recovery2.
Steps to remove backup files and exit the Xpress Recovery2 utility.
Explains the DualBIOS design for enhanced BIOS safety.
Describes the Q-Flash utility for updating BIOS without OS.
Describes the @BIOS utility for updating BIOS from Windows.
Steps to select the BIOS file and initiate the update process.
Details the BIOS update process, including warnings and completion.
Reboots system and loads optimized defaults after BIOS update.
Saves BIOS settings and exits the setup utility.
Steps to prepare for BIOS update using @BIOS, including closing apps.
Describes methods to update BIOS from GIGABYTE server or local file.
Saving current BIOS and loading defaults after update.
Introduces the EasyTune 6 interface and its various tabs (CPU, Memory, Tuner).
Explains how to adjust system clock settings and voltages using Tuner tab.
Describes the Meter Mode interface for tracking power savings.
Explains the functions of buttons in Meter Mode.
Details the Total Mode interface for viewing accumulated power savings.
Explains how Stealth Mode keeps power saving settings active after restart.
Instructions on how to launch and use the Q-Share tool for data sharing.
Lists and describes the options available within the Q-Share utility.
Configures automatic daily backups and disk space usage.
Instructions on browsing and copying files from created backups.
Sets up a Bluetooth cell phone as a portable key for power saving.
Adjusts scan times, rescan times, and HDD turn-off settings.
Chooses system power saving modes like Standby or Suspend.
Steps to launch Cloud OC and log in to the server.
Describes the three main functions: system tweaking, monitoring, and status control.
Lists required items and preparations before configuring SATA drives.
Instructions for physically connecting SATA hard drives to the motherboard.
How to enter the RAID Option ROM Utility after POST.
Overview of the RAID BIOS Main Menu options.
How to access the LD Define Menu to configure RAID arrays.
Details items within the LD Define Menu for array configuration.
Displays whether drives are assigned to arrays or are unassigned.
Instructions for deleting disk array assignments and potential data loss warning.
Guides installing Windows 7/Vista and loading the RAID/AHCI driver.
Guides setting up multi-channel audio configurations using rear jacks.
How to use the HD Audio Manager for jack retasking and configuration.
Selects speaker configuration and adjusts sound effects.
Activates AC'97 audio and mutes back panel audio for HD audio.
Connects the S/PDIF optical cable to the audio connector.
Selects sample rate and bit depth for digital audio output.
Connects microphone and configures the jack for microphone input.
Adjusts recording and playback volumes, including microphone boost.
Steps to enable Stereo Mix for recording computer audio.
Instructions for recording audio using the Sound Recorder.
How to play back recorded audio files.
Explains why BIOS options might be hidden and standby power behavior.
Guides on clearing CMOS values and addressing weak speaker sound.
Troubleshooting steps for installing the HD audio driver on Windows XP.
Lists Award BIOS beep codes for diagnosing startup problems.
| Brand | Gigabyte |
|---|---|
| Model | GA-990XA-UD3 |
| Category | Motherboard |
| Language | English |