- 34 -
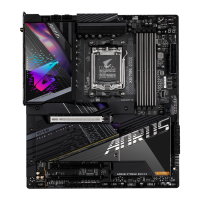
14) M2P/M2Q (M.2 Socket 3 Connectors)
TheM.2connectorssupportM.2SATASSDsorM.2PCIeSSDsandsupportRAIDconguration.Please
note that an M.2 PCIe SSD cannot be used to create a RAID set either with an M.2 SATA SSD or a SATA
harddrive.TocreateaRAIDarraywithanM.2PCIeSSD,youmustsetupthecongurationinUEFIBIOS
mode.RefertoChapter3,"ConguringaRAIDSet,"forinstructionsonconguringaRAIDarray.
M2P
(Note)
F_USB30
F_U
B_
F_ F_
_
B
BS_
B
SB_
B
_S
S_
_
B
_U
_
B
S
123
123
123
123
1
1
1
1
BSS
S
_S
SSU
1 2 3 4 5
S3
BSSS
U
__ 3
F_USB3F
S _
S _
S _
SF
B_
B_
F
_0
S
S
_0F
_F
_
_
__B
U
S _S
_
SF_
USB0_B
B_
F_USB3
F_USB303
_
_3U
S_
80 60
M2Q
(Note)
42110
F_USB30
F_U
B_
F_ F_
_
B
BS_
B
SB_
B
_S
S_
_
B
_U
_
B
S
123
123
123
123
1
1
1
1
BSS
S
_S
SSU
1 2 3 4 5
S3
BSSS
U
__ 3
F_USB3F
S _
S _
S _
SF
B_
B_
F
_0
S
S
_0F
_F
_
_
__B
U
S _S
_
SF_
USB0_B
B_
F_USB3
F_USB303
_
_3U
S_
80 60 42110
(Note) The M2P and M2Q connectors must work with an Intel
®
VROC Upgrade Key to support RAID
conguration.
Follow the steps below to correctly install an M.2 SSD in the M.2 connector.
Step 1:
LocatethepropermountingholefortheM.2SSDtobeinstalledandthentightenthestandoffrst.Insert
the M.2 SSD into the M.2 connector at an angle.
Step 2:
Press the M.2 SSD down and then secure it with the screw.
Step 3:
Install the water cooling kit. (Refer to Chapter 1-3-2, "Installing the Water Cooling Kit," for more information.)
Select the proper hole for the M.2 SSD to be installed and refasten the screw and standoff.
 Loading...