- 24 -
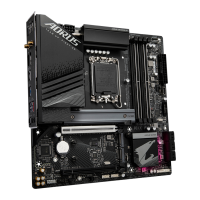
10) M2A_CPU/M2B_CPU/M2C_SB/M2D_SB (M.2 Socket 3 Connectors)
There are two types of M.2 SSDs: M.2 SATA SSDs and M.2 PCIe SSDs. This motherboard only supports
M.2 PCIe SSDs. Please note that an M.2 PCIe SSD cannot be used to create a RAID set with a SATA
hard drive. Please navigate to the "Conguring a RAID Set" page of GIGABYTE's website for instructions
on conguring a RAID array.
Follow the steps below to correctly install an M.2 SSD in the M.2 connector.
Step 1:
Unfasten the screws on the motherboard heatsink diagonally to remove the heatsink. Select the M.2 slot
you want to use and press down on the M.2 EZ-Latch clip to open it. Loosen the M.2 EZ-Latch clip with a
screwdriver, move it to mounting hole for your M.2 SSD and tighten it in the hole.
* Types of M.2 SSDs supported by each M.2 connector:
M.2 PCIe x4 SSD M.2 PCIe x2 SSD M.2 SATA SSD
M2A_CPU
a a
r
M2B_CPU
a a
r
M2C_SB
a a
r
M2D_SB
a a
r
& Please visit GIGABYTE's website for details on using M.2 EZ-Latch.
Install the M.2 SSD: https://www.gigabyte.com/WebPage/919/M2-ezlatch.html
* Motherboard heatsink design may vary by model.
60 42
M2D_SB
F_USB30
F_U
B_
F_ F_
_
B
BS_
B
SB_
B
_S
S_
_
B
_U
_
B
S
123
123
123
123
1
1
1
1
BSS
S
_S
SSU
1 2 3
S3
BSSS
U
__ 3
F_USB3F
S _
S _
S _
SF
B_
B_
F
_0
S
S
_0F
_F
_
_
__B
U
S _S
_
SF_
B
USB0_B
B_
B_
F_USB3
F_USB303
_
_3U
S_
_S
SS_F
_
_
F
_SB
80110 60 42
M2A_CPU
60 42
M2B_CPU
60 42
M2C_SB
F_USB30
F_U
B_
F_ F_
_
B
BS_
B
SB_
B
_S
S_
_
B
_U
_
B
S
123
123
123
123
1
1
1
1
BSS
S
_S
SSU
1 2 3
S3
BSSS
U
__ 3
F_USB3F
S _
S _
S _
SF
B_
B_
F
_0
S
S
_0F
_F
_
_
__B
U
S _S
_
SF_
B
USB0_B
B_
B_
F_USB3
F_USB303
_
_3U
S_
_S
SS_F
_
_
F
_SB
80110 60 42
F_USB30
F_U
B_
F_ F_
_
B
BS_
B
SB_
B
_S
S_
_
B
_U
_
B
S
123
123
123
123
1
1
1
1
BSS
S
_S
SSU
1 2 3
S3
BSSS
U
__ 3
F_USB3F
S _
S _
S _
SF
B_
B_
F
_0
S
S
_0F
_F
_
_
__B
U
S _S
_
SF_
B
USB0_B
B_
B_
F_USB3
F_USB303
_
_3U
S_
_S
SS_F
_
_
F
_SB
80110 60 42
F_USB30
F_U
B_
F_ F_
_
B
BS_
B
SB_
B
_S
S_
_
B
_U
_
B
S
123
123
123
123
1
1
1
1
BSS
S
_S
SSU
1 2 3
S3
BSSS
U
__ 3
F_USB3F
S _
S _
S _
SF
B_
B_
F
_0
S
S
_0F
_F
_
_
__B
U
S _S
_
SF_
B
USB0_B
B_
B_
F_USB3
F_USB303
_
_3U
S_
_S
SS_F
_
_
F
_SB
80110 60 42
Step 2:
Insert the M.2 SSD into the M.2 connector at an angle. Press down on the front end of the M.2 SSD and
close M.2 EZ-Latch clip to secure the M.2 SSD.
Step 3:
Remove the protective lm from the bottom of the motherboard heatsink and then replace the heatsink
and tighten the screws diagonally.
• If you want to install an M.2 SSD that came with its own heatsink, you have to remove the
EZ-Latch clip rst and use the provided screw and standoff to fasten the SSD.
• If you want install an M.2 SSD in the 110mm hole that already has a motherboard heatsink
standoff, be sure to remove the EZ-Latch clip rst and use the motherboard heatsink screw
to secure the heatsink and SSD.
 Loading...