Chapter3 Appendix
3-1 ConguringaRAIDSet
RAIDLevels
Beforeyoubegin,pleasepreparethefollowingitems:
• AtleasttwoSATAharddrivesorSSDs.
(Note1)
(To ensure optimal performance, it is recommended that you
usetwoharddriveswithidenticalmodelandcapacity).
(Note2)
• Windows setup disk.
• Motherboard driver disk.
• A USB thumb drive.
ConguringtheOnboardSATAController
A.InstallingSATAharddrive(s)inyourcomputer
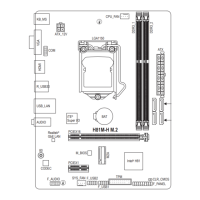
Installtheharddrives/SSDsintheIntel
®
Chipset controlled connectors on the motherboard. Then connect the
power connectors from your power supply to the hard drives.
B.ConguringSATAcontrollermodeinBIOSSetup
MakesuretoconguretheSATAcontrollermodecorrectlyinsystemBIOSSetup.
Steps:
1. Go to Peripherals\SATAAndRSTConguration, make sure SATAController(s) is enabled. To create
RAID,setSATAModeSelection to IntelRSTPremiumWithIntelOptaneSystemAcceleration. Then
savethesettingsandrestartyourcomputer.Note:WhenusingaPCIeSSD,makesuretosettheUSERST
LegacyOROM item under Peripherals\SATAAndRSTConguration to Disabled. Then depending the
M.2 connector you use, set the corresponding PCIeStorageDevonPortXX item to RSTControlled.
2. TousetheEZRAIDfeature,followthestepsin"C-1."TocongureUEFIRAID,followthestepsin"C-2."To
enterthelegacyRAIDROM,referto"C-3"formoreinformation.Finally,savethesettingsandexitBIOSSetup.
The BIOS Setup menus described in this section may differ from the exact settings for your motherboard.
The actual BIOS Setup menu options you will see shall depend on the motherboard you have and
the BIOS version.
C-1.UsingEZRAID
GIGABYTEmotherboardsprovideyouwiththeEZRAIDfeature, allowingyoutoquickly congureaRAID
arraywithsimpliedsteps.
Steps:
1. After restarting the computer, enter the BIOS Setup and go to Peripherals.Press<Enter>ontheEZRAID
item.SelectthetypeofharddrivesyouuseforRAIDintheTypetabandthenpress<Enter>.
2. Go to the ModetabtoselectaRAIDlevel.RAIDlevelssupportedincludeRAID0,RAID1,RAID10,andRAID
5(theselectionsavailabledependonthenumberoftheharddrivesbeinginstalled).Thenpress<Enter>to
move to the Create tab. Click Proceed to begin.
RAID0 RAID1 RAID5 RAID10
Minimum
Number of Hard
Drives
≥2 2 ≥3 4
Array Capacity Number of hard
drives*Sizeofthe
smallest drive
Sizeofthesmallest
drive
(Number of hard
drives-1)*Sizeof
the smallest drive
(Number of hard
drives/2)*Sizeofthe
smallest drive
Fault Tolerance No Yes Yes Yes
(Note1) AnM.2PCIeSSDcannotbeusedtosetupaRAIDseteitherwithanM.2SATASSDoraSATAharddrive.
(Note2) Referto"1-7InternalConnectors,"fortheinstallationnoticesfortheM.2andSATAconnectors.
- 40 -
 Loading...