1. For the complete enjoyment, use and understanding of this
product READ AND FOLLOW ALL SAFETY INSTRUCTIONS and all
important notices on the appliance before using. Failure to do so
may result in damage to the unit.
WARNING: This appliance is NOT waterproof and MUST be protected
from coming in contact with water.
2.
DANGER – To avoid possible electrical shock, special care should
be taken since water can be in close proximity to this equipment.
For each of the following situations, do not attempt repairs
yourself; return the appliance to an authorized service facility for
service or discard the appliance.
A. If the appliance falls into the water, DON’T reach for it! First
unplug it and then retrieve it. If the electrical components of the
appliance get wet, unplug the appliance immediately.
B.
Carefully examine the appliance after installation. It should not be
plugged in if there is water on parts not intended to be wet.
C. Do not operate any appliance if it has a damaged electrical
cord or plug, or if it is malfunctioning or if it is dropped or damaged
in any manner. The electrical cord of this appliance cannot be
replaced: if the electrical cord is damaged, the appliance should
be discarded. Never cut the cord.
D.
To avoid the possibility of the appliance plug or receptacle getting
wet, position the appliance to one side of a wall mounted receptacle
to prevent water from dripping onto the receptacle or plug. A “drip
loop” (see illustration A) should be arranged by the user for the cord
connecting appliance to a receptacle. The “drip loop” is that part
of the cord below the level of the receptacle or the connector if an
extension cord is used, to prevent water traveling along the cord
and coming in contact with the receptacle. If the plug or receptacle
does get wet, DON’T unplug the cord. Disconnect the fuse or circuit
breaker that supplies power to the appliance. Then unplug and
examine for presence of water in receptacle.
If an extension cord is necessary, a cord with a proper rating
should be used. A cord rated for less amperes or watts than the
appliance rating may overheat. Care should be taken to arrange
the cord so that it will not be tripped over or pulled.
E. This fluorescent lighting system is supplied with a grounded
plug and must only be connected to a properly grounded
receptacle.
3. Close supervision is necessary when an appliance is used by or
near children.
4. To avoid injury, do not contact moving parts or hot parts such as
heaters, reflectors and lamp bulbs.
5. Always unplug an appliance from an outlet when not in use, before
putting on or taking off parts, and before cleaning. Never yank cord
to pull plug from outlet. Grasp the plug and pull to disconnect.
IMPORTANT SAFETY INSTRUCTIONS
WARNING: To guard against injury, basic safety precautions should be observed when handling the
GLO T5 HO High Output Linear Fluorescent Lighting System including the following:
6. Do not use an appliance for other than intended use (i.e. don’t
use on swimming pools, garden ponds, bathrooms, etc.). The
use of attachments not recommended or sold by the appliance
manufacturer may cause an unsafe condition.
7. Do not install or store the appliance where it will be exposed to
weather or to temperatures below freezing.
8. Make sure an appliance mounted on a tank is securely installed
before operating it.
WARNING: Do not plug in the GLO
T5 HO High Output Linear
Fluorescent Lighting System if there is water on parts not intended
to be wet. Ensure sufficient air space around the
GLO T5 HO High Output Linear Fluorescent Lighting System.
The safety of this appliance is granted only provided that the bulb(s)
are properly installed.
9. Read and observe all the important notices on the appliance.
10. GROUNDING INSTRUCTION: This appliance should be grounded
to minimize the possibility of electric shock. This appliance is
equipped with an electric cord having an equipment grounding
conductor and a grounding type plug. The plug must be plugged
into an outlet that is installed and grounded in accordance with all
appropriate codes and ordinances.
This appliance is for use with 220/240v. 50Hz grounded circuits only.
11. SAVE THESE INSTRUCTIONS. For the
complete use and understanding of
this High Output Linear Fluorescent
Lighting System, it is recommended
that this manual is
thoroughly read and
understood. Failure
to do so may result
in damage to this
unit.
Illustration A
Drip Loop
(See 2D.)
220/240v. 50Hz., FOR HOUSEHOLD, INDOOR USE ONLY.
INSTALLATION
RECOMMENDATION: USE ONLY T5 HO FLUORESCENT BULBS. This equipment is FOR INDOOR USE ONLY. For convenient and
controlled operations of this unit, it is recommended that you connect it to an approved grounded electric timer.
WARNING: Disconnect the plug of this unit and all other electrical equipment used for the aquarium, before placing
your hands in aquarium water and/or performing any maintenance of any kind.
WARNING: Whenever installing, removing or changing fluorescent tubes or maintaining, installing or removing the
GLO T5 HO High Output Linear Fluorescent Lighting System or any other equipment, always ensure that it is unplugged.
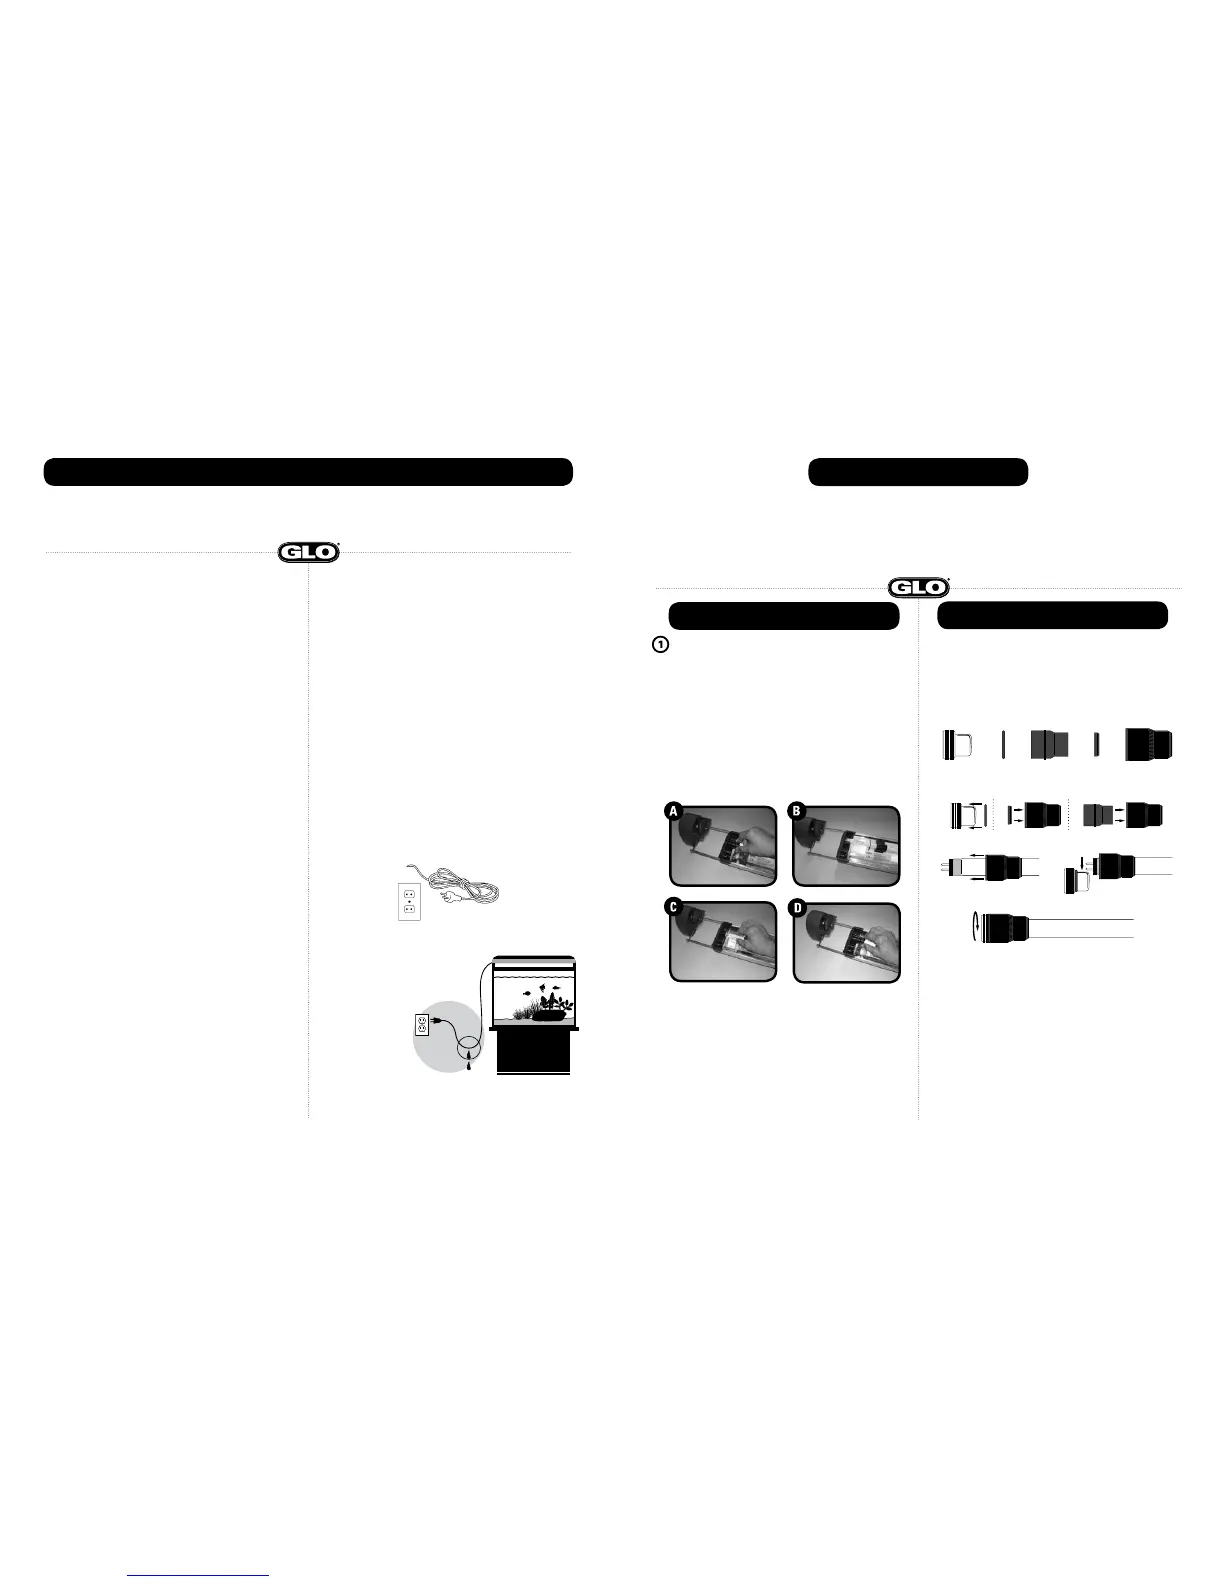
Fluorescent Tube Installation
To install the fluorescent tube(s) of the correct diameter and
wattage, please follow steps A to D:
A. Unthread the water resistant end cap, please take note of the
O-ring located at the socket base.
B. Slide the end cap and O-ring over the ends of the bulb(s).
C. Insert the bulb pins into the socket, carefully rotate the bulb
until it positively locates at the quarter turn position.
D. Slide the water resistant end cap onto the socket and thread
down the end cap securely by hand only.
(See figures A, B, C and D below)
It is very important when changing the fluorescent tube(s)
(see Fluorescent Tube Installation section) that the socket end
caps be reassembled correctly in order to ensure the integrity
of the water resistant end cap.
The diagrams below depict the correct assembly sequence for
the water resistant end cap assembly. It is important that the
O-rings and tube gaskets be assembled in the correct orientation
and sequence.
When reassembling the water resistant end caps:
1. The socket seal O-ring must be in place on the socket
receptacle as per the illustration. (See figure 1A)
2. Ensure that the end cap seal gasket is inserted into the end
cap with the beveled edge facing outward. Seal gasket should
be moistened with water before assembly. (See figure 1B)
3. If the inner retainer sleeve is removed during the disassembly
of the end cap, it should then be re-inserted into the socket
end cap. (See figure 1C)
4. The end cap assembly should then be placed over the
fluorescent tube. The fluorescent tube should then be
inserted into the socket receptacle. Then slide the end cap
assembly down the fluorescent tube and thread onto the
socket receptacle housing, hand tightened securely.
Do not cross thread. (See figure 2)
SOCKET SEAL
O-RING
A.
INNER RETAINER
SLEEVE
SEAL
GASKET
SOCKET
END CAP
SOCKET
RECEPTACLE
Fig. 1
Fig. 2
B. C.
Important Instructions
 Loading...