Do you have a question about the GlucoZen.auto AGM-4000 and is the answer not in the manual?
Step-by-step instructions for performing a blood glucose test quickly.
Defines the system's purpose and the scientific basis of its operation.
Essential safety guidelines to follow when using the device.
Guidelines for maintaining the integrity and usability of test strips.
Recommendations for storing the meter and related items to ensure longevity.
Lists all items provided within the GlucoZen.auto Blood Glucose Monitoring System package.
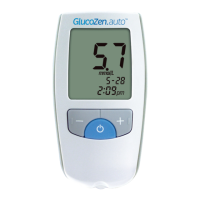
Details the physical components of the GlucoZen.auto meter, including display and buttons.
Describes other functional parts of the meter for data transfer and maintenance.
Explains the various icons, symbols, and messages shown on the meter's screen.
Identifies the key parts of the test strip and where to apply blood.
Procedure to ensure accurate calibration by matching codes.
Explains why and when to use the control solution to check system accuracy.
The process of inserting a test strip into the meter for control solution testing.
Correct method for applying the control solution sample to the strip.
How to save the results of a control solution test in the meter.
How to evaluate if control solution test results are within the acceptable range.
Identifying potential causes and solutions for inaccurate control readings.
How to designate control solution tests distinctly from blood glucose results.
Step-by-step instructions for preparing the lancing device for use.
How to customize puncture depth and charge the device.
The procedure for obtaining a blood sample and safely removing the lancet.
Guidelines for preventing infection and disposing of used lancets and strips.
Visual guide showing the meter, test strip, lancing device, and lancets.
Correctly inserting the test strip to turn on the meter and prepare for testing.
Guidance on collecting an adequate blood drop from the fingertip.
The proper technique for applying blood to the test strip's sample window.
How the glucose result is displayed and how to record associated events.
How to choose relevant icons (e.g., Post Meal) to categorize test results.
Explains the specific meaning and use of each event icon.
Actions to take if the meter shows 'HI' (high) or 'Lo' (low) glucose readings.
Information on recommended blood glucose ranges for diabetes management.
How to enter the mode for reviewing stored test results.
How to choose the duration (e.g., 7 days) for averaging test results.
How to view individual test results chronologically in memory.
The procedure to exit the memory mode and return to the default display.
Steps to access the meter's settings menu.
How to adjust the year displayed on the meter.
Adjusting the month and day values in the meter settings.
Choosing the desired display format for dates (e.g., MM/DD).
Adjusting the current hour and minute on the meter.
Choosing between 12-hour and 24-hour time display formats.
Setting parameters for average calculation and audible alerts.
How to program up to four distinct alarms for daily reminders.
A tip for efficiently setting multiple alarms on the meter.
Important warnings and steps before replacing the meter's battery.
The critical first step to prevent meter malfunction during battery replacement.
Detailed instructions for opening the cover, replacing the battery, and closing the cover.
Explains the messages shown when the meter powers on and is ready for use.
Interprets messages related to code numbers and the testing countdown.
How normal results are shown and the prompt to select an event icon.
Explains the 'HI' and 'Lo' indicators for extreme glucose readings.
How recorded test results and calculated averages are shown.
Explains the messages indicating the battery needs replacement.
Explains error messages related to operating temperature and test strip issues.
Explains error messages related to internal circuits, strip connection, or sample application.
Troubleshooting steps for when the meter does not power on after inserting a strip.
Troubleshooting steps when the test fails to initiate after blood application.
Defines common symbols found on the device and in the manual for user guidance.
| Brand | GlucoZen.auto |
|---|---|
| Model | AGM-4000 |
| Category | Blood Glucose Meter |
| Language | English |