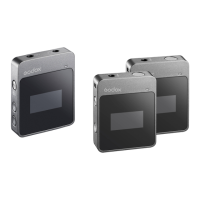
This document describes the Godox WEC-S Kit1 and WEC-S Kit2 wireless lavalier microphone systems, designed for Sony cameras. These systems are compact, portable, and offer long battery life, utilizing 2.4GHz wireless transmission for various applications such as live streaming, interviews, family lecturing, short video recording, and outdoor shooting.
Function Description
The Godox WEC-S systems are wireless lavalier microphone systems that transmit audio signals over the 2.4GHz frequency band. They are designed to capture clear and stable sound, offering features like noise reduction and flexible audio output options. The system includes a transmitter, a receiver, and a charging case.
The transmitter is a compact unit that clips onto clothing, typically near the collar, to capture audio. It features a power switch button, a pairing/denoise button, a built-in microphone, a back clip, an indicator light, a USB-C charging port, and charging points.
The receiver connects to a Sony camera via a hot shoe or to a smartphone via a 3.5mm audio cable. It can also function as an individual microphone. The receiver includes a digital/analog audio mode switch button, a receiver's mic switch button, a USB-C port, a 3.5mm audio output port, a power switch button, a pairing/volume+ button, a model/volume- button, a hot shoe, charging points, a hot shoe detaching button, a built-in microphone, a hot shoe connecting indicator, and a pairing indicator.
The charging case is used to charge and store both the transmitter and receiver. It has slots for the transmitter and receiver, an internal status indicator, external charging indicators, a USB-C charging port, and a reset hole.
Important Technical Specifications
| Name |
Transmitter (WEC TX) |
Receiver (WEC SRX) |
Charging Case (WEC-CS) |
| Transmission Type |
2.4GHz Frequency Hopping System |
2.4GHz Frequency Hopping System |
/ |
| Pickup Pattern |
Omnidirectional |
/ |
/ |
| Frequency Range |
20Hz–20KHz |
/ |
/ |
| Max. SPL |
110dB |
/ |
/ |
| Dynamic Range |
86dB |
/ |
/ |
| Max. Wireless Distance |
200m (sight distance) |
200m (sight distance) |
/ |
| Lithium Battery Parameters |
3.7V = 140mAh, 0.518Wh |
3.8V = 200mAh, 0.76Wh |
3.7V = 1400mAh, 5.18Wh |
| USB-C Input |
5V = 160mA |
5V = 200mA |
5V = 1.3A |
| Working Time |
Approx. 8h |
Approx. 8h |
Charge 3 devices for about twice |
| Charging Time |
Approx. 2h |
Approx. 2h |
Approx. 2h |
| Working Environment Temperature |
-10~50°C |
-10~50°C |
-10~50°C |
| Dimension |
48mm×22mm×16mm (1.89"×0.87"×0.63") |
52mm×24mm×30mm (2.05"×0.94"×1.18") |
63mm×85mm×36mm (2.48"×3.35"×1.42") |
| Net Weight |
12g |
19g |
87g |
Usage Features
- Power On/Off: Press and hold the power switch button for 3 seconds to turn on or off the transmitter and receiver. When taken out of the charging case, they will boot up automatically. When put into the charging case, they will turn off. If unpaired, the transmitter and receiver will turn off after 5 minutes.
- Pairing: Press and hold the pairing/denoise button on the transmitter and the pairing/volume+ button on the receiver for 2 seconds to pair them. They will exit pairing status once paired, or after 10 seconds if unpaired.
- Indicator of transmitter flashes green rapidly (0.25s): Pairing status.
- Both indicators of receiver flash green rapidly (0.25s): Pairing status.
- Indicator of transmitter is constant on green: Paired.
- TX1 indicator of receiver is constant on green, TX2 indicator of receiver is off: One transmitter and one receiver are paired.
- Both indicators of receiver are constant on green: Two transmitters and one receiver are paired.
- Denoise Function: Press the pairing/denoise button on the transmitter to turn on or off the denoise function. When the denoise function of one transmitter in WEC-S Kit2 is turned on, the other transmitter will be turned on simultaneously, and the same applies when the denoise function is turned off.
- Indicator of transmitter is constant on orange: Denoise function is on.
- Mono/Stereo Mode Switch: The sound track mode is mono by default. Press and hold the model/volume- button on the receiver for 5 seconds to switch to stereo mode.
- Both indicators of receiver are constant on green: Mono mode.
- Both indicators of receiver are constant on blue: Stereo mode.
- Output Volume Adjustment: Press and hold the pairing/volume+ button or model/volume- button on the receiver to adjust the output volume in 3 levels (high, medium, and low). The volume is at the medium level by default after first boot.
- Digital/Analog Audio Mode Switch: Slide the digital/analog audio mode switch button on the receiver to switch to digital audio mode or analog audio mode.
- Receiver's Mic: Slide the receiver's mic switch button to turn on or off the receiver's mic. The receiver is workable as a microphone to record individually when it's turned on.
- Charging:
- Via USB-C Cable: The transmitter and receiver can be charged after connecting to power source through a USB-A to USB-C cable.
- Indicators of transmitter and receiver flash white: Charging.
- Indicators of transmitter and receiver are constant on white: Fully charged.
- Indicator of transmitter flashes red every 0.5s: Battery level of transmitter is below 10%.
- TX1 indicator of receiver is constant on red, TX2 indicator of receiver displays normally: Battery levels of receiver and transmitter TX1 are normal, while battery level of transmitter TX2 is below 10%.
- TX1 indicator of receiver displays normally, TX2 indicator of receiver is constant on red: Battery levels of receiver and transmitter TX2 are normal, while battery level of transmitter TX1 is below 10%.
- TX1 and TX2 indicators of receiver are constant on red: Battery level of receiver is normal, while battery levels of transmitter TX1 and TX2 are below 10%.
- TX1 and TX2 indicators of receiver flash red every 0.5s: Battery level of receiver is below 10%.
- Via Charging Case: When the transmitter/receiver is inserted into the charging case, the internal status indicator and external charging indicators will light up to show the battery level of the transmitter/receiver and the charging case itself.
- Internal status indicator flashes white: The transmitter/receiver being charged.
- Internal status indicator is constant on white: The transmitter/receiver is fully charged.
- Four external charging indicators are constant on white: Charging case battery level is 100%.
- The first three external charging indicators from left to right are constant on white after the lid is open, while the last one is off: Charging case battery level is 75%.
- The first two external charging indicators from left to right are constant on white after the lid is open, while the other two are off: Charging case battery level is 50%.
- The first external charging indicator from left to right is constant on white after the lid is open, while the last three are off: Charging case battery level is 25%.
- The first external charging indicator from left to right flashes white after the lid is open, while the last three are off: Charging case battery level is low, please charge in time.
- Four charging indicators are all off after the lid is open: Charging case battery level is 0%, it will automatically turn off.
- Installation:
- Clip the transmitter to the collar with its back clip.
- Clip the receiver to a Sony camera directly through the hot shoe. The hot shoe connecting indicator will light up after connection. Push the hot shoe-detaching button and pull out the receiver to detach it from the camera.
- Connect the 3.5mm audio output port of the receiver to the 3.5mm earphone jack port of a smartphone with the 3.5mm TRS-TRRS audio cable.
Maintenance Features
- Avoid falling: Strong collision or vibration may malfunction the device.
- Keep dry: This product is not water-proof. Malfunction, rust, and corrosion may occur and go beyond repair if soaked in water or exposed to high humidity.
- Avoid sudden temperature changes: Condensation happens in sudden temperature changes such as when taking the product out of a building with higher temperature to outside in winter. Put the product in a handbag or plastic bag beforehand to prevent condensation.
- Keep away from strong magnetic field: The strong static or magnetic field produced by devices such as radio transmitters leads to malfunction.
- Warning:
- This product is a high-precision instrument; avoid falling, collision, or pounding.
- Do not disassemble. Repairs should be sent to the company or an authorized maintenance center.
- Always keep this product dry. Do not use in rain or damp conditions.
- Do not leave or store this product in direct sunlight, near heating devices, or in hot, humid, or dusty environments.
- Keep out of reach of children.
- Do not use in flammable and explosive environments.
- Do not leave or store the product if the ambient temperature exceeds 50°C.
- Read carefully and follow the warnings or instructions provided by the manufacturer.
The warranty period for products and accessories is implemented according to the relevant Product Maintenance Information. The warranty period is calculated from the day of purchase (first time) and the purchase date is considered as the date registered on the warranty card when buying the product.
- Product Main Body: 12 months (Customer sends the product to designated site).
- Battery: 3 months (Customer sends the product to designated site).
- Charger, Electrical Parts, etc.: 12 months (Customer sends the product to designated site).
- Other items (Battery Case, Windscreen Foam, Wind Cap, Locking Device, Lanyard, Tie, Velcro Type, Clip, Bag, Package, etc.): No warranty.
Inapplicable Cases for Warranty:
- The product or accessory has expired its warranty period.
- Breakage or damage caused by inappropriate usage, maintenance or preservation, such as improper packing, improper usage, improper plugging in/out external equipment, falling off or squeezing by external force, contacting or exposing to the improper temperature, solvent, acid, base, flooding and damp environments, etc.
- Breakage or damage caused by non-authorized institution or staff in the process of installation, maintenance, alteration, addition and detachment.
- The original identifying information of product or accessory is modified, alternated, or removed.
- No valid warranty card.
- Breakage or damage caused by using illegally authorized, nonstandard or non-public released software.
- Breakage or damage caused by force majeure or accident.
- Breakage or damage that could not be attributed to the product itself.
Once these situations occur, solutions should be sought from the related responsible parties, and Godox assumes no responsibility. The damage caused by parts, accessories, and software that go beyond the warranty period or scope is not included in our maintenance scope. The normal discoloration, abrasion, and consumption are not the breakage within the maintenance scope.