G-Series Automatic On/O Timer Instruction Manual
Before Getting Started
2. Operating your Guardian G2 Propane Cannon
Time Indicator
Important: Before installation, ensure the tank valve is closed.
Remove the caps from the gas ttings on the timer. Cut the hose line
between the propane tank regulator and the cannon at a distance of
approximately 4–6” from the tank.
Slide the hose clamps over the end of each hose and t the hoses to
each gas tting. Connect the hose from the propane tank/regulator on
to the left timer gas tting (marked “IN”). Connect the hose from the
cannon on to the right timer gas tting (marked “OUT”). Tighten the
hose clamps over each gas tting.
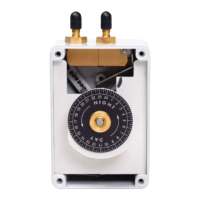
Remove the front cover by unscrewing the 4 screws in each corner of the timer housing.
Remove the drive unit from the housing and insert the AA battery.
Flip the drive unit over to access the timer unit. The timer unit is a 24-hour timer which
rotates in a counter-clockwise direction. 1 revolution equals a 24-hour day. The timer
automatically sets a daily start/stop time of the propane cannon each day at a specied
time (1 on/o period per day), creating an operational period between 10–19 hours.
To adjust the timer, loosen the milled nut while holding the timer unit. Do not loosen or
remove the milled nut while holding the drive unit. This could damage the drive unit.
1. Installing your G-Series Automatic Timer
2. Setting the Automatic Timer
General Information
• Read entire manual before use.
• Gas cannons and timers are for outside use only.
• Do not smoke when near the device or during operation.
• This timer is intended for use with any Guardian Propane
Scare Cannon. It is intended to operate on LP gas.
• Avoid rough handling of the timer, especially shocks and
bumps, as the device operates on sensitive components.
Gas Fittings: IN OUT
• The timer cannot be used at temperatures below 14°F (-10°C).
• To avoid leakage, keep the gas hose and ttings free of dust and debris.
• Warning: To prevent gas leakage, do not dismantle any parts in the valve assembly or timer drive unit. The timer has certain
components that can only be repaired by trained technicians.
Please note, the timer does not regulate the time between cannon blasts; the gas regulator controls blast frequency. The
automatic timer controls gas ow to the cannon at specied times (one on/o period per day).
Included In Your Package
G-Series Automatic On/O Timer
Hose Clamp (2)
AA Battery
Drive Unit
Timer
Housing
Timer
Unit