© Gooligum Electronics 2015 www.gooligum.com.au
Baseline and mid-range PIC training and dev board operation guide Page 7
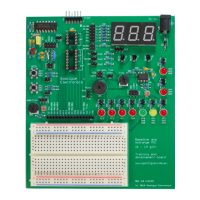
A sawtooth form of the variable frequency signal can be connected to comparator input C2IN+, via
jumper JP27.
A piezo sounder is connected directly to pin RC5, which is also PWM output P1A.
To drive the piezo using a single-ended PWM output (or by toggling RC5), the other side of the piezo
should be connected to ground, by placing a shunt across positions 1 and 2 of jumper JP23.
Alternatively, the piezo can be driven (at higher volume) by a double-ended or half-bridge PWM output,
by placing a shunt across positions 2 and 3 of JP23, connecting its other side to PWM output P1B.
Finally, every PIC pin, the 32.768 kHz and variable frequency signals and the power supply are brought
out to a 16-pin expansion header, next to the breadboard (making it easy to build custom circuits and to
use this training board a general 6 – 14-pin PIC development board), as follows:
32.768 kHz buffered digital signal
Variable frequency (150 – 10000 Hz) digital signal
 Loading...