6
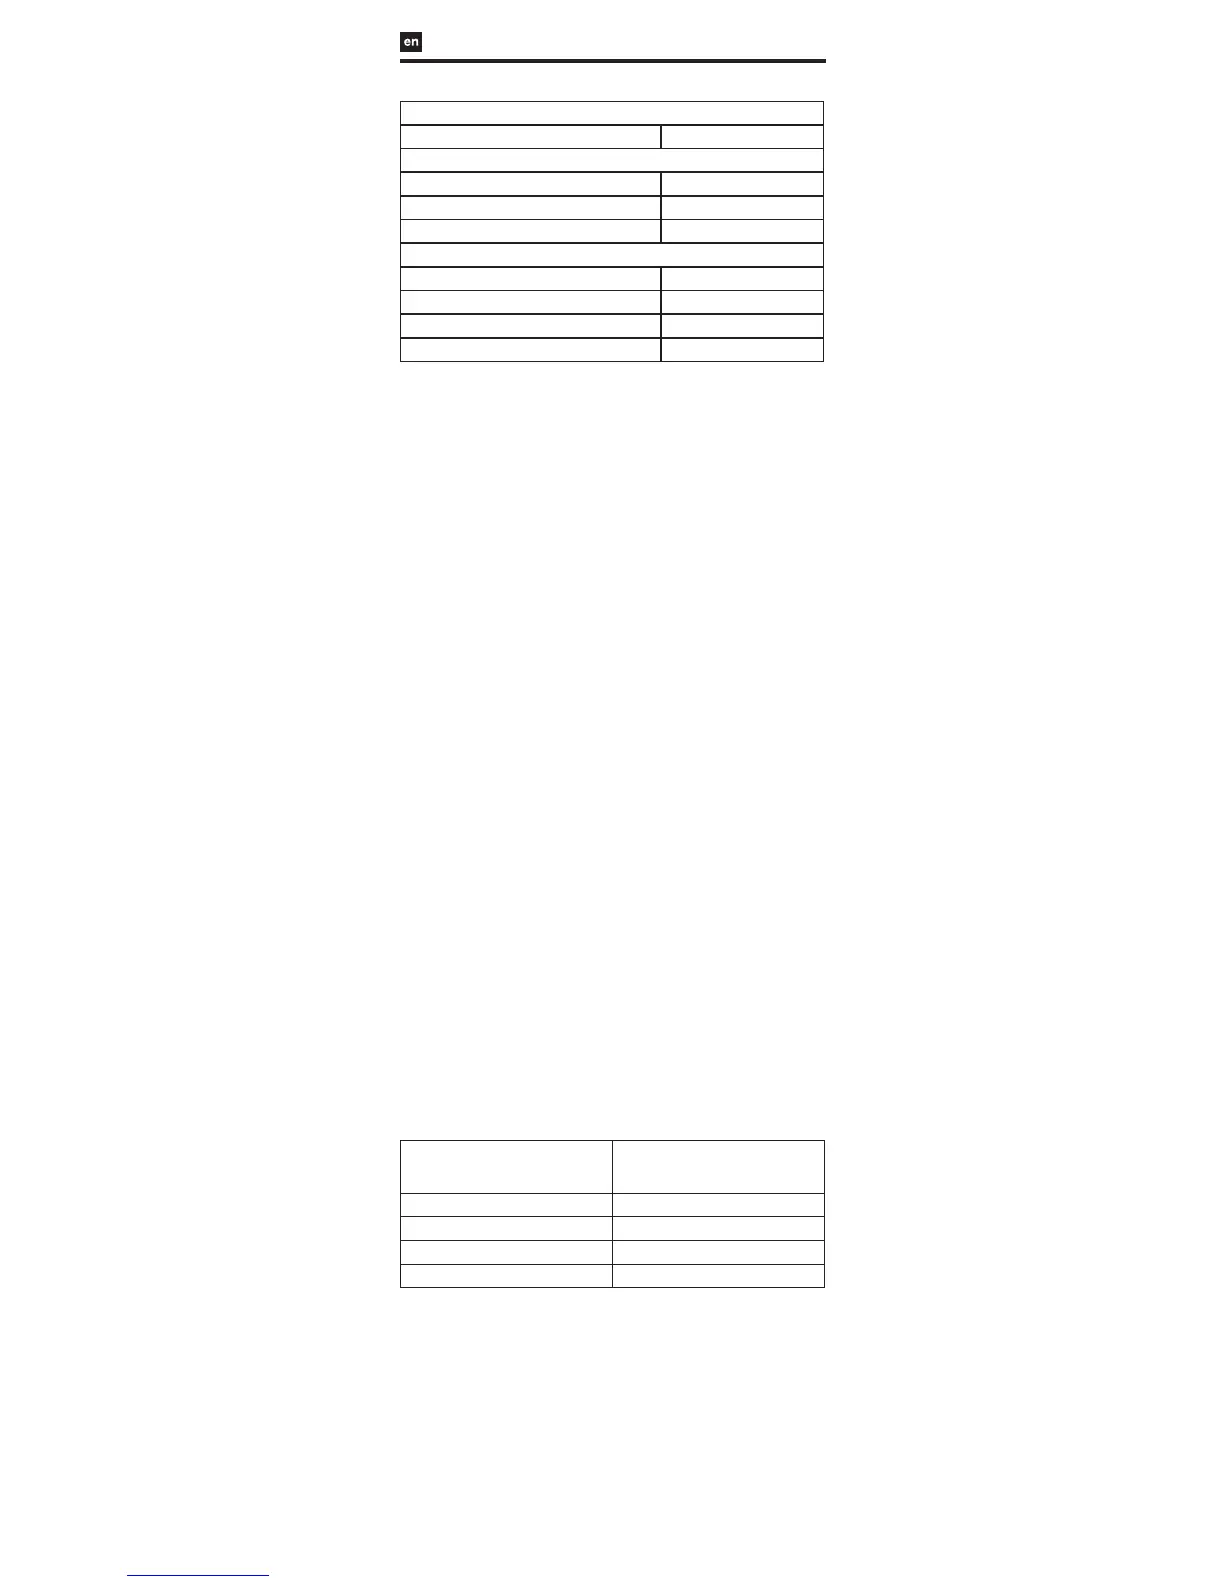
Table 4. Primary, Safety, and Efficacy Endpoints – Pivotal Study
Primary Endpoint
Composite Clinical Success
1
40/43 (93.0%)
Safety Endpoints
30-Day Serious Adverse Events 0.0% (0/50)
6-Month Serious Adverse Events 0.0% (0/50)
6-Month Device Events
2
0.0% (0/50)
Efficacy Endpoints
Technical Success
3
47/50 (94.0%)
Procedure Success
4
46/47 (97.9%)
6-Month Closure Success
5
43/45 (95.6%)
6-Month Clinical Closure Success
6
40/40 (100%)
1
Technical Success and 6-Month Clinical Closure Success without Serious Adverse Events through
30 days or Device Events through 6 months
2
Post-procedural device embolization, post-procedural device removal, or any reintervention to the
septal defect
3
Successful delivery and retention of the device in subjects with a delivery attempted
4
Technical Success with completely occluded defect or residual shunt ≤ 2 mm at the completion of the
implant procedure
5
Technical Success with completely occluded defect or residual shunt ≤ 2 mm at 6 months
6
Technical Success with completely occluded defect or clinically insignificant residual shunt at 6 months
HOW SUPPLIED
The GORE® CARDIOFORM Septal Occluder is supplied sterile in a protective tray
and pouch. Provided that the integrity of the pouch is not compromised in any
way, it will serve as an effective barrier until the “use by” (expiration) date printed
on the box.
REQUIRED ACCESSORIES
• 10 Fr Introducer Sheath
• Heparinized saline
• Flushing syringe
• Stopcock
• Sizing balloon
• Sterile bowl for flushing catheter
OPTIONAL ACCESSORIES
0.035" / 0.89 mm guidewire, or smaller (if necessary for defect access)
12 Fr Introducer Sheath when a guidewire is utilized.
RECOMMENDED PROCEDURES
A. Sizing the Defect and Selecting the Proper Occluder Size
1. Use echocardiography to measure the septal length.
2. Measure the septal defect using fluoroscopy or echocardiography; the stop
flow balloon technique is recommended, as described below:
a. Place a contrast filled, compliant balloon across the defect and gently
inflate until shunting through the defect has stopped.
b. Measure the diameter of the defect using either echocardiography or
calibrated fluoroscopy.
3. Select the appropriate occluder size for the defect, taking the following
recommendations into consideration:
• A minimum occluder to defect size ratio of 1.75:1 is recommended
(reference Table 5). The defect size should be no greater than 17 mm.
An occluder that pulls through the defect after disc conformation
may be too small and should be removed and replaced with a larger
size.
• There must be adequate space to accommodate the discs within
the atrial chambers. To assure that there is adequate space to
accommodate the discs within the atrial chambers, the selected
occluder diameter should be less than 90% of the measured septal
length.
• The septal tissue margins surrounding the defect must be of
sufficient size and integrity to prevent disc prolapse through the
defect and Occluder embolization.
Table 5: GORE® CARDIOFORM Septal Occluder Device Sizing
Labeled Occluder Diameter (mm) Maximum Recommended Defect Size
Measured with Stop Flow Balloon
Sizing (mm)
15 8.5
20 11
25 14
30 17
B. Access Site Preparation
1. Prepare the venous access site according to standard practice.
2. Place appropriately sized Introducer Sheath.
C. Occluder Preparation and Loading
1. Check the “use by” (expiration date) and the condition of the package.
2. Using aseptic technique, remove the sterile tray from the pouch, and
remove the packaging tray lid.
3. Remove the device from the package and visually inspect the device for
shipping damage. Ensure that the Retrieval Luer is tight.
4. Remove the Packaging Insert from the handle (Figure 3).
5. Loading and Flushing the Occluder:
a. Submerge the Occluder and catheter tip in a heparinized saline bath
during loading to reduce the chance of air entrapment in the delivery
system.
b. Fill a syringe with heparinized saline.
 Loading...