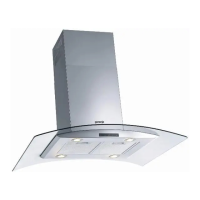
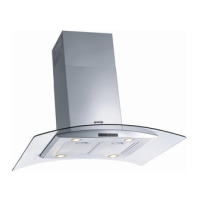
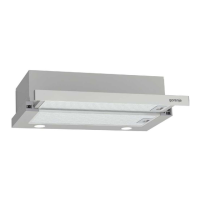
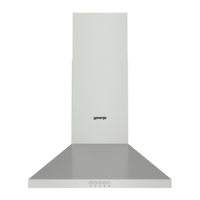
This document describes a Gorenje cooker hood, specifically models IHT941A2XBG, IHT971S2XBG, and IHT961S2X. The cooker hood is designed for the suction of cooking fumes and steam in domestic use.
Function Description:
The cooker hood operates by extracting cooking fumes and steam. It can be configured for two main modes:
- Ducting Version: In this mode, fumes are conveyed outside the building through a special pipe connected to the connection ring on top of the hood.
- Filter Version: In this mode, an active charcoal filter removes grease and odors from the extracted air before returning it to the room through an upper outlet grid.
The hood features a control panel with touch controls for various functions:
- T1 (Standby/ON): Switches the control panel on or off. The hood automatically enters standby mode after about a minute of inactivity.
- T2 (ON/OFF Lights): Controls the hood's lighting. On some models, the LED strip (SL1) allows for adjusting light intensity.
- T3 (ON/OFF Automatic Operation): Activates an automatic mode where the hood adjusts suction speed based on environmental conditions detected by a sensor. If conditions remain stable, the hood turns off after 10 minutes (if already at suction speed 1). This function requires prior "Hood Calibration" and "Selection of the hob."
- T4 (Manual Suction Speed Selection): Allows manual selection of suction speeds (L4: speed 1, L5: speed 2, L6: speed 3).
- T5 (Intensive Suction Speed "POWER BOOST"): Activates an intensive suction speed for a timed period (5 minutes), after which the hood returns to its previous state.
- T6 (Intensive Suction Speed "POWER BOOST x 2" - on certain models): Activates a second, even more intensive suction speed for a timed period (5 minutes), returning to the previous state afterward.
- T7 (ON/OFF Operation Mode "Air Refresh"): Turns on suction speed 1 for 10 minutes every 50 minutes of inactivity.
- T8 (ON/OFF Delayed Switch Off): Allows setting a delayed switch-off time for the suction speed (10, 20, or 30 minutes).
- T9 (Indicator and Reset Filter Saturation): This button indicates when grease filters (steady light) or charcoal filters (flashing light) require maintenance. After maintenance, pressing the button for 3 seconds resets the indicator. The charcoal filter saturation indicator is normally disabled and needs to be activated manually.
Important Technical Specifications:
- Minimum Distance from Hob: Not less than 50cm from electric cookers and 65cm from gas or mixed cookers. If the gas hob instructions specify a greater distance, that must be followed.
- Electrical Connection: The hood requires a mains power supply corresponding to the rating on its plate. It can be connected via a plug to an accessible socket or directly to the mains with a double-pole switch ensuring complete disconnection. The hood uses a special power cable.
- Ducting Pipe Diameter: Must be equal to the connection ring diameter (e.g., Ø120-125mm or Ø150mm depending on the model). Horizontal runs should be slightly slanted (about 10°) upwards.
- Screws: Only use the fixing screws supplied or purchase the correct type and length as specified in the installation guide.
- Lighting System: Equipped with LED technology for optimum lighting, longer duration (up to 10 times traditional lamps), and 90% energy saving.
Usage Features:
- Recommended Use: Switch on the hood at minimum speed 5 minutes before cooking, keep it running during cooking, and for about 15 minutes after finishing. Increase speed only for large amounts of smoke/vapor; use boost speeds only in extreme situations.
- Environmental Impact Reduction: Follow recommended usage practices to minimize environmental impact.
- Safety: Never use the hood without effectively mounted grating. The hood must NEVER be used as a support surface unless specifically indicated. Ensure adequate ventilation in premises when the hood is used with other gas combustion devices. Flaming of foods beneath the hood is prohibited. Avoid exposed flames to prevent filter damage and fire risk. Fry with care to prevent oil overheating. Accessible parts may become hot.
- Automatic Operation Parameters: For correct automatic operation, "Hood Calibration" and "Selection of the hob" must be performed.
- Hood Calibration: Initiated by pressing T4 for 5 seconds (with display ON and suction OFF). Takes approximately 15 minutes.
- Selection of the Cooktop: Initiated by pressing T3 for 5 seconds (with display ON and suction OFF). Then select gas (T5 or T7) or electric (T6 or T8) cooktop depending on the model.
Maintenance Features:
- Cleaning: The cooker hood should be cleaned regularly (at least once a month), both internally and externally. Use a cloth dampened with neutral liquid detergent. Do NOT use abrasive products or alcohol. Failure to follow cleaning recommendations can lead to fire risks.
- Grease Filter (Fig. 24-29): Traps cooking grease particles. Must be cleaned once a month using non-aggressive detergents, either by hand or in a dishwasher (low temperature, short cycle). Discoloration in a dishwasher does not affect filtering capacity. To remove, pull the spring release handle.
- Charcoal Filter (Filter Version Only) (Fig. 26): Absorbs unpleasant odors. Saturation depends on usage and cleaning regularity of the grease filter. Must be replaced at least every four months. It cannot be washed or regenerated.
- Replacing Lamps: The LED lighting system requires technical service for replacement.
Installation Notes:
- Heavy Product: Requires at least two persons for handling and installation.
- Pre-installation Checks: Verify product size, remove charcoal filters (if supplied and not needed for ducted version), check for other materials inside the hood, and ensure access to the installation area.
- Masonry Work: Complete any necessary masonry work (e.g., electrical socket, discharge tube hole) before installation.
- Wall Plugs: Expansion wall plugs are provided, but a qualified technician must verify suitability for the wall/ceiling type, which must be strong enough to support the hood's weight. Do not tile, grout, or silicone the appliance to the wall. This is a surface mounting only appliance.
- Ducting System: Use a duct with minimum indispensable length, as few elbows as possible (max 90° angle), no drastic changes in cross-section, a smooth interior, and made of certified material.
- Electrical Safety: Do not connect to mains until installation is complete. Disconnect from mains before cleaning or maintenance. Do not make electrical or mechanical variations. Check all components for damage before installation.
The appliance is designed, tested, and manufactured according to various safety, performance, and EMC standards (e.g., EN/IEC 60335, EN/IEC 61591, EN 55014). It is marked according to European directive 2002/96/EC on Waste Electrical and Electronic Equipment (WEEE) for proper disposal and recycling.