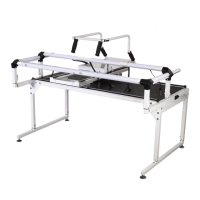
The device described in the manual is the Q-Zone Hoop-Frame PRO, a quilting frame designed for use with sewing machines to facilitate quilting projects. It is manufactured by Grace Company.
Function Description:
The Q-Zone Hoop-Frame PRO serves as a stable and adjustable platform for quilting. It allows users to mount their sewing machine (including home sewing machines with an optional top plate accessory) and fabric, enabling them to move the machine across the fabric to create quilted patterns. The frame is designed to hold the quilt sandwich (quilt top, batting, and backing) taut and flat, making it easier to achieve straight lines and consistent stitches. Its modular design allows for assembly and adjustment to suit different user heights and quilting needs.
Important Technical Specifications:
- Dimensions/Height: The frame offers adjustable height settings, with a "Floor to Top of Fabric" range from 31 inches (Hole Number 1) to 40 inches (Hole Number 10). This adjustability is achieved by sliding the legs up or down and securing them with height screws and centering screws.
- Components:
- Box 1: Includes Left Leg Assembly (1), Right Leg Assembly (1), Corner Brace (4) (QZF-04-12031), Bungee Mount (4) (SVP-05-13306), M6 x 10mm Connector Bolt (16) (HDW-03-10953), Side Fabric Clip (2) (QZF-05-12024), Bungee Clamp Assembly (4) (ACC-01-10261), 10mm & 13mm Box End Wrench (1) (HDW-03-10743), 14mm & 17mm Box End Wrench (1) (HDW-03-12068), 3mm Allen Wrench (1) (HDW-03-10166), 4mm Allen Wrench (1) (HDW-03-10167), and Hoop Frame Leader Cloth Set (1) (ACC-01-13370).
- Box 2: Contains Table Assembly (1) (SVP-09-13363), Back Long Rail (1) (QZF-09-13040), Front Long Rail (1) (QZF-09-12030), Front Fabric Clip (2) (QZF-05-12025), and Fabric Clip (3) (QZF-05-12023).
- Box 3: Includes Carriage (1) (CNT-09-11866), Channel Lock (2) (ACC-09-13057), Channel Lock Washer (2) (CNT-04-11580), and M6 x 20mm SBHCS (2) (HDW-03-10088).
- Fasteners: A variety of M6 bolts (10mm, 16mm, 20mm, 30mm, 40mm), set screws, thumb screws, and hex nuts are used for assembly.
- Tools: The assembly requires 3mm and 4mm Allen wrenches, and 10mm, 13mm, 14mm, and 17mm box end wrenches.
- Fabric Preparation: Quilt batting should be 2-3 inches larger than the quilt top on all sides. Quilt backing should extend 4-5 inches out from the batting on all sides.
- Leader Cloths: Recommended length is 105 inches to accommodate various quilt widths. They feature 3/4" casings and require marking for centering and fabric attachment.
- Optional Accessory (Top Plate Assembly): Includes Handle Left (1), Handle Right (1), Top Plate (1), Handle Crossbar (1), Carriage Bolt and Clamp (1), M6 x 10mm SBHCS (4), Channel Lock (1), M6 x 20mm SBHCS (1), and Sewing Machine Clamp (4).
Usage Features:
- Adjustable Height: The frame's height can be adjusted to ten different settings (31-40 inches) to suit the user's comfort and preferred working height.
- Carriage System: A carriage moves along tracks, allowing the sewing machine to glide smoothly across the fabric. The carriage wheels can be adjusted for optimal fit and smooth rolling.
- Channel Locks: These mechanisms are used to lock the Top Plate or the Carriage, assisting in achieving straight-line stitching. They are adjusted by loosening a 4mm hex nut, twisting a rubber foot, and then tightening the hex nut.
- Hoop Adjustment: The "Hoop" (likely referring to the fabric take-up mechanism) can be adjusted to ensure the top of the Front Long Rail and the sewing machine needle plate are level. This involves loosening M6 x 10mm set screws and using the Hoop Adjustment Take-Up Levers.
- Fabric Management: The system uses leader cloths, fabric clips, side fabric clips, bungee mounts, bungee clamp assemblies, and bungee stops to hold the quilt sandwich taut and secure. The fabric is rolled onto the frame, and the finished area is secured with a Fabric Holder Assembly.
- Machine Compatibility: The frame is designed to accommodate quilting machines, and with the optional Top Plate Assembly, it can also be used with home sewing machines.
- Leveling Feet: The frame includes leveling feet to ensure stability and prevent unwanted movement of the carriage or machine.
Maintenance Features:
- Frame Cleaning: Regular cleaning of the carriage wheels and tracks is recommended to prevent lint buildup, which can impede smooth rolling and potentially damage the track.
- Stitch Regulating Check: For machines with stitch regulating features, users should ensure encoder cords are tightly plugged in and encoder O-rings are contacting and rolling on the track.
- Carriage Alignment: Periodically check the alignment of the carriage and tracks to ensure smooth rolling. Adjustments can be made by loosening and tightening M6 Connector Bolts as described in Step 6 of the assembly instructions.
- Fabric Tension: Users are advised not to over-tighten the fabric on the frame, as this can stretch the fabric and result in a quilt that does not lay flat.
- Bungee Clamp Usage: When using bungee clamps over batting, it's recommended to turn them upside down so the rubber grip clamps against the bottom fabric for better effectiveness.
- Rail Positioning: Keeping the fabric on the Take-Up Rail slightly above the bed of the sewing machine is recommended for best results, preventing thread/needle breakage and ensuring smooth machine movement.
- Quilt Rolling: When rolling the quilt, pull the batting slightly to each side to prevent bunching and ensure the back of the quilt remains smooth.