EasyManua.ls Logo

Graco Bryson User Manual

Graco Bryson
16 pages
To Next Page IconTo Next Page
Page #1 background imageLoading...
Page #1 background image
Crib End Left
Back Left Leg
Back Right Leg
Crib End Right
1
1
1
1
1
1
1
1
1
2.
3.
4.
5.
6.
7.
8.
9.
10.
Back Assembly
Conforms to
ASTM F1169
Safety Standa
r
ds
ID756
01
ASSEMBLY INSTRUCTIONS
Convertible Crib
Adult assembly required.
Small parts may present choking hazard prior to assembly.
Enclosed please find the simple step-by-step instructions to help you quickly assemble your product. Before you begin we
recommend that you follow the steps below:
1. Please read the instructions thoroughly
2. Identify all parts and hardware.
3. You may need to provide the following tools:
Philips Head screw driver
Flat head screw driver
Hammer.
Do Not Use Power Drills or Drivers.
To protect your parts during assembly please place them on a soft surface. To clean surface use only water on a damp cloth.
Do not use window cleaners or cleaning abrasives as it will scratch the surface and could damage the protective coating.
PARTS LIST
REF. PART NAME QUANTITY
Front Assembly
Bottom Stretcher Bar
Metal Spring Support Platform
Model Number
04540-671
04540-689
04540-671
04540-679
04540-67D
04540-67F
14
1.
1
Front Left Leg
Front Right Leg
Question and Answer IconNeed help?

Do you have a question about the Graco Bryson and is the answer not in the manual?

Graco Bryson Specifications

General IconGeneral
Product Type4-in-1 Convertible Crib
Dimensions54.72 inches (L) x 29.8 inches (W) x 35.28 inches (H)
Weight44.09 lbs
Adjustable Mattress HeightYes
Assembly RequiredYes
MaterialWood
Conversion OptionsCrib, Toddler Bed, Daybed, Full-Size Bed
Safety StandardsJPMA certified, meets ASTM and CPSC safety standards
ColorGray
Weight Limit50 lbs (Crib/Toddler Bed)

Summary

Parts List

Hardware and Tool Diagram

Furniture Care Instructions

Room Climate Control

Wood moisture content affects expansion/contraction. Control humidity levels.

Ideal Environment for Furniture

Optimal temperature and humidity range for fine wood furniture to prevent issues.

Sticking Doors and Drawers

Swelling due to humidity changes can cause sticking. Use dehumidifier or wax.

Avoid Direct Sunlight

Protect from UV rays which fade colors and can cause finish cracks.

Proper Storage Guidelines

Store in a dry, ventilated area. Do not stack items on furniture.

General Care Recommendations

Protect surfaces, use coasters, avoid abrasives and excessive polishing.

Product Assistance Procedures

Critical Safety Warnings

General Safety and Assembly Warnings

Follow all warnings to prevent injury or death. Check parts for damage.

Strangulation Hazard Prevention

Avoid strings/cords near cribs and ensure fasteners are tight to prevent entrapment.

Suffocation and Fall Hazard Prevention

Use correct mattress size, avoid soft bedding, and lower mattress as child grows.

Step-by-Step Assembly Guide

Step 1: Attach Back Assembly

Connect back assembly with legs and side panels using hardware.

Step 2: Assemble Side Panels

Connect left and right crib ends to other components.

Step 3: Connect Main Sections

Join the main crib frame sections together using provided hardware.

Step 4: Add Bottom Stretcher

Attach the bottom stretcher bar for structural support.

Step 5: Install Spring Support

Place and secure the metal spring support platform.

Step 6: Final Assembly Checks

Complete assembly by attaching remaining parts and ensuring stability.

Converting Crib to Toddler Bed

Toddler Bed Use Warnings

Safety precautions for toddler bed use, including mattress and age limits.

Converting Crib to Full Size Bed

Storage, Care, and Support Information

Storage and Cleaning Instructions

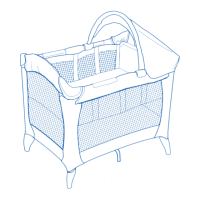
How to disassemble, store, and clean the crib.

Limited One Year Warranty

Details on the product's warranty coverage and period.

Obtaining Efficient Customer Service

Instructions for contacting customer service for assistance or parts.
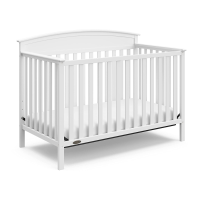
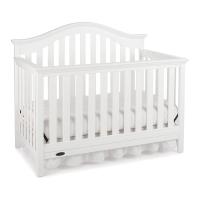
Related product manuals