Do you have a question about the GrainWood Shaker and is the answer not in the manual?
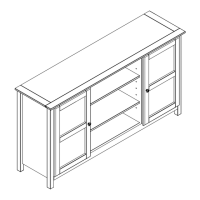
Details dimensions, model numbers, and available finishes for the 2-Door Console.
Recommends a spacious area, help from others, and protecting the unit.
Advises on handling wood imperfections, using provided tools, and avoiding power drills.
Guides on checking 90-degree angles for proper door/drawer closure.
Provides contact info for issues and a link to furniture care advice.
Lists all screws, dowels, connectors, and shelf supports needed for assembly.
Details hardware specifically for securing the unit to the wall.
Stresses checking hardware completeness and how to get missing parts.
Lists and labels all major wooden and panel components by number.
Indicates the part number designated for the hardware kit.
Attaches internal divisions to the base using dowels and connectors.
Connects the left and right side panels to the base structure.
Secures horizontal support pieces to the base and side panels.
Suggests using a hammer for difficult dowel installations.
Attaches the left side panel to the base and lower crosspiece with screws.
Joins divisions to side panels and upper crosspieces using screws.
Alerts users about potentially missing pilot holes for screws on specific panels.
Installs the upper center crosspiece connecting internal divisions.
Secures the back crosspiece to the main frame assembly.
Notes missing pilot holes for screws on specific support panels.
Connects the right side panel to the assembled base and crosspieces.
Affixes the top panel to the completed side and division structure.
Alerts users about potentially missing pilot holes for screws on top/side panels.
Secures the upper back panel to the main cabinet structure using dowels.
Stresses precise alignment of back panels for stability and appearance.
Notes potentially missing pilot holes for screws on certain structural components.
Continues the process of attaching the upper back panel to the frame.
Attaches the lower section of the back panel to the unit.
Inserts metal pins into interior panels to support adjustable shelves.
Secures additional brackets or supports to the bottom of the unit.
Alerts about potentially missing pilot holes for screws during reinforcement.
Instructs to click hinges onto their respective mounting plates.
Mounts the doors to the main cabinet using hinges and screws.
Places the shelf support pegs into the pre-drilled holes at desired shelf heights.
Positions the adjustable shelves onto the installed support pegs.
Fastens the doors to the cabinet frame using screws and hinges.
Attaches the handles or knobs to the doors using provided hardware.
Notes potentially missing pilot holes for screws on the doors.
Guides on sliding the doors into the cabinet hinges.
Completes door attachment and handle installation with screws and knobs.
Alerts about potentially missing pilot holes for screws on door parts.
Provides step-by-step visual instructions for fine-tuning door alignment.
Attaches one part of the anti-tip kit to the back of the furniture.
Fastens the other part of the kit to the wall, emphasizing anchor choice.
Links the furniture to the wall anchor using the safety strap.
This document provides assembly instructions for the Shaker Collection 2-Door Console from Grain Wood Furniture. It is a solid wood furniture piece designed for home use, requiring a 2-person assembly.
The Shaker Collection 2-Door Console serves as a versatile storage and display unit. It features a top surface, multiple adjustable shelves behind two doors, and open compartments, making it suitable for organizing various items in a living room, dining room, or entryway. The console is designed with a classic aesthetic, characteristic of the Shaker style, emphasizing simplicity, utility, and durable craftsmanship.
| Brand | GrainWood |
|---|---|
| Model | Shaker |
| Category | Indoor Furnishing |
| Language | English |