BLDG. 289 PINTADO ST.
VALLEJO, CA 94592
TEL: 707-562-2099
FAX: 707-562-2091
www.granberg.com
G106B
INSTRUCTIONS
AND PARTS LIST
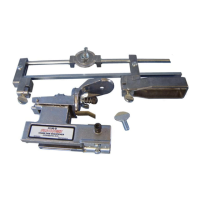
Position File-N-Joint on
bar, tighten screws (A) to
lock clamp over chain riv-
ets. Hold File-N-Join par-
allel to bar, tighten screw
(B). Back off screws (A)
slightly to allow chain to
move through snugly but
freely. Position back of
cutter against chain stop.
Positionnez le File-N-Joint sur
le guide. Serrez les vis (A)
pour bloquer la bride de ser-
rage de la chaîne sur les riv-
ets. Maintenez le File-N-Joint
parallèle au guide puis serrez
la vis (B). Dévissez légèrement
les vis (A) pour permettre
le mouvement libre mais
sans jeu de la chaîne. Placez
l’arrière de la gouge contre la
butée de chaîne.
Coloque el alador en la
espada..apriete los tornillos
(A) para bloquear la cadena
con las prensas por encima
de los eslabones. Sostener el
alador paralelo a la espada;
apriete el tornillo (B). Aoje
los tornillos (A) ligeramente
para que puedan mover la
cadena hasta el siguiente
diente por alar. Posicione
la parte trasera del diente
cortante contra el freno de
cadena del alador.
STEP 1
Set le height by turn-
ing screw (C). File should
show approximately 1/5 to
1/10 of its diameter above
the cutter.
Régler la hauteur de la lime
en tournant la vis (C). La lime
doit dépasser du bord supé-
rieur de la gouge d’environ 1/5
à 1/10 de pouce. Consultez
les instructions de limage du
fabricant.
Escoja la altura de la lima
girando el tornillos (C). La
lima deberia tener aproxi-
madamente de 1/5 a 1/10
parte de su diametro fuera
del diente cortante. Ver
instrucciones de alado del
fabricante.
STEP 2
Adjust tooth length gauge
(D) to control amount of
cutter to be led back.
Réglez la jauge de longueur
de dent (D) pour déterminer l’
épaisseur à limer.
Ajuste el eje de longitude del
diente (D) para controlar la
cantidad del diente que se
ala.
STEP 4
Set tilt dial 0 degrees. Set
ling angles according to
manufacturer’s instruc-
tions on horizontal scale
(eg. 35 degrees for stan-
dard cross cut chain).
Placez le cadran de réglage
angulaire à 0·. Réglez l’angle
d’attaque frontal sur l’échelle
horizontale en suivant les in-
structions du fabricant (par ex
35· pour une chaîne à gouges
rondes).
Coloque el eje giratorio verti-
cal en 0·. Escoja los angulos
de afilado en el eje giratorio
horizontal segun instruc-
ciones del fabricante (Ej.
35· para cadena con diente
redondo).
STEP 3
·
·
Start with the shortest
cutter and le all the cut-
ters on the same side to
the same length.
Commencez avec la lame la
plus courte et aiguisez toutes
les lames du même côté à la
même longueur.
Comience con la cuchilla más
corta y lime todas las cuchillas
del mismo lado hasta la misma
longitud.
FILE-N-JOINT
When ling cutters on the
other side of chain, reset
ling angle on opposite
side of horizontal scale.
Ensure teeth on both sides
are same length. Adjust
tooth length gauge (D) if
necessary. See manufac-
turer’s ling instructions.
Quand vous aiguisez les lames
de l’autre côté de la chaîne, ré-
glez l’angle de la lime du côté
opposé de l’échelle horizontale.
Assurez-vous que les dents de
chaque côté sont de même
longueur. Réglez la jauge de
longueur des dents (D) si
nécessaire. Reportez-vous aux
instructions d’aiguisage du fab-
ricant.
Al limar las cuchillas del otro
lado de la cadena, reajuste
el ángulo de limado del lado
opuesto de la escala horizon-
tal. Asegúrese de que los di-
entes a ambos lados tengan
la misma longitud. Ajuste la
medida de la longitud de los
dientes (D), en caso de que
sea necesario. Consulte las
instrucciones de limado del
fabricante.
STEP 5
STEP 6
chain
stop
screw (A)
screw (B)
screw (C)
tooth
gauge
length
A=B
0
35