EasyManua.ls Logo

Grape Solar GS-150-KIT - User Manual

Grape Solar GS-150-KIT
2 pages
Print Icon
To Next Page IconTo Next Page
Loading...
www.GrapeSolar.com
Tel. 1-877-264-1014 (toll free), 1-541-349-9000
Document Version 210519
©Copyright 2021, Grape Solar, Inc.
150 Watt Off-Grid Charging Kit
(GS-150-KIT)
Quick Connect Guide
IMPORTANT: Please read GS-PWM-20A charge controller
owners manual and GS-STAR-50W connection guide (both
included with products) before assembling kit.
For additional information about Grape Solar products:
email Support@GrapeSolar.com, or
call 1-877-264-1014 for live telephone support.
GS-150-KIT PHOTOVOLTAIC
POWER GENERATION SYSTEM
QUICK CONNECT GUIDE Rev. 210519
1
Check your order to make sure that all parts are included:
GS-PWM-20A Charge Controller
3x GS-STAR-50W Solar Panel
2x Branch Connector Set
5-Foot Ring-lug Red/ Black Cable Pair
Black 15-foot MC4 Cable
Additional tools and equipment you will need:
Screwdriver– Philips Head Wire Stripper/Cutter
◦12-Volt Deep-Cycle Battery Bank Voltmeter (for Troubleshooting)
Mount the three 50-watt solar panels so that they are facing due South at approximately the same angle as
your latitude. The ideal area has full sun and no shading. If the following connections are made during daylight,
cover the panel with cardboard, cloth, or a similar opaque material so that the panel does not put out power.
Connect the wire end of the red battery cable to the
“+BATTERYterminal on the back of the GS-PWM-20A
charge controller . Connect the wire end of the 5-foot
black cable to the -BATTERYterminal. A Phillips head
screwdriver can be used to loosen and tighten the screw
clamps onto the wires.
Attach the ring lug end of the red cable to the positive
terminal of a 12V deep cycle battery. Attach the ring lug end
of the black cable to the negative terminal.
2
3
[diagrams not to scale]
*12V deep cycle battery
not included with kit
Question and Answer IconNeed help?

Do you have a question about the Grape Solar GS-150-KIT and is the answer not in the manual?

Summary

150 Watt Off-Grid Charging Kit Quick Connect Guide

Parts Verification

Check your order to ensure all included parts for the charging kit are present before proceeding with assembly.

Solar Panel Mounting

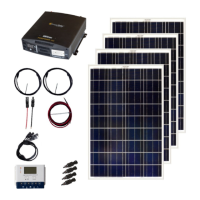
Mount the three 50-watt solar panels facing due South, angled to match your latitude for optimal sun exposure.

Battery Cable Connections

Connect the red and black battery cables to the charge controller's battery terminals and the positive/negative battery terminals.

MC4 Cable Preparation and Connection

Prepare the 15ft MC4 extension cable by cutting, stripping, and connecting branch connectors to the solar panel cables.

Solar Input to Charge Controller

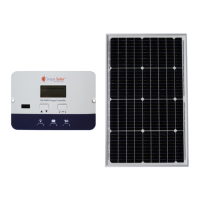
Connect the prepared solar cables to the 'SOLAR +' and 'SOLAR -' inputs on the GS-PWM-20A charge controller.

Final System Operation Check

Verify battery charge level reaches 100% and controller is set to 'LOAD ON' for system power output.

Overview

The Grape Solar 150 Watt Off-Grid Charging Kit (GS-150-KIT) is a photovoltaic power generation system designed for clean, off-grid energy solutions. This kit provides a reliable way to generate electricity using solar panels and store it in a battery bank, making it suitable for various remote applications where grid power is unavailable.

Function Description

The primary function of the GS-150-KIT is to convert sunlight into electrical energy and manage its storage in a 12V deep-cycle battery. This system is designed to provide power for low-voltage DC loads directly from the charge controller or, if an inverter is added (not included), for AC loads from the battery bank.

The core components work in concert to achieve this:

  • Solar Panels (3x GS-STAR-50W): These panels capture sunlight and convert it into direct current (DC) electricity. They are the primary energy source for the system.
  • Charge Controller (GS-PWM-20A): This is the brain of the system, regulating the flow of electricity from the solar panels to the battery bank. It prevents overcharging and deep discharging of the battery, thereby extending its lifespan. It also provides outputs for DC loads and USB charging.
  • Cabling and Connectors: A robust set of cables and connectors ensures safe and efficient electrical connections between all components. This includes MC4 extension cables for the solar panels, branch connectors to combine the panel outputs, and ring-lug cables for connecting to the battery.

The system operates by directing the DC power generated by the solar panels through the charge controller. The controller then intelligently charges the connected 12V deep-cycle battery. Once the battery is sufficiently charged, the system can supply power to connected DC loads via the charge controller's load control output or its two USB ports. For AC loads, an external inverter (not included) must be connected directly to the battery bank.

Usage Features

The GS-150-KIT is designed for straightforward installation and operation, making it accessible for users with varying levels of technical expertise.

Installation and Setup:

  • Modular Design: The kit consists of individual components that are assembled on-site, allowing for flexibility in placement and configuration.
  • Clear Connection Guide: The Quick Connect Guide provides step-by-step instructions for connecting all components, from mounting the solar panels to wiring the charge controller and battery.
  • Branch Connectors: These connectors simplify the parallel wiring of the three solar panels, ensuring that their combined output is efficiently fed into the charge controller.
  • Battery Connection: The system uses ring-lug cables for a secure connection to a 12V deep-cycle battery, which is essential for stable power storage.
  • Charge Controller Mounting: The charge controller can be mounted on an indoor wall or within a NEMA-3R rated enclosure, providing options for protection and accessibility.

Operational Features:

  • Automatic Charge Regulation: The GS-PWM-20A charge controller automatically manages the charging process, protecting the battery from overcharge and discharge, which is crucial for battery longevity.
  • Load Control Output: The charge controller includes a load control output, allowing users to connect 12V DC loads directly to the system. This output can be configured to turn on or off based on battery voltage, further protecting the battery.
  • USB Charging Ports: Two integrated USB ports on the charge controller provide convenient charging for small electronic devices, enhancing the system's versatility.
  • Status Indicators: The charge controller features a "BAT %" indicator, which allows users to monitor the battery's state of charge, providing immediate feedback on system performance.
  • Daylight Operation: The system is designed to operate during daylight hours, generating power whenever sunlight is available. It is recommended to cover the panels during initial wiring to prevent power output.
  • Expandability: While designed as a standalone kit, the system can be integrated with an external inverter (connected to the battery bank) to power AC appliances, expanding its utility.

Safety Features:

  • Polarity Marking: Users are advised to mark the positive panel cable to distinguish polarity, minimizing the risk of incorrect connections.
  • Component Protection: The charge controller's role in preventing overcharging and deep discharging is a fundamental safety feature for the battery.
  • Disclaimers: The manual emphasizes the importance of adhering to national and local building and electrical codes, recommending proper fuses or breakers, and ensuring identical battery types and ages for optimal performance and safety.

Maintenance Features

Maintaining the Grape Solar 150 Watt Off-Grid Charging Kit is relatively straightforward, focusing on ensuring optimal performance and longevity of the components.

Routine Checks:

  • Panel Cleaning: The solar panels should be kept clean and free of obstructions (like dirt, leaves, or snow) to maximize sunlight absorption and power generation. Regular visual inspection and cleaning with a soft cloth and water are recommended.
  • Connection Integrity: Periodically inspect all electrical connections, including those at the solar panels, branch connectors, charge controller, and battery terminals. Ensure they are tight and free from corrosion. Loose connections can lead to power loss or overheating.
  • Battery Health: Monitor the 12V deep-cycle battery for any signs of damage, swelling, or corrosion at the terminals. While the charge controller protects against overcharge/discharge, regular battery maintenance (if applicable to the battery type, e.g., checking water levels for flooded lead-acid batteries) is crucial.
  • Charge Controller Status: Regularly check the "BAT %" indicator on the charge controller to ensure the battery is charging correctly and maintaining a healthy state of charge. Any unusual readings or error codes should be investigated.

Troubleshooting:

  • Voltmeter Use: A voltmeter is listed as an additional tool for troubleshooting. This allows users to check voltage levels at various points in the system (panels, battery, controller outputs) to diagnose issues such as low power output or charging problems.
  • Wire Stripper/Cutter: These tools are essential for making and maintaining proper wire connections, allowing for repairs or adjustments if needed.
  • Screwdriver: A Phillips head screwdriver is used to loosen and tighten screw clamps on the charge controller, facilitating secure wire connections and potential re-wiring.

Component Longevity:

  • Proper Panel Orientation: Mounting the solar panels facing due South at the appropriate angle for your latitude ensures maximum sun exposure throughout the day, optimizing energy harvest and reducing stress on the system from inefficient operation.
  • Shading Avoidance: The guide emphasizes selecting an installation area with full sun and no shading. Shading on even a portion of a solar panel can significantly reduce its output and potentially affect the performance of other panels in the array.
  • Battery Compatibility: The manual explicitly states that all batteries used for the system should be identical in type, size, and age. Mixing batteries can lead to performance anomalies and reduced lifespan for the entire battery bank, highlighting a key maintenance consideration for multi-battery setups.
  • Enclosure Protection: Mounting the charge controller in a NEMA-3R rated enclosure (if outdoors) protects it from environmental elements, extending its operational life.

By following these usage and maintenance guidelines, users can ensure the Grape Solar 150 Watt Off-Grid Charging Kit provides reliable and efficient power for their off-grid needs for an extended period.

Grape Solar GS-150-KIT Specifications

General IconGeneral
Output Voltage120 VAC
Input Voltage12 VDC
Frequency60 Hz
Efficiency90%
WaveformModified Sine Wave
Output Power150W
Protection FeaturesOverload, Overheat, Short Circuit

Related product manuals