The Grape Solar 300 Watt Off Grid Kit (GS-300-KIT) is an expandable photovoltaic power generation system designed for off-grid applications. This kit provides a complete solution for generating and storing solar energy, allowing users to power AC devices independently of the main electrical grid. It is ideal for remote cabins, RVs, backup power systems, or any situation where grid power is unavailable or unreliable. The system is designed for ease of installation and provides a reliable source of clean energy.
Function Description
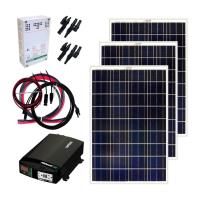
The primary function of the Grape Solar 300 Watt Off Grid Kit is to convert sunlight into usable electricity and store it for later use. The system comprises several key components that work together to achieve this:
- Solar Panels: These are the core energy collection units. The kit includes three 100-watt solar panels, which capture solar radiation and convert it into direct current (DC) electricity. These panels are designed to be placed in full sun, ideally facing due south at an angle that matches the user's latitude for optimum output.
- Charge Controller (GS-PWM-COMET-40): This device regulates the voltage and current coming from the solar panels to safely charge the battery bank. It prevents overcharging and deep discharging of the batteries, thereby extending their lifespan. The charge controller also features an LCD display that provides information about the battery's charge status and system operation. It is powered by the battery, activating its display once the battery has sufficient charge (11.5 volts or more).
- Battery Bank: While not explicitly included in the kit, a battery bank is an essential component for energy storage. The charge controller connects to the battery terminals, ensuring that the DC power generated by the solar panels is stored efficiently. The system is designed to work with a 12V battery system.
- Inverter (Grape Solar PurePower 1800): This component converts the DC electricity stored in the battery bank into alternating current (AC) electricity, which is the type of power used by most household appliances and electronic devices. The PurePower 1800 inverter allows users to plug in their AC devices and utilize the solar-generated power.
The overall workflow of the system involves the solar panels generating DC power, which is then managed by the charge controller to charge the battery bank. Once the battery bank is charged, the inverter draws DC power from the batteries and converts it into AC power, making it available for use by connected appliances. This setup ensures a continuous and stable power supply, even when sunlight is not available.
Usage Features
The Grape Solar 300 Watt Off Grid Kit is designed with user-friendliness in mind, offering straightforward installation and operation.
- Expandable Design: The "expandable" aspect of the kit means that users can potentially add more solar panels or battery capacity in the future to increase their power generation and storage capabilities, adapting the system to evolving energy needs.
- Comprehensive Component Set: The kit comes with most of the necessary cables and connectors for a basic setup, including 10-amp inline fuses, MC4 T-branch connectors, MC4-to-MC4 cables, MC4-to-bare cable pairs, bare-wire-to-ring-lug cables for charge controller to battery, and battery-to-inverter cables. This reduces the need for separate purchases of essential wiring.
- QuickStart Setup Guide: The manual provides a step-by-step QuickStart Setup, guiding users through the connection process from placing the panels to connecting the inverter. This structured approach simplifies the installation for those new to solar power systems.
- Panel Placement Guidance: The guide advises users on optimal panel placement for maximum energy harvest, recommending facing panels due south at an angle matching local latitude. This ensures efficient energy capture.
- Safety Precautions during Installation: The manual emphasizes covering panels during daylight installation to prevent power output, a crucial safety measure.
- Visual Wiring Diagram: A basic wiring diagram is included to provide a clear visual representation of how the components should be interconnected, aiding in correct assembly.
- Charge Controller Display: The GS-PWM-COMET-40 charge controller features an LCD display that activates once the battery has sufficient charge. This display provides real-time information, allowing users to monitor the battery's voltage and charge status, including when it reaches "Float" status, indicating a fully charged battery.
- AC Power Availability: Once the battery is charged and the inverter is turned on, users can plug in their AC devices, making the solar-generated power readily accessible for various applications.
- Important Considerations for Battery Use: The manual stresses the importance of using identical batteries for the system, advising against mixing battery types, sizes, or ages to prevent performance and charging anomalies. This guidance is critical for maintaining system efficiency and battery longevity.
- Code Compliance: Users are reminded that installations must be certified/approved as "code-compliant" according to national and local building and electrical codes. This highlights the importance of professional installation or thorough understanding of relevant regulations.
- Proper Fusing/Breakers: The manual advises on the use of proper fuses or breakers to comply with local and national codes, emphasizing safety and system protection.
Maintenance Features
While the manual primarily focuses on installation, several aspects imply or directly relate to the maintenance of the system:
- Battery Management by Charge Controller: The GS-PWM-COMET-40 charge controller plays a vital role in battery maintenance by preventing overcharging and deep discharging. This automatic regulation significantly extends the lifespan of the connected batteries, reducing the frequency of battery replacement. The "Float" status displayed on the controller indicates that the battery is fully charged and being maintained, which is a key aspect of battery health.
- Guidance on Battery Compatibility: The explicit instruction to use identical batteries (same type, size, and age) is a crucial maintenance tip. Mixing batteries can lead to uneven charging and discharging, reducing the overall efficiency and lifespan of the battery bank. Adhering to this guideline minimizes potential issues and ensures optimal performance.
- Panel Cleaning (Implied): Although not explicitly stated as a maintenance step, the recommendation for "optimum output" by placing panels in "full sun" implies the need to keep the panels clean and free from obstructions (like dirt, leaves, or snow) that could reduce their efficiency. Regular cleaning of the solar panels would be a standard maintenance practice to ensure maximum energy harvest.
- Component Inspection (Implied): The detailed connection steps suggest that periodic inspection of all cables, connectors, and components for wear, corrosion, or damage would be a good maintenance practice. Ensuring secure and clean connections is vital for system reliability and safety.
- Documentation and Support: The availability of additional information at grapesolar.com/manuals.html and email support (support@grapesolar.com) serves as a maintenance resource. Users can consult these resources for troubleshooting or further guidance on system upkeep.
- Adherence to User Guides: The "IMPORTANT" note at the beginning, urging users to read the Panel User Guide, charge controller, and inverter manuals, is a foundational maintenance feature. These individual component manuals likely contain specific maintenance instructions for each part, such as cleaning, inspection schedules, or troubleshooting steps.
- Professional Installation/Inspection: The emphasis on code compliance and the need for adequate knowledge of national and local codes for installers suggests that professional oversight or periodic inspection by qualified personnel might be beneficial for long-term system maintenance and safety, especially for complex setups.
- Exclusion for Documentation: The exclusion clause regarding the accuracy and suitability of technical information, while a legal disclaimer, also serves as a reminder that users are responsible for understanding the system and its maintenance. It encourages users to seek professional advice when necessary and to rely on the English version of the manual for authoritative information.
In summary, the Grape Solar 300 Watt Off Grid Kit is a robust and user-friendly solar power solution. Its design prioritizes ease of installation and reliable energy generation, with built-in features like the charge controller to protect critical components. While direct maintenance instructions are brief, the manual provides essential guidance on proper setup and battery management, which are key to the system's longevity and performance.