!
!
5.13
Ensure! that! the! battery! key! (Lock)! is! in! the! position!
that!prevents!th e!battery!from!b eing !removed .!Otherwise!
it!could!detac h !while!underway.
!
5.14
Excessive!vibration!may!cau se!a!cable!or!circuit!to!become
!
disconnected.!This!scooter!is!not!designed!for!jumping!or!use!on!rugged!terrain.
!
5.15
Do!not!touch!the!brake!discs!or!wheels!when!they!are!turning,!as!there!is!a!severe!risk!of!injury!by!cutting.
!
5.16
Caution!should!be!exercised!in!windy!conditions.!A!gust!of!wind!could!knock!the!rider!over.
!
5.17
Wear!glasses!or!contact!lenses!if!required!when!riding.
!
5.18
Do!not!use!the!scooter!with!insufficient!lightin g .
!
5.19
The!scooter!is!not!suitable!for!use!by!young!children.
!
5.20
Continued!use!of!the!scooter!may!cause!the!rider!to!suffer!tiredness!or!fa tigue ,!esp ec ially!on!u ne ve n !
terrain.
!
5.21
The!scooter!can!produce!a!maximum!noise!level!of!70!dB!when!operating.
!
!
6. SCOOTER!ASSEMBLY.!
!
You! will! receive! the! electric! scooter! adjusted! and! partially! assembled;! you! will! only! need! to! assemble! the!
handlebars ,!wheels ,!k ic k s tand!an d !c onnec t!the
!
motor:
!
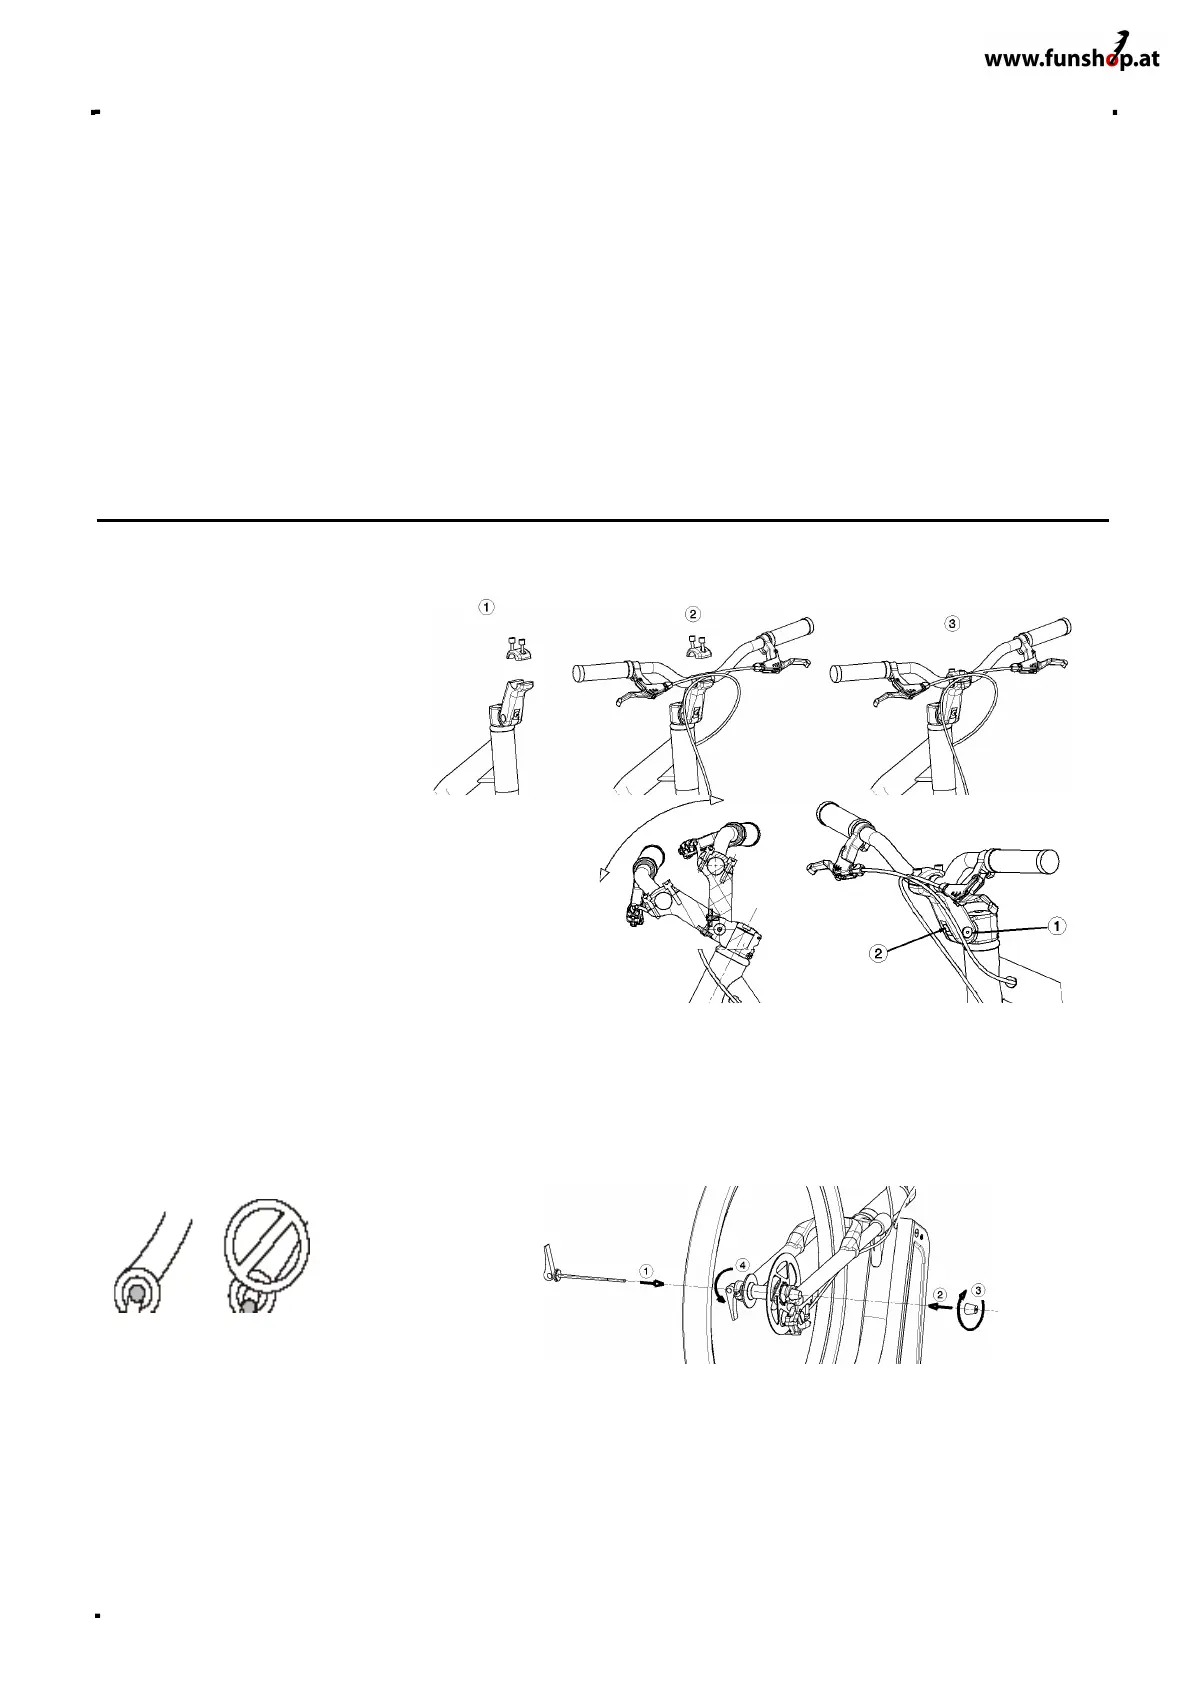
6.1
Assemble! the!handlebars
.!To!
assemble! the! handlebars,! you!
need! an! Allen! key.! Rem ove! the!
screws!from!the!power!plate!and!
remove ;! Put! the! h and leb ar! into!
position! and! adjust! to! your!
comfort;! reattach! the! plate! and!
tighten! the! screws! (start!
threading! the! screws! by! hand!
and!then!tighten!with!a!wrench).
!
6.2
Position! the!stem
.!The!h e igh t !of!the!st e m!on!the!
M10! model! is! adjustable.! Once! the! scooter! is!
assembled,!adjust!its!height!to! provide! mo st!com fort!
and!ensure!the!components!are!properly!tightened.!
To!do!this,!loosen!the!screw!on!th e!axis!(1)!and!the!
screw!on!the!low er!part!of!the ! pow er! arm ! (2),!then!
place!in! the! desired!position,!and! ensure! all!screws!
are!properly!tightened.
!
6.3
Position!the!brake!and!the!accelerator
!in!a
!
comfortable!position!according!to!the!height!of!the!pow er!plate.!To! do! this,!loosen! the!Allen!screw! which!
clasps! the! brake,! p lace! in! the! correct! position! and! retighten! the! screw;! then! do! the! same! with! the!
accelerator.
!
6.4
Assembly!of!the!front!wheel
.!Po s ition!the!f ront!wheel!as!sho wn,!tighten!the!hig h-speed!ax le!following!
points!1,2,3!and!4.!Make!sure!the!wheel!axle!is!firmly!positioned!in!the!fork! end.
!
!
!
OK! NOT!OK
!
!
6.5
Adjusting!the!quick-release!me ch an ism.!Read!the!following!instructions!carefully!to!set!the!quick-release!
mechanism!properly!and!safely:
!
6.5.1
Open! the! quick-release! lever! and! clip! the! wheel! into! the! fork! ends,! makin g! sure! that! the! axle! is!
properly!in!place.!(see!diagram!of!point!6.4)
!
6.5.2
Turn!the!lever!to!180º!and!tighten!the!quick-release !n ut!(3 )!by!hand!in!a!clockwise!direction!until!it!can!
no!longer!rotate.
!
6.5.3
Actuate!the!lever!(4)!in!the!d ir e c t io n ! o f !tig htening .
!
6.5.4
If!t he !lever!can!e a sily!be!turned!back!to !the!open!position,!it!means !that!the!cor re ct !force!has!n o t!been!
applied! to! tighten! it.! In! this! case! tighten! the! quick ! release! nu t! up! again .! If! an! exc essiv e! amoun t! of! force! is!