Do you have a question about the GRE Kayak Adventure and is the answer not in the manual?
Cautions against operating the cleaner out of water or with people in the pool.
Notes on RCD/GFCI protection and cord damage for safe electrical operation.
States the appliance is not for persons with reduced capabilities and children need supervision.
Explains how the cleaner collects dirt and debris into internal filters.
Details the cleaner's operation on the pool floor and walls.
Outlines required temperatures, pH, and chlorine levels for proper function.
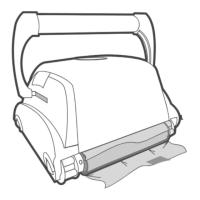
Lists and illustrates the main parts of the robotic cleaner unit.
Lists optional accessories like remote control, caddy, and trolley.
Explains the connection and function of the power and control unit.
Lists items included in the robotic cleaner package.
Instructions on how to safely remove protective covers from brushes.
Details how to adjust the floating handle for wall climbing models.
Instructions on positioning the power and control unit away from the pool.
Ensures no people are in the pool, filters are clean, and pool conditions are met.
Steps for unrolling the cable, placing the cleaner, and connecting it.
How to connect the unit and initiate the cleaning program via the operation button.
Explains the cleaner's movements and actions during the cleaning cycle.
How to stop the cleaner during a cycle or after it completes.
Steps for safely removing the cleaner from the pool using the handle.
Detailed steps for removing, cleaning, and re-installing the filter bag.
Instructions for proper storage of the cleaner and its components.
Steps for cleaning debris and hair from the water outlet propeller.
Describes the functions of the On/Off button, function description, control buttons, and status display.
Details the different cleaning programs available for various SPS models.
Function of the Check Filter indicator light and its effect on wall climbing.
How to select the desired cleaning duration for the pool.
Automatic operation option for setting cleaning intervals.
Options for selecting floor-only or floor and wall cleaning programs.
How to program cleaning schedules using an external timer.
Adjusts the robot's rate of turns for standard or high operation.
Prevents the robot from getting stuck on obstacles by choosing OFF or ON.
Allows the robot to calculate the most efficient cleaning pattern for the pool's shape.
Selects cleaning performance based on dirt level: Quick, Regular, or Thorough.
Sets a 2-hour delay before the robot starts cleaning to allow debris to sink.
Explains how to connect an external timer to the power and control unit.
Solutions for power connection, socket issues, and unit activation problems.
Addresses issues like dirty filters, propeller problems, and obstacles.
Solutions for dirty filters, propeller issues, and obstacles affecting water flow.
Solutions for obstacles in the drive system or propeller issues.
Addresses dirty filters, propeller issues, and suction inlet height.
Solutions for broken filter shutters, filter holes, or improperly closed bottom lid.
Solutions for dirty filters, cable length issues, handle angle, and incorrect pool chemistry.
Checks if the model supports wall climbing and if the correct program is selected.
Solutions for dirty filters, improper lid closure, cable spread, and cable length.
Addresses issues like empty batteries and advises contacting the dealer.
Explains how the remote control transmits signals to the cleaner.
Instructions on how to operate the cleaner using the left, right, and forward/reverse buttons.
Steps to assemble the caddy using a screwdriver and wrench.
How to place the cleaner, coil the cable, and position the control unit on the caddy.
Visual guide for assembling the trolley parts.
Instructions for attaching wheels, assembling the handle, and housing the control unit.
Completes the trolley assembly by inserting the handle, attaching the remote holder, and placing the control unit.
Specifies connection to a grounded 3-conductor socket via GFCI/RCD.
States fuse changes must be done by authorized personnel using the same type.
Prohibits user internal adjustments; power cord must be disconnected before cover removal.
Notes the unit works indoors/outdoors but not in direct sunlight, water, or above 40°C.
Lists dimensions and weight of the unit.
Details input/output ratings, storage/operating temperatures, and ingress protection.
| Brand | GRE |
|---|---|
| Model | Kayak Adventure |
| Category | Swimming Pool Vacuum |
| Language | English |